Alewives
The Alewives toolkit mixes ecology with technology for a fantastic experience unlike any of our other toolkits. Youth are introduced to the classic Maine Native fish, Alewives, a migratory species that is highly beneficial for aquatic environments in our state and are asked to utilize MIT’s Scratch program to better understand the lifecycle, migration patterns, and impacts of Alewives within an ecosystem. Each activity in this kit builds on the one before, culminating in a presentation of each group, using the Scratch program.
*All visuals are included in limited numbers within the project kit binder and also included in a digital form on one of the provided flash drives. Visuals can be located in the Activity Visuals folder.
- Curriculum Activities
Are you interested in learning more about what the University of Maine and UMaine system campuses offer?
The University of Maine offers over 100 academic majors! To learn more either:
Visit UMaine’s Find a Major.
Explore our other campuses here.
If you need help connecting to UMaine or one of the other UMaine System campuses, contact us by email or call (207) 581-3877 and ask for Laura, Greg, or Sarah!
Contact 4-HScience@maine.edu to reserve a toolkit.
Curriculum Activities
Activity 1: Introduction to the Importance of Alewive
Objectives:
At the end of this activity, youth will have been introduced to migration and will have an understanding of the importance of alewives in a Maine ecosystem.
Time to complete activity: 90 minutes
Background/Setting the Stage: 15 minutes
As a group, introduce the term “migration.” According to Oxford Dictionaries, the definition of migration is the “seasonal movement of animals from one region to another.” An example would be the annual migration of butterflies across North America.
- Watch Animation Migration (Vimeo) (What is Missing Foundation website, one minute and twenty-eight seconds)
In small groups, have youth brainstorm a list of answers to the question “What are some animals that migrate? Why are animals that migrate important to an ecosystem?” Give each group one to two minutes to share their brainstorm lists. Use the wisdom of the group to lead the conversation and assess how much background knowledge they have. Clarify and ask questions about key issues as they come up. Migration is a key concept throughout this unit.
Materials:
- pencils/markers/paper for the initial brainstorm
- equipment to view video clips
- set of laptop computers with Scratch program
- File “lesson1.sb2” (provided USB flash drive in the Alewives toolkit)
Methods
Part 1: Introduce Alewives as Migratory Species (10 minutes):
Explain to youth that they will be focusing on one migratory animal, in particular, the alewife. It is important to know that migrating animals do not choose to migrate. It is simply what they do. For example, when a monarch heads south for the winter, it can’t change its mind and head somewhere else instead. If their destination is destroyed or altered in some way, what will they do?
Key Facts about Alewives:
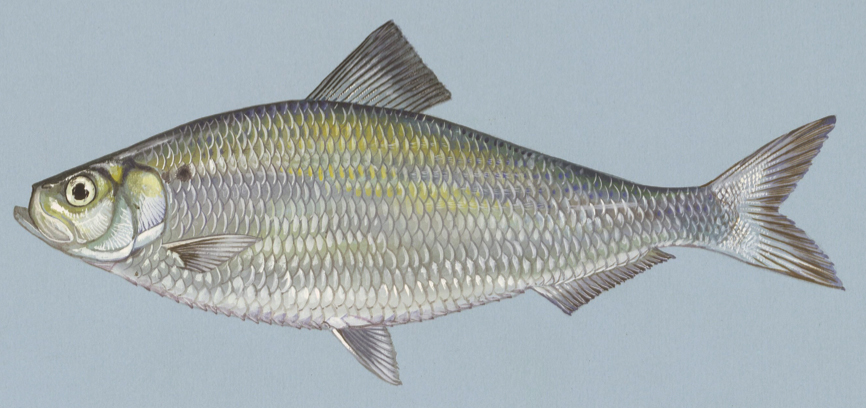
- The alewife is a small fish that was once abundant in Maine.
- They have declined in number over the last 200 years because of dams and pollution.
- Most of the larger fish off the Maine coast rely on alewives as food, including cod and haddock.
The next video clip shows alewives migrating upstream in the spring to a lake. Notice how many there are and how shallow the water is. How would you make a video like this? Imagine what it would be like to stand in a stream knee deep and have thousands of 10” long fish swim by you.
- Watch the video, Presumpscot Alewife Migration Teaser (with music) (YouTube) for two to three minutes (or longer).
Reflection Questions (Journal or Discussion):
- Does it matter if alewives were to disappear?
- What happens to other fish if alewives disappear?
- What parts of migration do you think alewives can control?
- After talking about this, discuss how these two activities might connect?
Part 2: Guided Practice: Scratch Introduction (10 minutes):
Facilitator explains: Now we are going to experiment with Scratch. Scratch is an application that will provide you with experience with computer programming. Using computer programming will be a way to demonstrate learning throughout this project.
Show demonstration program “lesson1.sb2” to give youth an idea about some of the kinds of things that are possible.
Two choices:
- Open Scratch (offline version). Click “file” and then “open”. Look at the directory on the USB flash drive and find “lesson1.sb2”. Open file.
- Open Scratch (online version). Have youth login to their accounts. Click “create”. Once the new project is open, click “file” and “upload from your computer”. Look at the directory on the USB flash drive and find “lesson1.sb2”. Open file.
Have youth turn speakers on (optional) and then each youth can click the green flag when they are ready.
The program runs for approximately three minutes.
Independent Practice/Group Work (30 Minutes):
Youth (alone or in pairs) should open Scratch on their computers.
Have youth complete Scratch Challenge #1 “Three Random Things About Me.” This activity will take a minimum of 30 minutes. Encourage youth to add to their projects at home. Encourage out of the box thinking.
For step-by-step directions with this Scratch challenge:
Closure (10 minutes):
Allow a few to share their “Three Random Things About Me.” Review the concept of migration and what is an alewife. Spend time reflecting on how these two activities might connect in the next session.
Reflection Questions (Journal or Discussion)
- Why did you choose these random facts about yourself?
- What random facts about yourself can you control?
- What did youth like/dislike about Scratch programming?
- How could Scratch be used?
Life Experience Connections:
- Presumpscot Alewife Migration Teaser (with music) (YouTube)
- MIT Scratch website
- Animal Migration (Vimeo) (What is Missing Foundation website)
Supplemental Information:
Many youth may be familiar with migration. In some cases, they will apply it to animal species, and in some cases, they may apply it to human migration. Common themes will come from these discussions about why an individual might leave one location and migrate to a new location.
Assessment:
- Journaling/Group Discussion
- Scratch Challenge #1 “3 Random Things About Me”
Vocabulary:
Migration: The process of passing periodically from one region or climate to another, as certain birds, fishes, and animals: The birds migrate southward in the winter.
Ecosystem: A system made up of an ecological community of living things interacting with their environment especially under natural conditions.
Alewife: A food fish (Alosa pseudoharengus) of the herring family that is very abundant along the Atlantic coast.
Computer programming: A process that leads from an original formulation of a computing problem to executable programs.
Appendix A: Scratch Challenge #1, Three Random Things About Me
In this project, we will begin our exploration of Scratch. Scratch is an introductory programming language developed by the Massachusetts Institute of Technology, and we will use it frequently. Our first project is not directly related to alewives or migratory animals, but is designed to give you a first taste of Scratch, which will then lead into more complex projects in future activities.
First, you need to open Scratch. If the leader has already installed it on your computer, open it by either finding it in the Applications folder (Mac) or locating the program in the Start Menu (Windows). Otherwise, you will need to install the Scratch 2.0 Offline Editor.
To download the program from the website, navigate your web browser to scratch.mit.edu/scratch2download, and follow the instructions on the website. You will need an Internet connection to install Scratch in this manner.
To install the program from the flash drive included with this activity, ask the leader to install it for you.
Now that we have Scratch open, the screen will look like this:
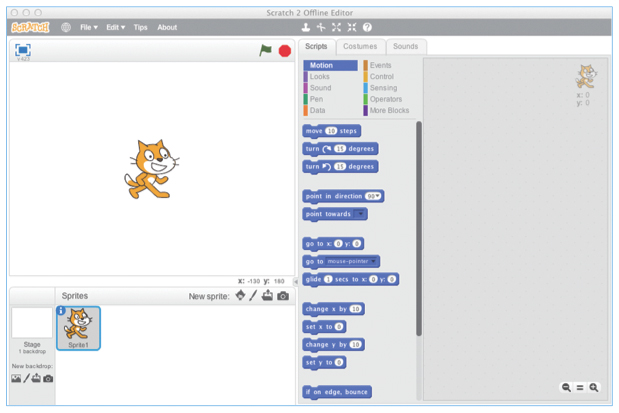
On the Scratch screen, there are four spaces. First, there is the Stage, in the upper left. Every program you create will be displayed on the Stage.
Below it is the Sprite Navigator, which currently has a picture of the cat surrounded by a blue line. Here, you can manage all the different actors in your program.
Next, there is the Block Menu, which has many, many blocks. In Scratch, you write computer code using blocks. Each block does something different. We’ll start to explore different blocks soon.
Finally, on the right, there is the Workspace. Here, we create our Scratch programs. At the moment, it is empty, but we’ll fill it up soon.
In our first project, we will create a simple program that displays three random things about ourselves.
First, think of three things that you’d like to put in the program. Here is what I’m going to put in mine:
- I have brown hair
- I own a goldfish named Skip
- I love pizza.
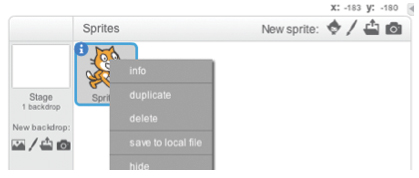
Write down any three statements. Next, we need to clean up the Scratch window. First, delete the cat that’s on-screen by right-clicking on his portrait in the Sprite Navigator, then clicking Delete.
Now, we’re just left with an empty white screen. We need to fill it up by clicking on the “Backdrops” tab at the top of the Block Menu:

An empty window will pop up. Here, you can create a background for your programs. In this project, we will make three different backgrounds, each with one of your three statements. You can draw in the white area using the drawing tools on the side of the Workspace and the colors below.
In addition, you can create a new backdrop (you will need three in total) by clicking the “Paint New Backdrop” button:

Make your backgrounds colorful and eye-catching. Designing the artwork for a program is as important as the programming behind it.
Once done, your Workspace should look something like this:
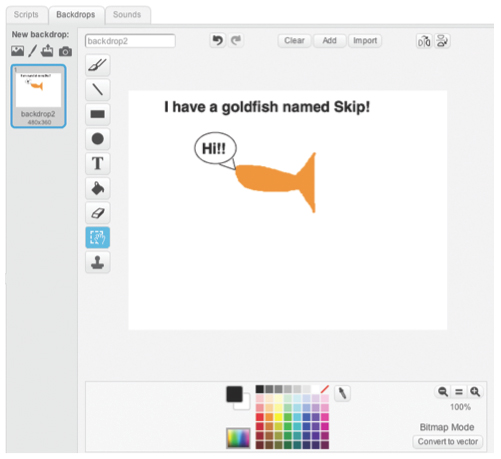
Your artwork should show up where mine is now. Next, click on the “Scripts” tab, next to “Backdrops:”

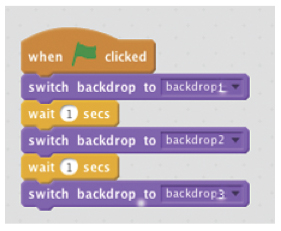
In Scratch, a script is a set of blocks that tells the computer what to do. Our script will be made of six blocks. It will start with a “When Flag Clicked” block, which can be found in the “Events Menu.”
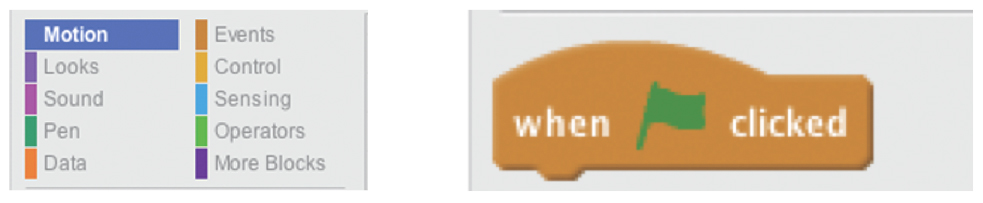
Drag a “When Flag Clicked” block into the Workspace. Every program needs something that tells it to start, that’s what the “When Flag Clicked” block is for It tells a program to begin when the green flag above the Stage is clicked.
Next, we need to tell the program to switch to one of our backgrounds. In the “Looks” menu, drag out a “Switch BackdropTo” block:
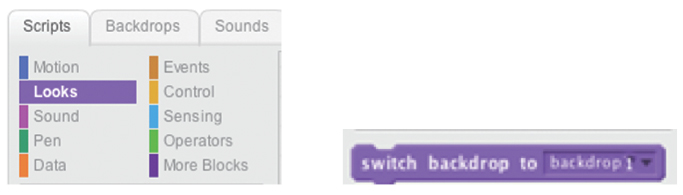
Drag a “Switch BackdropTo” block below the “When Flag Clicked” block. You will see a white line appear between them. Let go of the block once you see this, the two blocks will snap together into one script.

Click the green flag, located above the Stage:

If the Stage wasn’t displaying “backdrop1” already, it will now. But that’s not very exciting.
Instead, we want to switch between them. Next, in our script, we will want a “Wait” block, which can be found in the Control Menu:
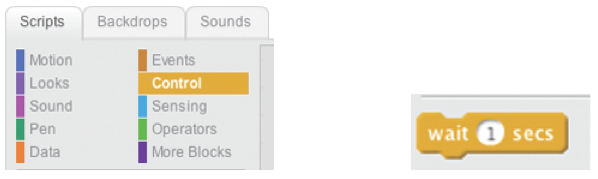
Attach a “Wait” block to our script. After we switch to “backdrop1”, we then tell the computer to “wait” some number of seconds before going on to the next command.
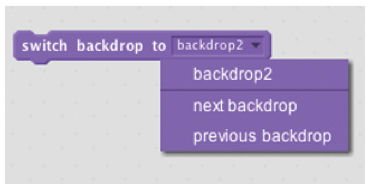
After we switch to the first background, we want to switch to the second. Drag another “Switch Backdrop To” block out, and change it to “backdrop2” instead of “backdrop1” by clicking on the drop-down menu:
What do we need now? We still have one more backdrop to go. See if you can figure out what combination of “Wait” and “Switch Backdrop” blocks will give you the behavior you want. Here’s my finished script, in case you need a hint.
Now, click the green flag and watch your creation run.
Scratch is a project of the Lifelong Kindergarten Group at the MIT Media Lab.
Activity 2: The Web of Life, Alewife Habitat
Objectives:
At the end of this activity, youth will be familiar with alewife habitat and what makes an ecosystem. Using Scratch programming, they will begin to explore mobility through the alewife habitat.
Time to complete activity: 90 minutes
Background/Setting the Stage: 15 minutes
As a group, have youth brainstorm a list of answers to the question “What are some things you ate today? “(Note these on the board)
- Have youth reflect on where these things come from? Explain that we are looking to see where the energy to produce them came from, not necessarily where they were bought.
- Are these things eventually all connected to plants?
- Where do plants get their energy?
Clarify and ask questions about key issues as they come up. The key concept here is that we are looking to see where the energy to produce them came from, not necessarily where they were bought.
Materials:
- flipchart or whiteboard
- markers
- ball of yarn or string
- Alewife Summary Web of Life cards
- Alewife Web of Life cards: Diatoms, Dinoflagellum, Daphnia, Copepods, Krill, Mare’s Tail, Phosphorus, Alewives, Cod, Lobster, American Eel, (Androscoggin River) freshwater, Pontook Dam
- rope, two pieces, 20-30 feet long
- set of laptop computers with Scratch program
- Scratch File: lesson2.sb2 (provided USB flash drive in the Alewives toolkit)
Methods
Part 1: Web of Life Activity (20 minutes):
- Have youth gather in a circle, seated or standing.
- Hand each youth one of the alewife “web of life cards.” Explain that they are now going to make some of the connections they made in the pre-activity questions only this time they will be an organism or resource in alewife habitat.
- After every youth has a card, have one youth volunteer to explain how his/her card is related to another card in the circle. For example, vegetation is connected to silt because they are often found together and make for good spawning areas for alewives.
- Once a youth has explained a connection between his/her card and another youth’s card, he/she will pass the ball of yarn to that youth while holding onto the end of the string.
- The youth now holding the ball of string makes a connection between his/her card and a new card in the circle. He/she then passes the ball of yarn to that youth while holding onto the string.
- As this activity progresses the string will form a web in the middle of the circle.
- Optional: After the youth have made a lot of connections you can introduce a stressor that limits availability or pollutes the environments resources such as pollution, dams, urbanization.
Reflection Questions (Journal or Discussion):
- In what ways are habitats important to organisms that live away from them?
- How do different organisms depend on each other (interdependence)?
- What role does water have in alewife ecosystem?
- What are the energy sources for alewives? What do alewives provide an energy source to?
- Alewives are migratory; does their habitat stay the same throughout their lives? How could this impact the ecosystem around them?
- What are the bare essentials in terms of food, shelter, water, protection from predators and temperature extremes that alewives need?
Part 2: Guided Practice: Computer Programming Game (20 Minutes):
 Set-up: Create the following “course” with twine or rope, leaving 2½ feet between the two pieces. The whole course should be roughly 10-15 feet across and 20-30 feet long. This should be assembled in an open space.
The purpose of this activity is to explore communication and following directions. Select one youth to be the “alewife.” The alewife does not understand the same language that we speak. The idea is for youth to take turns using commands to navigate a fish through a river/stream.
Have other youth line up, each is allowed to give a one-statement direction to the alewife. This is analogous to the computer programming language, where the computer will follow exact directions. For example, it’s not enough to say “go forward,” which would result in the alewife going forward until they hit a wall, or “take a right,” which would result in the alewife continuously turning right in a circular fashion. Youth should say “move forward 6 inches” or “turn 20 degrees to the right.” It is important to think in a discrete stepwise fashion in computer programming.
Independent Practice/Group Work (30 Minutes):
Have youth open the file: lesson2.sb2 while in Scratch. This is a program that replicates the computer programming game (above) in Scratch. Then have them complete Scratch Challenge #2
Closure (5 minutes):
Spend time reflecting on how youth designed their fish pathways and were able to make them move.
Reflection Questions (Journal or Discussion)
- Tell me how you made your alewife move? What challenges did you have?
- How could this apply to a real fish pathway, particularly alewives?
- How do you think the environment impacts how alewives migrate?
- How does this translate to computer programming?
Life Experience Connections:
Youth will be able to connect with the idea of communication, and how when one person says something, it may not necessarily mean the same thing to another without specific clarity. They will also connect with the concept of interdependence and how other parts of our ecosystem affect they way they live.
Assessment:
- Web of Life Connections
- Journaling/Group Discussion
- Scratch Challenge #2
Supplemental Information:
- Scratch website (Scratch is a project of the Lifelong Kindergarten Group at the MIT Media Lab)
- Sebago Lakes Watershed 4-H Science Toolkit
Vocabulary:
Habitat: An ecological or environmental area that is inhabited by a particular species of animal, plant, or another type of organism.
Interdependence: Relationships in which members of the group are mutually dependent on the others.
Appendix B: Scratch Challenge #2, Navigate a Fish
In this project, we will learn more about Scratch, the programming language we began exploring during the last activity. Today, we will explore sprites and how to move them around the Stage.
First, open Scratch as in the first activity. It should already be installed on your computer, but if it isn’t, ask your leader for help. Again, the screen should look like this:
If it doesn’t, click on “File”, then “New”. A new project screen will open up.
Last time, we deleted the cat, and we didn’t talk much about him. He’s what is known as a sprite. A sprite is an individual actor in your program. Every sprite has two parts:
- Costumes tell the sprite how to appear. For example, the cat has a costume that is shown on the screen. Sprites can have more than one costume and can switch between them to change their appearance. Costumes are very similar to the backdrops we experimented with last activity.
- Scripts tell the sprite what to do. We made a script last activity, but that was associated with the background, not with a sprite. Sprites have access to many more blocks than backgrounds, some of which we will experiment today.
Sadly, we need to delete the cat again. Right-click on his portrait in the Sprite Navigator, and click “Delete”.
Instead of a cat, we will be working with an alewife. To create a new sprite, there are four options, shown on this bar:
First, we can pick a pre-drawn sprite that is included with Scratch. We can also draw our own sprite by clicking on the paintbrush icon.
Next, the folder icon allows us to upload our own image of a sprite. And finally, if your computer has a camera attached to it, the camera icon will let us take a picture to use as a sprite.
For this activity, we will use the upload button.

When you click it, you will see a file navigator window pop up on screen. Ask your leader to help you find the file named, “ActivityTwoSprite.jpeg”, which should have been loaded on to your computer already. Once you have found it, click “Open”, and it will be turned into a sprite on screen.
 Next, we need to create a background. We could draw one like in the first activity, but it will be easier to upload one. Click on the “Upload New Backdrop” button, which is not the same as the “Upload New Sprite” button we clicked earlier. It can be found below the “Stage” icon in the Sprite Navigator:
Again, a file navigator window will open. Find the file entitled “ActivityTwoBackground.jpeg”, and click “Open”. A backdrop will load onto the screen. Now that we have our sprite and background, we’re ready to start programming.
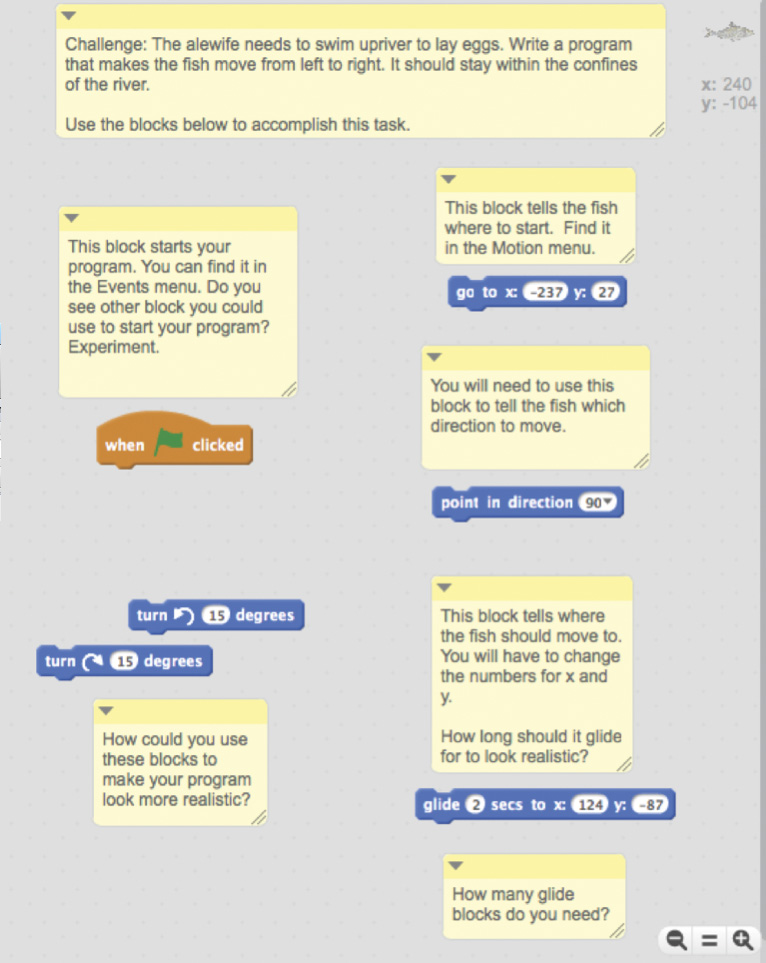
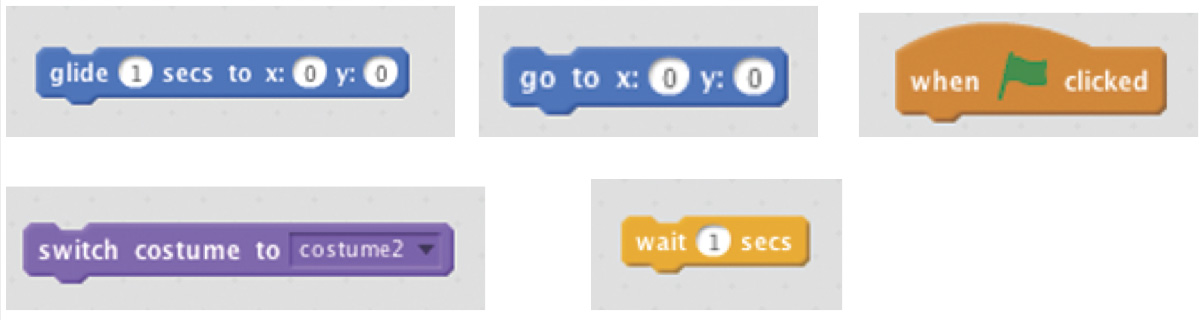
In this challenge, we will replicate the in-person exercise you and your leader just completed. Here, you must guide the alewife sprite through the river on the background. To do this challenge, we will use two new blocks, “Go To” and “Glide To”:
![]()
Both can be found in the Motion Menu, which is the dark blue menu on the top left of the Block Menu. It should automatically be selected. Note: You will not see these blocks unless the alewife is selected in the Sprite Navigator.
You may have some experience with the Cartesian coordinate system, which is what Scratch uses for movement. If not, imagine the Stage is split up with two lines. A diagram can be found on the next page of the challenge.
Every spot on the screen can be described with two numbers; an “x” and a “y”. “x” determines where it is horizontally, or left-to-right. “y” determines where it is vertically, or up-to-down.
We often write a position on the screen like (100, 200), where 100 is the “x”, and 200 is the “y”. “x” will always come first when you write it like this.
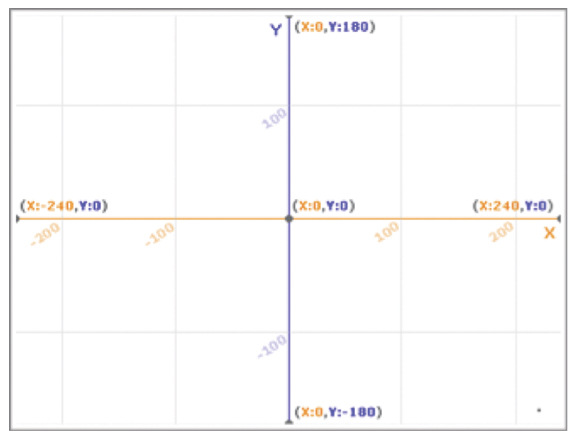
As you can see from the diagram, (0, 0) is right in the middle of the screen. So if we move to the right of the middle of the screen, “x” will increase, because we’re moving in a positive horizontal direction. If we move to the left, “x” will decrease, because we’re moving in a negative horizontal direction. The same is true for up and down, and whether “y” increases or decreases.
The easiest way to understand this is to play around with it, and that’s what our next step is. Drag a “Go To” block out from the Motion Menu. You can see that it has two numbers, labeled “x” and “y” like we just discussed. Try putting different numbers in this block. To run the block, double-click it. Once you have a good understanding of the Cartesian coordinate system, try using the “Glide” to block in the same manner. Double click it. How is it different than the “Go To” block?
To complete our challenge, we need to use one “Go To” block to tell the sprite where to begin, and a series of “Glide To” blocks to tell it to navigate the maze. Here’s an example script:

You will have to experiment with your own values for “x” and “y”. You can complete this project in many, many different ways; the only requirement is that the alewife can’t touch the bank.
Once you’re done, save your project by clicking “File”, then “Save.” Good job.
Fish Glide Help Additions:
Scratch is a project of the Lifelong Kindergarten Group at the MIT Media Lab.
Activity 3: Alewife Populations
Objectives:
How do alewife populations survive? As a result of this activity, youth will understand alewife populations, how humans and dams impact alewife survival, and how this affects Maine.
Time to complete activity: 90 minutes
Background/Setting the Stage: 10 minutes

Review the aquatic food web demonstrated in the food web activity. Ask youth to brainstorm a list at their table of what factors might impact the population levels of species in a river ecosystem. Make sure they keep in mind both natural factors and human impact. Have groups share and develop some common themes.
Materials:
- Survivor cards (habitat, oxygen, and food, alewife card optional)
- cones for boundaries
- three softballs (foam balls work best)
- flipchart or whiteboard
- markers
- copies of Alewife Population Lab
- timer
Methods
Part 1: Human Impact Brainstorm (20 minutes):
Explain to youth that they will be demonstrating how humans have impacted the alewife populations in Maine rivers. Before they do the game, youth will need to have some background information and understanding about alewives. Maine Public Broadcast Network (MPBN) produced a 27-minute video about alewives in Maine’s rivers that goes along with youth research (included as a DVD in this toolkit.
If time allows, you may consider having them do some research on the alewife using their laptops or other resources.
Reflection Questions (Journal or Discussion):
- How is the alewife important to Maine Fishermen and the economy?
- How is the alewife important to other fish in Maine?
- What factors have negatively impacted the alewife populations in Maine?
Part 2: Guided Practice, Alewife Population Demonstration (25 minutes):
Set-up: Create a rectangular playing field, using cones to mark the boundaries of the field. You may want to adjust the size of the playing field. Ultimately, every participant should be able to stand in the field, arms raised, without touching another participant.
Scatter survivor cards throughout the playing field. The cards should be upside down, to add an element of search and find to the game.
Survivor cards are labeled pictures of three requirements for alewife survival: habitat, oxygen, and food. There are other important pieces for alewife long-term survival, but the purpose of this demonstration helps to keep it simple.
The size of the group determines how many cards to put out.
Game Directions, Round 1:
- Have each group scatter themselves around the outside perimeter of the playing field.
- Explain to youth that they are going to be part of a population explosion. Everyone is looking for the same resources in order to be a survivor. Alewives resources are shelter, food, and oxygen.
- When the leader says, “go,” they have 30 seconds to gather 1 habitat card, 1 oxygen card, and 2 food cards. Hoarding is not allowed. There should be enough cards out at this point that everyone could potentially survive.
- When they have gathered their required resources, participants should return to the sideline. At the end of 30 seconds, anyone left in the middle is “out.”
Round 2:
- Participants, who collected the required resources, are now “Alewives.” If there are a large number of youth playing, you may want to give “Alewives” an identifying card or mark them somehow. “Alewives” should return their survivor cards/resources to the playing field. “Alewives” should remain on the perimeter of the playing field for Round 2.
- Those who did not survive Round 1 will be given a new job. They should remove any survivor cards/resources they may have collected from the playing field. One youth can become the timer for Round 2, and one youth can become the recorder. The recorder should mark on the population data sheet board how many “Alewives” there are for the current year (year 1 in this case).
- Repeat a couple rounds of this and record the number of alewives after each round. Each round represents a year. After Round 1, have them look for double the amount of resources (until reasonable for the number of cards on playing field).
Round 3:
- If more than a third of the group has been eliminated, have many of them return to the role of “Alewife” (you may need to do a quick inventory to make sure there are enough resources/survivor cards to support this many “Alewives”).
- Those who are not “Alewives” should become humans who are fishing along the river. There should still be a recorder and timer, and now might be a good time to rotate jobs.
- One to three of the humans should be given a foam ball. Humans can catch the “Alewives” by hitting them with the ball. However, humans cannot enter the playing field for any reason.
- “Alewives” still have 30 seconds to collect their resources, but to survive; they must not be caught by a human (aka hit by the ball). Go through a couple more rounds, and keep track of human populations each round as well. Rotate jobs for those who are not “Alewives.”
Round 4:
- Now, it is time to add a second factor that impacts alewife populations, a dam in the river. Assign the role of a dam to a few participants who are not “Alewives.” Dams can be anywhere on the playing field, in any position they want. Once the game starts, they cannot move. Touching the dams doesn’t hurt Alewives.
- Each round adds another dam and sees what it does to the alewife population. Be sure to record all species data on the population data sheet.
Independent Practice/Group Work (30 minutes):
Reconvene inside and provide each youth with a lab sheet. Post the data that was recorded for youth to copy down in the table. Have youth complete the line graph (they will have a total of three lines on the graph) then answer the questions on the front.
Closure (10 minutes):
Have youth share out the answers to the questions and their rationale. Express the importance of using their data as evidence.
Youth will later be creating a project, possibly using Scratch computer programming, and looking at human impacts on their river. Alewives are a large part of Maine river ecosystems.
Reflection Questions (Journal or Discussion)
- What did youth notice in this game? What happened to alewives in response to the availability of resources, humans, and dams?
- What other factors might impact alewives in their natural ecosystem?
- What causes the alewife population to increase? To decrease?
- How we might go about restoring the alewife populations in Maine rivers?
- What steps might be necessary to make that happen? Who needs to be involved?
Life Experience Connections:
Many of the youth living in Maine may be familiar with bodies of water near their homes. Familiarity with the ecosystems of those water bodies and what might be important to the survival of alewives, or another species living there. Youth living in Maine will be able to connect the value added to Maine’s economy by the survival of alewives.
Assessment:
- Journaling/Group Discussion
- Population Lab Sheet
Supplemental Information:
- See Alewife Population lab sheet
Vocabulary:
Species: Any group of individuals that can breed with themselves but not with any other group.
Population: A group of individuals of a single species that live in a particular area and interact with one another.
Economy: The management of the resources of a community.
Human impact: How humans have adapted to and changed their environment to survive and make life more comfortable and convenient. The effects of these changes and adaptations.
Oxygen: A colorless, odorless, gaseous element constituting about one-fifth of the volume of the atmosphere and present in a combined state in nature.
Resources: The elements of the natural world, as mountains, trees, animals, or rivers; a source of supply, support, or aid, especially one that can be readily drawn upon when needed; the collective wealth of a country or its means of producing wealth; usually money, or any property that can be converted into money; assets.
Activity 4: Alewives Lifecycle
Objectives:
Youth will be familiar with the lifecycle of alewives. Using Scratch programming, they will begin to create a conversation.
Time to complete activity: 90 minutes
Background/Setting the Stage: 5 minutes
So far, we have learned some things about alewives and about how to use Scratch. Now, we are going to begin to use Scratch as a tool to create projects to present to others. Youth can become involved meaningfully in conservation issues by presenting information to teach others.
We are going to watch a short video about fish life cycles that is hosted by a middle school youth. This video is part of a series that has won many Emmy awards for educational television. While you are watching this, try to imagine yourself as the host.
View the video: Comparing Fish Life Cycles (Into The Outdoors website)
Every day, it seems, there is something in the news about a problem in the world with animals becoming endangered or with some even becoming extinct. Because animal habitats are being threatened more and more, it will be important to have trained scientists in the future who help ensure the survival of wild animals. As a group, discuss the question: “What can youth do to make a difference today?”
Hopefully during the conversation, the concept of education through technology comes up. Beginning in this lesson and moving forward, we will begin identifying that the important thing is to learn about alewives and then create media, with Scratch, to tell about them.
Materials:
 equipment to watch the video clip
- Alewife Fact Sheet
- Alewife Life Cycle, Ages and Habit worksheet
- blank paper
- drawing materials (pencils, markers)
- dishpan trays (or small pool or tub if available)
- green food coloring
- water
- magnetic alewife
- non-magnetic fish (ex. Sunfish)
- paper clips
- set of laptop computers with Scratch program.
- Scratch file “ChallengeThreeDemo.sb2”
Methods
Part 1: Life Cycle of Alewife Activity (20 minutes):
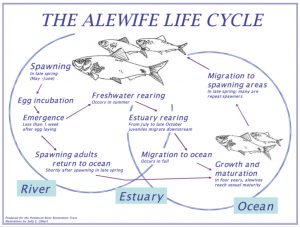
- Introduce the concept of a life cycle. When you describe how animals live their lives, you are talking about life cycles. This can be a confusing topic because it is easy to think of a cycle (or a circle) beginning when an animal is born and ending when it dies. What life cycle really means is that the cycle begins when an animal is born and ends when it reproduces. Of course many animals, like alewives, can reproduce more than once.
- Break the group up into pairs. Pairs will need a copy of the alewife fact sheet, a copy of the “Alewife Life Cycle, Ages and Habitat” worksheet and drawing materials.
- Give groups 10-15 minutes to take the alewife fact sheet and create a drawing of an alewife life cycle. Imagine that this illustration will be printed in a textbook. Try to incorporate habitat information.
- Have groups share their drawings with each other.
Reflection Questions (Journal or Discussion):
- What are the similarities in the life cycle drawings?
- What are the differences in the life cycle drawings?
- How can you use the life cycle of alewives to tell their (alewives) story?
Part 2: Guided Practice: Alewife Population Demonstration (25 min):
Essential nutrients, phosphorus, in particular, can be important when discussing alewives and water quality.
- Divide youth into small groups. Each group will need a dishpan half full of water, food coloring (or as a facilitator you may decide to administer this), a magnetic Alewife, a non-magnetic Sunfish and paperclips. If available, a small tub or swimming pool can be a great replacement for the dishpan and add to the experience.
- Ask what happens to water in their system when it rains? A discussion could be around soil erosion, nutrient cycling, or overall water quality. Youth should recognize that nutrients and chemicals run off into water systems.
- Have youth sprinkle paperclips around the bottom of their dishpan (or pool/tub). Explain that each paperclip represents a unit of phosphorus. Phosphorus can enter a lake or stream through different sources, most often soil erosion, or human or animal waste. Observe what happens to the water.
- Youth are going to add an additional organism, a Sunfish. Discuss what this might do to their water?
- Youth are going to add an additional organism, an Alewife. Discuss what this might do to their water? Remember that Alewives migrate, so they are there now, but they will be moving on in the near future. Have them test to see what happens when the Alewife swims through the water.
- After testing with the Alewife, remove the Alewife from the water system, including any phosphorus (paperclips) it might have picked up. Alewives are consumers. When alewives LEAVE a lake, they take any accumulated nutrients that they have gained (from eating) with them, causing a net loss of phosphorus and are therefore a benefit to water quality.
- Count how many paperclips are left in the water system and have youth document their findings.
- Add one drop of green food coloring to the water system for each paperclip remaining. Phosphorus feeds and helps produce an abundance of algae, it is like “junk food” for algae. When animals die in the water, their accumulated nutrients, including phosphorus, return to the lake.
- Have groups record any observations.
Independent Practice/Group Work (30 Minutes):
Have youth open the file: ChallengeThreeDemo.sb2 while in Scratch. This is a program that demonstrates today’s challenge using Scratch. Then have them complete: Scratch Challenge #3:
Closure (5 minutes):
Spend time reflecting on how youth designed their lifecycles. How does the lifecycle of an Alewife impact the world around it?
Reflection Questions (Journal or Discussion)
- Describe the water systems created.
- What happened when organisms entered or exited the system?
- What challenges did you have?
- How could this apply to share what you know about alewives?
Life Experience Connections:
Youth will be able to connect to what they know about migrating animals or people, and the impact they have on the world around them. They may also connect to issues of water quality.
Assessment:
- Model of water systems
- Journaling/Group Discussion
- Appendix C: Scratch Challenge #3, Create a Conversation
Supplemental Information:
- Explore more about water quality and nutrients using the EnviroScape Model and activities in the Maine Lakes 4-H Science Toolkit.
Resources and Additional Information:
- Video: Comparing Fish Life Cycles: (Into The Outdoors website)
- Penobscot River Restoration Trust
- The Alewife Life Cycle Penobscot River Restoration Trust
- Schalit, N. Winter, L., Wippelhauser, G., All About Maine Alewives factsheet
- MIT Scratch website
Vocabulary:
Life cycle: Series of changes in form that an organism undergoes.
Phosphorus: A nonmetallic chemical element with symbol P and atomic number 15. Phosphorus is the limiting nutrient in Maine’s freshwater ecosystems.
Nutrient cycling: Movement and exchange of organic and inorganic matter back into the growth/production of living matter.
Sprite: A two-dimensional image or animation integrated into a larger scene.
Appendix C: Scratch Challenge #3, Create a Conversation
It’s time for our third Scratch challenge. Today, you’re going to explore a bunch of new blocks, and you will design your own on-screen conversation between two characters. If you don’t have a good grasp of the Cartesian coordinate system from the last activity, you should review before starting this challenge. With that, let’s get started.
First, open the file entitled “ChallengeThreeDemo.sb2”. If you can’t find it, ask your leader for help. Once you have it open, click the green flag to run the program. Today, you will make your own program similar in function to the one you just watched.
Before you dive right into programming, you need to think about what you’re making. As fun as programming is, it can be very hard to program unless you have a good plan for what you’re making. So grab a sheet of paper, and let’s plan out a program.
Here are the criteria for your project:
- It must contain at least two sprites. Remember, sprites are the individual actors in your program. You can draw them, upload an image, or pick one that comes included with Scratch.
- It must have at least one background. You can either draw your own or pick one that comes included with Scratch.
- It must involve a conversation between sprites that involves each sprite saying at least three lines.
- In some way, it should relate to what you’ve learned about alewives so far.
Now that you have a rough idea of what you’re making, fire up Scratch 2.0 and create a new project by clicking “File” then “New.”
Before you begin programming, get your sprites set up. You can use the “Create New Sprite” button to pick a preexisting sprite, draw your own, upload a picture, or take a picture using a webcam if you have one.

If you choose to pick an existing sprite using the leftmost button, it will bring up a menu of sprites something like this:
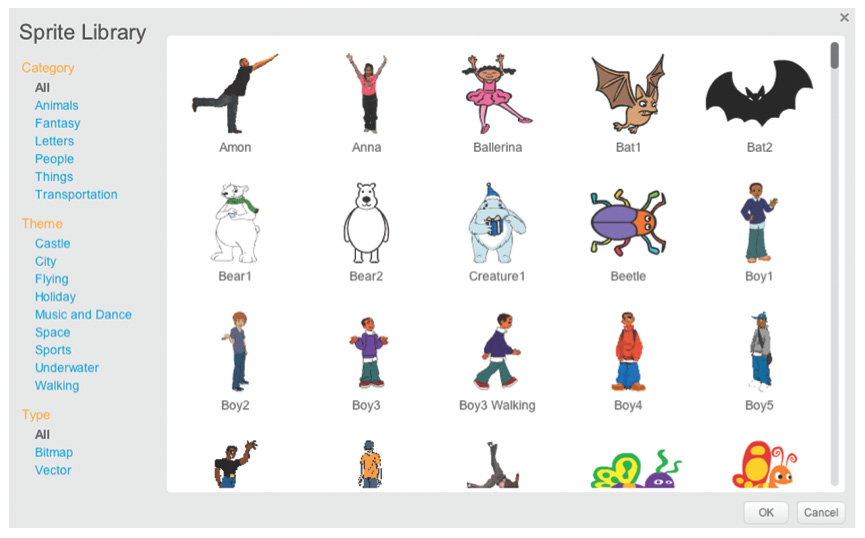
Once you have your sprites set up, choose a background by either drawing your own sprite, uploading one, or choosing from a list of preexisting sprites.

If you pick a sprite from the set that’s included with Scratch using the leftmost button, a window like this will pop up:

Now that we have the background and the sprites set up, it’s time to introduce some new blocks. First, we have the “Say” block, which can be found in the Looks menu:
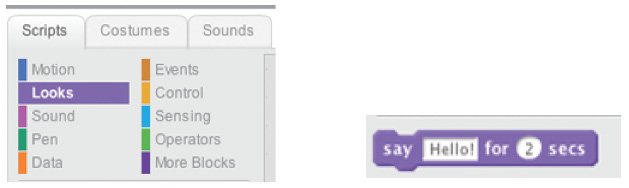
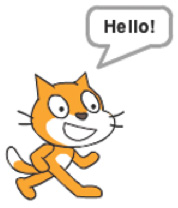
“Say” is pretty self-descriptive. You can type a message and time duration, and the sprite will display that text in a speech bubble for that amount of time. For example, using the “say” block above will result in your sprite doing this:
“Say” is the backbone of your conversation. But what if you wanted to have one sprite wait for the other to say something before responding? Enter the “wait” block, which we used in the first activity:
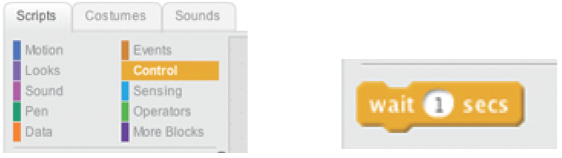
You can use the wait block to have one sprite pause while the other sprite talks. For example, here’s a conversation between a cat and a parrot:
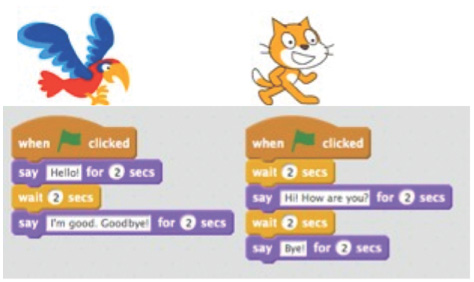
While the parrot is saying “Hello,” the cat is waiting for two seconds. And the parrot waits for two seconds while the cat says, “Hi, How are you?” and so on. You can time out conversations using wait blocks.
Next, what if you wanted the cat or parrot to face the opposite direction? Usually, when a person is talking, you look at them. To do that, we need two blocks, both of which are in the Motion Menu.

“Set Rotation Style” is a little tricky. It’s easiest to learn by experimentation. The “Point in Direction” block is quite simple, it simply tells your sprite which way to face. Clicking on the drop down menu brings up four options:
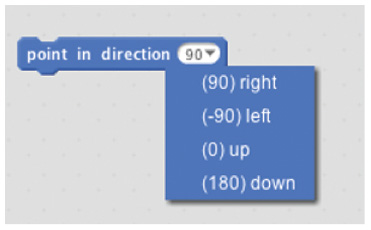
With this block, you can program your sprite which way to face. Try using it in conjunction with the “Set Rotation Style” block to get the effect you want. In your program, you will likely want to have a “left-right” rotation style.
Only three blocks are left. In the first activity, we created a bunch of backgrounds and switched between them using the “Switch Backdrop To” block. You can do the same thing with sprites. In the “Costumes” tab, you can create multiple costumes for the same sprite. Some preexisting sprites may even come with multiple costumes.
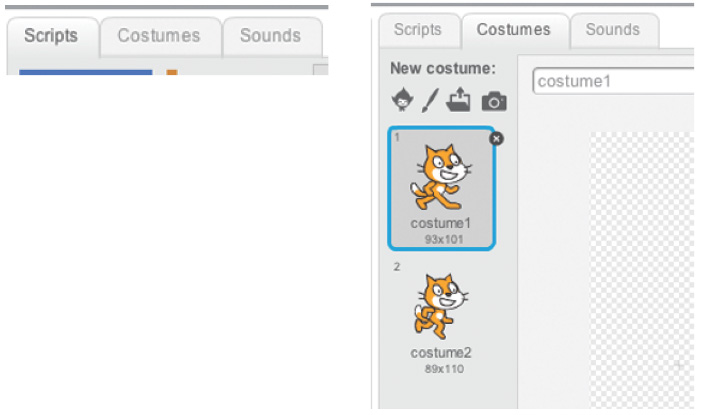
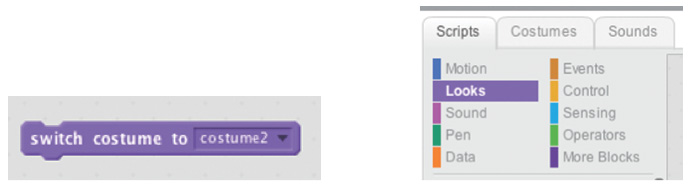
As with backgrounds, we can switch between costumes using the “Switch Costume To” block, also found in the Looks Menu:
Experiment with making a second costume for the same sprite. For example, if one of your sprites was a person, he could have a costume with a hand raised in the air, as if explaining some complicated idea, and one with his arms crossed as if arguing a point.
Our final two blocks are “Show” and “Hide”. In your program, maybe you want one sprite to begin on-screen, and start talking. Then, five or ten seconds in, the second sprite shows up and joins the conversation. That’s what the “Show” and “Hide” blocks in the Looks Menu are for:
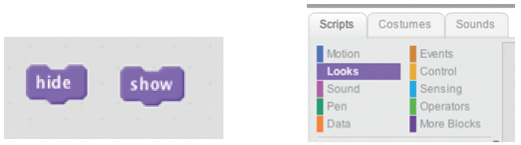
“Show” and “Hide” are very self-descriptive. “Hide” will make a sprite disappear from the screen.
Note that while hidden, it can still move and wait and say, you just won’t see it until you tell it to show. At times, you may tell a sprite to hide, and not be able to find it again. If you need to show it immediately, right click on its icon in the Sprite Navigator, and click “Show.”
Now that we’ve learned a bunch of new blocks, let’s get to work. Using the plan you drew up earlier, try to recreate it in Scratch. Don’t forget to use the blocks we’ve explored in previous activities:
Once you’re done, look at what other students have created. Sometimes, the best way to learn more about Scratch is to investigate other methods of programming.
Don’t forget to save your project using “File” then “Save.”
Scratch is a project of the Lifelong Kindergarten Group at the MIT Media Lab.
Activity 5: The Path of Alewives Migration
Objectives:
Youth will review what they have learned about alewives. The concept of migration will be introduced. Youth will begin preparing for a final presentation.
Time to complete activity: 90 minutes
Background/Setting the Stage: 10 minutes
Review previous activities. In small groups, brainstorm on a large sheet of paper, “What do we know about alewives at this point?” Have groups share their ideas with the rest of the group.
Materials:
- large sheets paper/flip chart
- markers
- building materials, items such as: scissors, masking tape, card stock, and craft sticks, may also include: corks, cardboard, elastics, pencils, index cards, paper clips, binder clips, and/or other items
- aluminum tray (at least 12” wide), with the barrier in the middle
- model alewife, red candy fish
Methods
Part 1: Alewives do what? Migration? (20 minutes):
Today we are going to look at migration and some of the problems migrating animals face. Here is some background information to share with the group.
When alewives leave the freshwater habitats where they emerged from eggs, they head out into the ocean where they swim considerable distances to find food. Four to five years later they swim back to spawn in the same freshwater habitat.
- How do they find their way back? What are some possibilities for any migrating species to find their way?” There is no right or wrong answer. Discuss some possibilities for a few minutes.
- View the video: Open Rivers, Abundant Fish, Ocean Today, NOAA website (3 minutes)
- Then watch:
Video: Penobscot River Restoration Flyover (4 minutes)
Reflection Questions (Journal or Discussion):
- Dams are still being built all over the world to produce electricity and to create reservoirs for crop irrigation. Hydroelectric dams generate 20% of the electricity in the world. How does this impact the world we live in?
- How does this impact alewives?
- Is it possible to balance the needs of humans with the needs of wildlife?
- Why is important to consider this as the human population grows?
Part 2: Guided Practice Fish Passage Building Challenge (40 minutes):
This activity is set up to be inquiry-based and to allow learners to explore how challenging it can be for an alewife to cross a dam during migration, or what is referred to as a fish passage.
- Begin with discussion around why it is important for alewives to get past dams (brainstorm benefits/costs as a group).
- Organize youth into groups. This may be having them work independently, or with partners. Present youth with the challenge: they have at least 30 minutes to design a way to for their fish to safely pass a dam.
- The dam will be a model replica, created from tin foil pan with a barrier across it. No water will be used in the initial design, but if advanced building occurs, this could be an extension to the activity.
- Present the table of building materials. Each team may initially choose 10 items to build with (this is an engineering design constraint). Suggested materials include scissors, masking tape, card stock, and popsicle sticks, may also include: corks, cardboard, elastics, pencils, index cards, paper clips, binder clips, and/or other items
- Have groups select their materials and space to build. Engineers do collaborate, so it is ok for teams to explore other teams designs. As the facilitator, set parameters for the teams around trading items. For example, they may want to trade their craft stick for an elastic. After building for at least 20 minutes, you may decide to open up the table and allow for more than ten items per team.
- Have them test their designs along the way, to see if they will be able to move items from one side to the other. Test and redesign is an important part of the process. Be sure to give time warnings along the way, letting teams know when they have 15 minutes, ten minutes, five minutes and two minutes remaining. Time is also a constraint.
- Have a fish passage challenge. Give each team a model alewife and have them demonstrate their design.
- Discuss success and challenges with this process. What factors might influence engineers of dams and/or fish passageways when they are building?
Independent Practice/Group Work (30 Minutes):
We are going to begin working on a personal project that communicates information about alewives and the problems they face. We will have to be creative to get people’s attention.
Break into small groups again. Groups should discuss five things that they think are important for people to know about alewives.
Closure (5 minutes):
Spend time reflecting on the information they learned about alewives and why they are important to their daily lives. Discuss the process.
Reflection Questions (Journal or Discussion)
- What are the important things the public needs to know about alewives?
- How could you show those things to the public? Share ideas for public presentations.
- What factors influence engineers of dams and/or fish passageways when they are building?
Life Experience Connections:
Many youth living in Maine may be familiar with bodies of water near their homes and may have visited a dam. Familiarity with the ecosystems of those water bodies and what might be important to the survival of alewives, or another species living there. Youth living in Maine will be able to connect the challenges associated with fish passage and navigating from point A to point B.
Assessment:
- Journaling/Group Discussion
- Fish Passage Building Challenge
Resources and Additional Information:
- The Nature Conservancy, “Penobscot River Restoration Flyover” (YouTube)
- Open Rivers, Abundant Fish, Ocean Today, National Ocean and Atmospheric Administration
- MIT Scratch
Vocabulary:
Dam: A barrier that impounds water.
Fish passage: A structure on or around artificial or natural barriers to facilitate fish migration.
Activity 6: Alewives Public Presentation Preparation
Objectives:
Youth will work on preparing for a final presentation.
Time to complete activity: 90 minutes
Background/Setting the Stage: 5 minutes
Review previous activities and last session’s top five brainstorm ideas. Review what is important for the public to know about alewives and how they plan to showcase that. Lesson topics include:
- Facts about alewives
- Habitat (what kind of habitat at different parts of its lifecycle)
- Conservation (what kinds of things could be improved)
- Food Webs
- Migration
- Lifecycle
Materials:
- large sheets paper/flip chart
- markers
- set of laptop computers with Scratch program.
- Scratch File: ChallengeFourDemo.sb2
Methods
Part 1: Preparing for Project Presentation (10 minutes):
- Review the pieces that are important and the facilitator’s expectation for a finished product. Will there be a final showcase? If so, what will that look like, including any assessments?
- Prepare youth for independent work and support as necessary.
Part 2: Scratch Challenge (60 Minutes):
The Scratch Challenge asks youth to complete the second of a two-part project that communicates some information about alewives and conservation. Youth can use the “Alewife Info” document for reference but they should use their own words to convey their message. They should begin by opening the Scratch file: ChallengeFourDemo.sb2 to see a demonstration of what is expected.
Have youth share their finished products. This may occur during this session or may require a final session involving formal presentation time.
Closure (15 minutes):
Spend time reflecting on the information they learned about alewives and why they are important to their daily lives. Discuss the process.
Reflection Questions (Journal or Discussion)
- Share your ideas about how alewives are important.
- How does this connect to your daily life?
Resources and Additional Information:
Vocabulary:
Dam: A barrier that impounds water.
Fish passage: A structure on or around artificial or natural barriers to facilitate fish migration.
![]()
![]() This activity is supported by National Science Foundation award #EPS-0904155 to Maine EPSCoR at the University of Maine
This activity is supported by National Science Foundation award #EPS-0904155 to Maine EPSCoR at the University of Maine