Maine Home Garden News — April, 2010
- April is the month to . . .
- Preparing to Avoid Late Blight
- Lily Leaf Beetles: Spring is the best time to manage them!
- Early Season Vegetables
April is the month to . . .
- Finish pruning apples and other fruit trees. For information on the care of fruit trees plan to purchase Growing Fruit Trees in Maine for $9.50 from your local Extension office or from our online bookstore. It contains information on how to grow fruit trees under Maine conditions, including cultural practices for apple, pear, peach, cherry, plum, and apricot trees. It covers varieties adapted to Maine, rootstocks, planting, early care, fertilization, pollination, pruning, lack of fruitfulness, pests and diseases, and preparation for winter.
- Take soil samples and send to the University of Maine Analytical Lab. When you receive the soil test report, plan to amend the garden as recommended. The cost is $15. Get your form online or visit your local Extension office for a form and mailer box. (For more information about testing your soil, see Bulletin #2286, Testing Your Soil.)
- Till only when soil is dry enough. Tilling wet soil will ruin the soil structure for the rest of the summer! Once you have tilled your garden, some of the first vegetables that can be planted include peas, lettuce, and spinach.
- Rake the remaining leaves off the lawn. In late April plan to reseed bare spots in the lawn. For help on establishing a new lawn, check out Bulletin # 2367, Establishing a Home Lawn.
- Refresh mulch around landscape trees and shrubs once the ground has thawed and warmed. Beware of “tree volcanoes” that have mulch built up around the trunk of the tree. Mulch in contact with the trunk can trap moisture and encourage disease and insect attack on the tree.
- “Rejuvenate” old, overgrown shrubs by removing 1/3 of the thickest stems. Cut them off right at the ground. Next spring, you can remove another 1/3 and finish the job in 2012.
- Lime/sulfur spray on raspberries before the leaves are at the 1/2-inch green stage to control anthracnose, spur blight, and cane blight.
- Order a copy of Pest Management for the Home Vegetable Garden in Maine, Bulletin #2188 for $6.90.
- Enjoy the fall bulbs that you planted. The daffodils, crocus, hyacinth, and tulips will be showing their colors this month.
- Plan your landscape with summer cooling in mind. Small to medium height deciduous shade trees planted near the east and west-facing walls of your house can provide cooling shade to the walls. To shade the roof, plant taller deciduous trees at the southeast and southwest corners of your yard, but keep the true south side of your house tree-free to get all the solar gain in the winter. Place large trees no closer than 20 feet from the house. Three properly placed trees can save an average of $100 to $250 in heating and cooling costs annually.
- Plant a thick line of evergreen trees 40 to 100 feet from the house to block the cold northwesterly winds and evergreen foundation plantings about 5 feet away from the house to create a “dead air” space next to the house will help reduce your winter heating costs.
Preparing to Avoid Late Blight
By James F. Dill, Ph.D., Pest Management Specialist, UMaine Extension, jdill@umext.maine.edu
Griffin M. Dill, Crop Technician, UMaine, griffin.dill@maine.edu
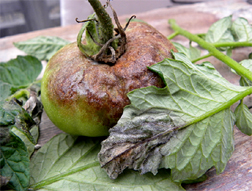
Much of the winter’s snow has melted and you are already thinking ahead to this year’s growing season. Last year’s garden was a big success except for the LATE BLIGHT that wiped out the tomatoes and potatoes. The substantial presence of late blight in Maine during the 2009 crop year has produced the potential for inoculum to be widespread in 2010. As the growing season draws near, it is time for gardeners to prepare for late blight avoidance.
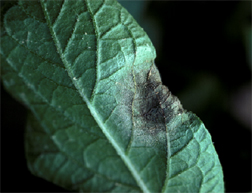 Late blight (which helped to create the Irish Potato Famine and the “hungry forties” in England and throughout Europe in the 1840s) is caused by Phytophthora infestans, a fungus that overwinters on living tomato or potato tissue. The disease first appears as irregular, pale to dark green, water-soaked spots. These spots usually appear on the tips or edges of the leaves. In cool, moist weather or under humid conditions, the spots enlarge rapidly and form brown to purplish-black necrotic areas with wavy, indefinite borders, surrounded by a yellowish-green halo. Also under these conditions, a ring or a surface of white fungal growth may appear at the edge of the lesion on the underside of the leaf, which produces spores that move to other plants and continue the infection.
Avoidance Strategies
Eliminate inoculum: When the snow has melted, thoroughly examine your garden and surrounding property for any potential sources of inoculum. Destroy cull piles and any other potatoes that were left behind after last year’s harvest. Search the area, including compost piles, and destroy volunteer potatoes and any remaining living tomato plants. The living tissue that has overwintered could be infected with late blight and could potentially infect this year’s crop.
 Use disease-free seed and transplants: You should not plant saved tubers from last year’s blighted potato crop. However, if you choose to plant saved tubers, keep them at room temperature for two weeks. At the end of the two weeks, examine the tubers, discard any suspect ones, and plant the remainder. Buy and plant certified potato seed to reduce your risk of planting infected tubers. Try to use whole potato seed if possible. Use of whole potato seed reduces the risk of spreading late blight to multiple tubers during the cutting process. Growing your own tomato transplants or purchasing from a reputable grower will ensure a healthy start to the season. Be sure to inspect all transplants for late blight lesions and other potential problems before planting.
Choose resistant varieties: Planting late blight resistant varieties is also an option. Resistance, however, does not mean immunity. Late blight-resistant varieties can withstand late blight pressure to a point. However, if there is a great spore load from many infected plants, even resistant plants can get the disease, although not as badly as the susceptible varieties. The other point to remember is that late blight can mutate and the mutation may be able to overcome the resistance. Some of the resistant potato varieties available to the backyard gardener include Kennebec, Sebago, Allegany (foliage only, tubers are very susceptible), and red-skinned varieties, Rosa, and Chieftain. Resistant tomato varieties include Ferline, Fantasio, and Legend. Anecdotal evidence also indicates that the tomato variety Matt’s Wild may also have some resistance.
Rotate planting sites: Tomatoes and potatoes can be planted in the same spot as last year without any late blight problems as long as overwintering plant debris has been disposed of. However, it is certainly good practice to rotate the crops in your garden as much as possible. Try not to plant crops in the same spot in your garden year after year and do not rotate with related crops.
 Provide optimal growing conditions: The weather conditions during the 2009 growing season were extremely conducive to the development of potato late blight. During the months of May through August, central Maine received over 20 inches of rain, 7 inches above the average rainfall for that time period. Unfortunately, gardeners have no control over the weather conditions. However, by providing proper drainage, air circulation, good soil fertility, and utilizing the necessary cultural practices late blight susceptibility can be minimized. The use of nitrogen in the garden can also affect late blight susceptibility. Excess nitrogen produces lush foliage that is more susceptible to late blight and for a longer period of time. In order to avoid this increased susceptibility, nitrogen should be applied early in the season and at the recommended dosage.
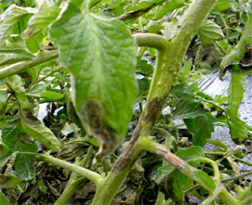
While these avoidance strategies provide an excellent starting point to a late blight-free growing season, they do not guarantee one. During the growing season, be sure to pay attention to weather conditions and pest alerts to learn about whether late blight has been observed in your area. Most importantly, monitor your garden for any irregularities, especially early stem lesions, and to determine any actions you may need to take in order to protect your crops.
Good gardening!
Lily Leaf Beetles: Spring is the best time to manage them!
By Lois Berg Stack, Extension Professor, Ornamental Horticulture, University of Maine (lois.stack@maine.edu);
Eleanor Groden, Professor, Entomology, University of Maine; and
Philip Stack, Research Entomologist, University of Maine
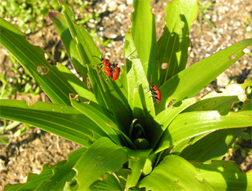 Lily leaf beetles have been in Maine gardens since 1997. By now, we’re all familiar with them: the bright red beetles feed on our lilies in late spring, and lay their egg masses on the undersides of the leaves. By late summer, the larvae that develop from those eggs have turned our lilies into skeletons. After a few years of feeding, the plants decline and die.
But there’s good news. You CAN manage lily leaf beetles. Spring is a great time to address this problem with non-chemical controls. Here’s what you need to get started:
- Learn to recognize lily leaf beetles;
- Understand the most vulnerable stage in this beetle’s life cycle; and
- Dedicate time to scouting and managing the beetles.
1. Learn to recognize lily leaf beetles
Lily leaf beetle adults are bright scarlet and about 1/4-inch long. Their head, antennae, legs, and undersides are black (see photo). When disturbed, they either fall to the ground or fly away. They are strong fliers and can travel quite long distances.
2. Understand the most vulnerable stage in this beetle’s life cycle
Lily leaf beetle adults overwinter in plant debris or soil. You might find them near the lilies they fed on last year, or some distance away. NOW is the time to look for them. They’re most often in places that are cool, moist, and shaded. They’re already active – disturb the mulch in your garden, and you’ll likely find them if you saw them last year.
Unlike many other plant pests, lily leaf beetles complete just one generation each year. Each beetle you can kill now means a significant reduction in the population later this summer.
The adults are now living on their fat reserves and will start to feed when host plants such as lilies and fritillarias emerge later this spring. Soon after that, the beetles will lay their orange eggs in an irregular line on the undersides of lily leaves. By midsummer, the larvae will emerge from these eggs to feed on leaves and flower buds. As the larvae grow, they’ll cover themselves in their own excrement, making their removal an unpleasant task. By late summer, the larvae will metamorphose into pupae, drop to the soil, and emerge later as adults. These adults will overwinter … and the cycle will continue.
3. Dedicate time to scouting and managing the beetles
While you’re checking your garden this spring, disturb the mulch in the area around your lilies. Check moist, shaded, cool spots for best success. When you find a beetle, simply step on it or crush it between your finger and thumb. Repeat this process at least once a week. When your lily plants emerge, check them as well; you’ll see many adults either feeding or mating on lilies. After you see mating beetles, check the undersides of lily leaves for the eggs. They’re easy to crush; simply rub them off the leaves. Stick to your weekly schedule, as you’ll find new egg masses through most of the summer. Your job will be easier if you start early. Remember, every adult you kill now means a reduced population later in the summer.
For more information, see Bulletin #2450, Lily Leaf Beetle.
Early Season Vegetables
By Rick Kersbergen, Extension Educator, Waldo County,
Wow, what a spring season we have had so far. Rains in the Southern part of Maine have been torrential, while gardeners in the central part of Maine are rototilling their gardens in March and planting early-season vegetables.
Many gardeners begin planting in May, sometimes around the traditional last frost date or Memorial Day weekend. Unfortunately, this leaves them missing out on some of the best growing conditions for cool-season vegetables. Not only do they miss out on some of the productivity of the crop, the cool season crops sown late in the spring or early summer often have their season cut short by hot dry conditions in June or early July. Cool-season crops sown early in the season tend to be more productive and also are more competitive against weeds, and usually beat out the pesky summer annual weeds that germinate in late May and early June.
 So what can be sown in the garden early in the season? First off, your soil must be dry enough before you go rushing out and plant. If you can grasp a fist full of your soil and it stays together in a ball, it is too wet. Don’t go out and till, thinking that will help dry it out quicker. You may end up destroying your soil structure and causing more problems down the road. Secondly, plan your early season crops where you know it will remain somewhat drier if we get those pesky late April or early May rains. This may mean that you might want to rake some soil into a raised bed of about 6-8” tall that will keep any seeds or young plants from drowning. Finally, you may consider germinating some plants indoors that you would not traditionally transplant and therefore get a jump on the season while being able to control seeds from rotting if it does get too wet.
So what can be planted that withstand cold nights and germinate in cool soils? Some of the traditional crops that can be sown are greens such as lettuce, spinach, and kale. Often carrots are seeded this time of year as well. Since carrots are relatively slow to germinate, some gardeners add in a small number of radish seeds to mark the rows as the radishes emerge quickly in cool soils and may be some of your first crops to harvest, well before the carrots. Members of the brassica family are also suited for cool-season growing. Broccoli, cauliflower, and cabbage grow best in temperatures between 60 and 70 F. However, exposure to prolonged periods of temperatures below 50 F may cause premature head development or buttoning. These are often transplanted into the garden but can also be direct seeded. Onion seeds, sets, or plants are also cold and frost tolerant and can be sown early in the garden season.
Two of my favorite vegetables and a Maine tradition for early season growing are peas and beets. Both of these crops require moist cool soils to germinate. Remember to inoculate your pea seeds with an appropriate nitrogen-fixing bacteria! Finally, as I like to have new potatoes with my peas on the 4th of July, plant some early season potatoes.
All of these crops can benefit from the use of row covers or low tunnels early in the season to enhance growing conditions and protect from some extreme cold conditions that may happen—remember we do live in Maine!
University of Maine Cooperative Extension’s Maine Home Garden News is designed to equip home gardeners with practical, timely information.
Let us know if you would like to be notified when new issues are posted. To receive e-mail notifications fill out our online form.
Maine Home Garden News was created in response to a continued increase in requests for information on gardening and includes timely and seasonal tips, as well as research-based articles on all aspects of gardening. Articles are written by UMaine Extension specialists, educators, and horticulture professionals, as well as Master Gardener Volunteers from around the state, with Professor Richard Brzozowski serving as editor.