Maine Home Garden News — October 2014
- October Is the Month to . . .
- Are You Thinking of Raising Poultry?
- School Gardening Programs
- Facts About Leaf Color in Maine
- Winter Squash and Pumpkins
October Is the Month to . . .
By Amy Witt, Horticulturist, University of Maine Cooperative Extension, amy.witt@maine.edu
- Walk around the outside of your house and gardens and note what tasks need attention (i.e. pull weeds; prune diseased or dead tree limbs; remove and replace diseased or struggling plants; fix leaky faucets and hoses; check irrigation lines and drip heads, unclog and replace if necessary; clean up plant debris from vegetable garden, etc.)
- Mark perennials with tags before cutting back or map out your garden so you know where the plants are when you are cleaning the gardens in the spring.
- Your tools have worked hard for you all season long in the garden. Before putting tools away, give them some TLC by cleaning and sharpening them. An easy way to clean and oil your tools is to fill a bucket with sand and oil, dip your tools in the bucket, swish them around, remove, and wipe them off with a cloth.
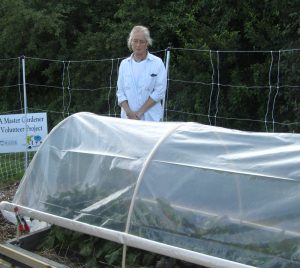
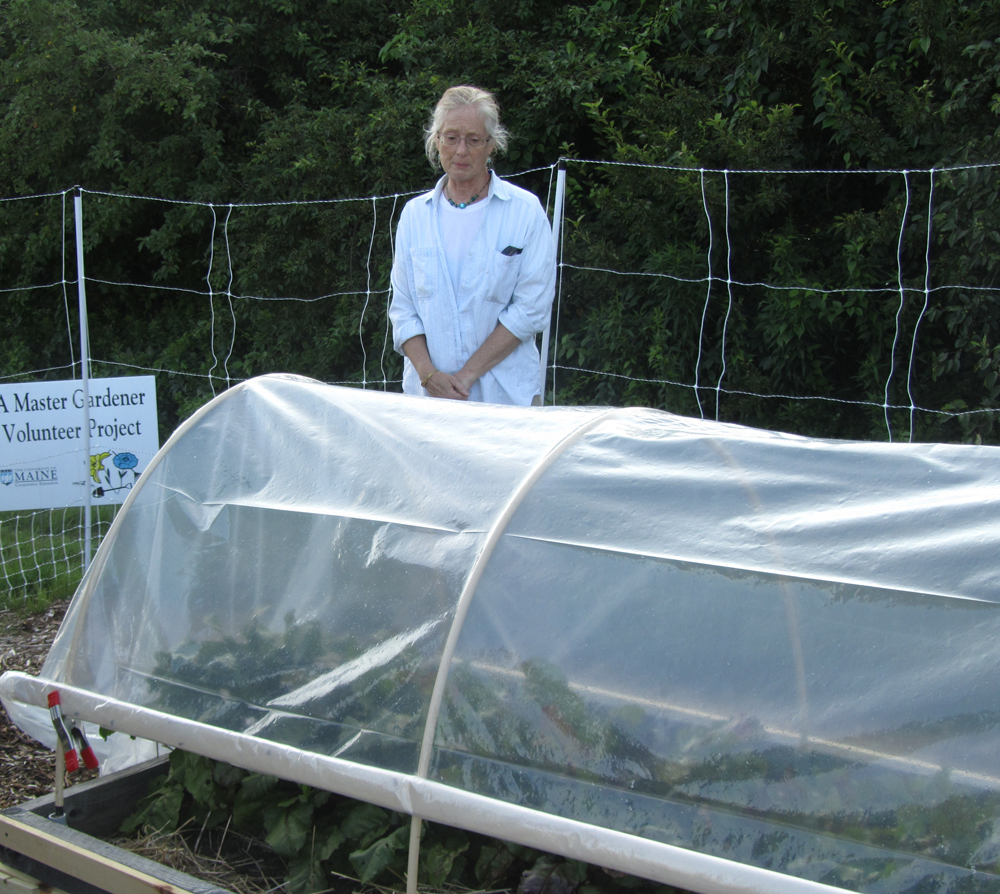
Hoop house with Master Gardener Kim Payne. Photo by Amy Witt. - Extend the growing season and enjoy the wonderful produce from your garden well into the autumn by using structures like cold frames and hoop houses. Refer to Bulletin #2752, Extending the Gardening Season for more information and instructions.
- Protect young fruit trees from being girdled by rodents over the winter. Refer to Protecting Trees from Deer and Mice for various methods of protection.
- Leave Brussel sprouts and root crops such as carrots, onions, and parsnips in the ground and dig them up as needed. They will become sweeter after the first frost. Make sure to apply enough mulch around the crops to keep the ground from freezing and to keep them fresh.
- Go apple picking at a one of Maine’s wonderful “pick-your-own” orchards. Bulletin #4262, Vegetables and Fruits for Health: Apples provides a description of varieties, storage tips and recipes.
Photo by Amy Witt - Remove any leaves and debris from your gutters; plugged gutters can cause damage to your home and surrounding gardens when winter weather arrives.
- Drain and store rain barrels.
- Feed the birds; they need all the extra food and protein they can get for their long journey south.
- Autumn is a great season, with its crisp days and brilliant colors. Don’t forget to take time from your gardening tasks to enjoy the vibrant colors of the leaves, berries, and flowers.
Are You Thinking of Raising Poultry?
By Cooper Bramble, Extension Volunteer, and Richard Brzozowski, Extension Educator, University of Maine Cooperative Extension, richard.brzozowski@maine.edu
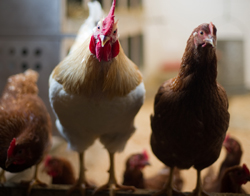 Raising poultry in the backyard or on a small scale has become fairly popular in recent years. The information in this article has been assembled to provide a non-biased list of considerations for those thinking about raising poultry.
Poultry Raising Options
Here is a list of basic poultry raising options. Before you start raising poultry, identify why you want to do it.
- Meat Production
- Broilers, Turkeys, Game Birds, Guineas, Waterfowl
- Egg Production
- Chickens, Ducks, Guineas
- Insect and Tick Control
- Feathers
- Fly tying, Crafts, Fashion
- Show (bird fancier clubs)
- Youth and Adult Activity
The Pros of Raising Poultry
Poultry . . .
- provide fresh eggs and/or meat.
- are efficient converters of feed.
- will eat various insects and pests.
- produce valuable manure.
- can help work the soil.
- provide a learning opportunity.
- can be entertaining.
The Cons of Raising Poultry
Your poultry will . . .
- require daily attention.
- require an investment to start.
- require funds to maintain.
- be prone to diseases.
- likely be a target of predators.
- likely smell, attract flies and rodents.
- need a clean coop.
- die or become unproductive.
- need to be culled.
- be limited by local ordinances.
Steps to Start Raising Poultry
- Ordinances? — Check with your town office to see if you are allowed to keep poultry.
- Neighbors — Consider your neighbors in relation to your poultry (noise, odor, flies, etc.).
- Research — Read and familiarize yourself with poultry production and care. Do you have the time, personality, funds, and space to raise poultry?
- Species & Breed — Decide whether you want to raise poultry for meat or eggs. Consider species, breed, flock size, etc. for your circumstances. Start researching reliable sources for your birds.
- Planning — Push a pencil on the costs of the birds, feed, bedding, housing, and equipment.
- Brooder — You will need to obtain a brooder (heated area) to start young poultry.
- Coop — After brooding, poultry will need a coop for safe keeping.
- Egg Laying — Different types of poultry will take longer to mature and begin laying eggs.
- Results — Do you have a plan for all of the eggs and meat produced? What will you do with manure produced and birds that get sick or die?
Possible Sources of Poultry
- Local farm feed store
- Mail order hatcheries
- Friend or neighbor (not a good choice)
- Livestock auction (not a good choice)
More Sources for Egg Laying Birds:
- Reliable pullet producer (ready-to-lay)
- Spent hens (from a commercial laying operation)
For more information and a list of reputable websites for small scale poultry producers, visit our poultry website or contact richard.brzozowski@maine.edu
School Gardening Programs
By Kate Garland, Horticultural Professional, University of Maine Cooperative Extension, katherine.garland@maine.edu

This article is the first in a series that will highlight some of the diverse and exciting school gardening programs that are happening throughout our state. We’re starting by profiling a new garden, three 8’x10’ raised beds constructed this spring behind Leonard Middle School in Old Town. School Counselor Tracey O’Connell and Art Teacher Adele Drake took the lead on this project and have kindly shared some reflections on their first year.
What inspired you to have a garden at your school?
Adele: “We were inspired by our own love of gardening. We enjoy the time we spend in the garden and wanted students to have the experience of working in the garden.”
Tracey: “Students were really interested in supporting the community and learning more about good food.”
How have students been involved?
Tracey: “Students have been involved from the beginning. They planned, planted, filled the raised beds, shoveled manure and compost, and now are harvesting. Mrs. Drake . . . integrated a lot of ideas into her art class and the students from her art classes helped plan the garden. We worked all winter on various projects . . . recycled garden art, bee friendly zones with a bee keeper . . . Our 8th grade geometry students are going to try to help [write a grant] this year.”
Adele: “The students have been involved in every aspect . . . including writing grants and presenting what they have accomplished to the school community.”
What has been your biggest success?
Tracey: “The garden has become a place of refuge and learning. Students take walks to the garden to de-stress, observe what is happening with the weather and plants, and pick produce.”
Adele: “Our biggest success has been receiving a grant to build an Earth loom in the garden. Last spring, we made the 3 raised beds and installed the loom all in the same week. Today was wonderful, as we all tasted the newly harvested carrots and delivered vegetables to the lunchroom to be used for the school lunches.”
At least 125 zucchini were harvested this summer and fall, many of which were used in their summer food program. Both teachers shared the success of having community partner support. For example, a University of Maine professor brought his class and his own family over to help prepare and plant the gardens and a FoodCorps Service Member provided technical support. Community members also donated seedlings and a local nursery donated loam.
What has been your biggest challenge?
Large and small pests such as deer, Japanese beetles, and possibly a bear have provided many challenges.
Adele: “We have been analyzing the scat, which has been fun for the kids. The deer demolished the green beans, ate big bites out of the cucumbers, totally denuded the tomatoes and even spit them in the field. [Overall], the biggest challenge is finding the time to do everything that needs to be done.”
What do you see the garden looking like in 3 years? What about 10 years?
Tracey: “The students would like to see a greenhouse, and a better protection from the wildlife.”
Adele: “I see the garden being the perfect balance between form and function. There will be a greenhouse, garden furniture, a garden shed, and plenty of works of art (mosaic tiles, bird baths, and fencing with an artistic element to its design).”
If you were to give one piece of advice to someone starting a school garden, what would it be?
Tracey: “Adele and I both have a lot of school and community support. Our school nurse and several teachers were instrumental in helping us get going. The biggest setback was finances and we know financial backing is critical. There are lots of resources that are exceptional at the Cooperative Extension . . . we have no budget so our advice would be to have a good grant writer.”
Adele: “Jump right in and do whatever you can. Don’t feel overwhelmed; just take the small steps necessary to get things started.”
Is there anything else you’d like to share?
Adele: “A garden is an outdoor classroom with all kinds of unexpected and fascinating occurrences.”
Tracey: “This has been a wonderful experience. We are sharing our harvest with the school community. Experts have come in and given students support and shared knowledge from bees to bugs in the garden. We are getting ready to prepare for winter and plant garlic again.”
Thank you to Tracey and Adele for taking the time to share your project. Fall is an excellent time to start a school garden. Here are some quick tips:
- Gather allies within your school (other teachers, food service staff, custodians, administration, support staff, parents, and youth). Find out how deeply people want to be involved. Do they want to help out over the summer?
- Ask your group “what will success look like?” This will help clarify the purpose of the garden. School garden goals can include, but are not limited to: growing food for the cafeteria, science demonstrations, beautification, team building, service learning, physical activity, and more.
- Assess your site. Is there easy access to water? How many hours of sunlight does the site receive over the course of the day? Do you have good soil (have your soil tested)? Is there a known pest problem (deer, groundhogs, etc.)?
- Make a plan for how you will address pest problems in the garden. Know the laws regarding pesticide use on school grounds. There are many non-chemical strategies that can be used to manage pests.
- Start small, have a successful and manageable season, and get bigger as resources, time, and support allows.
- Know your resources. Here a few:
Facts About Leaf Color in Maine
Originally adapted from Why Leaves Change Color, USDA Forest Service FS 12, February 1967. Revised by James Philp, Extension forestry specialist – wood products, July 2001.
Revised by Kathryn Hopkins, Extension Professor, University of Maine Cooperative Extension, khopkins@maine.edu
 It doesn’t take much imagination to picture Nature going about on autumn days and painting the leaves of trees and other plants red, purple, orange, and yellow. Every fall, we delight in the beauty of the trees and shrubs, knowing that it is only a passing pleasure. Before long, the leaves will fall from the trees and become part of the rich carpet that covers the forest floor, providing nutrition for new forest growth. Many people suppose that frost causes the color change, but it does not. Some of the leaves begin to change color before we have had any frost.
A Chemical Process
During spring and summer leaves serve as food factories for trees’ growth. Photosynthesis, the food-making process, takes place in the numerous leaf cells that contain the green pigment, chlorophyll. Chlorophyll absorbs energy from the sun and uses it to change carbon dioxide and water to sugars and starches that are used for tree growth.
In addition to chlorophyll, leaves also contain yellow and orange pigments, such as xanthophyll and carotene. Carotene is the pigment that gives carrots their familiar color. For most of the year, the yellow and orange colors are hidden by the much greater amount of green pigment. In the fall, because of decreasing daylength and temperature, the leaves stop producing chlorophyll. The remaining chlorophyll breaks down and the green color disappears making the yellow and orange colors visible. Some trees, such as silver maple, aspen, birch, and hickory, show only yellow colors.
At the same time, other chemical changes are taking place in the leaf. In some species, anthocyanins are formed, giving leaves a crimson red, purplish or blue color. Anthocyanins give the reddish and purplish fall colors to dogwood and sumac leaves and give the sugar maple its brilliant orange, fiery red or yellow colors. Oaks are mostly brownish, while beech turns a golden bronze. Mixtures of pigments in the leaves cause the various colors during the fall season. Trees with red or scarlet leaves in autumn include red and sugar maple, flowering dogwood, sweetgum, black gum, red and scarlet oak, and sassafras.
It is believed that fall weather conditions may play a part in the formation of autumn colors. Warm sunny days, with nighttime temperatures below 45 degrees Fahrenheit but above freezing, raise the level of red coloration. Sugars, made in the leaves during the day, are used to produce the pigment, anthocyanin. The degree of color may vary between trees of the same species because of genetic differences. Colors can even vary on the same tree. For example, leaves directly exposed to the sun may turn red, while those on the shady side of the same tree may be yellow. The leaves of some trees may just die and turn brown, never showing any bright color.
The colors on the same tree may also vary from year to year, depending upon combinations of weather conditions. When there is a lot of warm, rainy weather in the fall, less red color can be expected. The small amount of sugar made in the limited sunlight is not sufficient to form the red pigments.
The timing of the color change on leaves depends on weather, latitude, elevation above sea level, and the local microclimate. Warm but not excessively hot temperatures and sufficient spring and summer rainfall will usually produce the best fall color. Many states have foliage maps and webcams to track foliage color changes as fall progresses. This makes it easier to plan a foliage-viewing trip for peak color season.
As the leaves change color, other things are happening to them. The leaf veins close off and stop carrying liquids. At the base of the leafstalk or petiole, where it is attached to the twig, a layer of special cells forms and gradually separates the leaf from the twig. This layer of special cells is called the abscission layer. It is the reason that the leaves fall from the tree. At the same time, scar tissue forms on the twig to seal the old pathway between the twig and the leaf. Leaf scars are so unique in appearance that they can often be used to identify trees after the leaves are gone.
Fall Colors for a Fortunate Few
Only a few regions of the world have showy fall displays. Eastern North America has large areas of forests with broad-leaved trees and favorable weather conditions for vivid fall colors. Some areas of western North America, especially in the mountains, also have bright coloration. Eastern Asia and southwestern Europe have colorful fall foliage, too.
Most broad-leaved trees in the north shed their leaves in the fall. Some of the oaks, and a few other species, may keep their dead brown leaves over winter until growth starts again in the spring. In the south, where the winters are milder, some broad-leaved trees are evergreen.
Most conifers — pine, spruce, fir, hemlock, cedar, etc. — are evergreen in both the north and in the south. The leaves, which are needle-like or scale-like, remain green or greenish year-round. The individual leaves may stay on the tree for two or more years.
Fallen leaves help fertilize the forest soil. Leaves contain nutrients, particularly calcium and potassium, which the trees’ roots took up from the soil. Decaying leaves recycle the nutrients back into the top layers of the soil. The humus produced by the decaying leaves is also important for conserving water in the forest soil.
Food and Nutrition
Winter Squash and Pumpkins
Revised and updated by Associate Extension Professor Kathleen A. Savoie, ksavoie@maine.edu
Originally developed by Extension Nutrition Specialist Nellie Hedstrom
 Winter squash will keep for several months after harvesting. Winter squash is always eaten cooked. Most varieties have orange flesh that is slightly sweet with a nutty flavor. Maine-grown winter squash is available September through February. The following are all varieties of winter squash: acorn, butternut, buttercup, hubbard, and spaghetti.
A type of winter squash, pumpkins come in many sizes, from miniature varieties of one pound or less, to giant, prize-winning varieties of 300 to 400 pounds! The traditional round, deep-orange pumpkins used for carving jack-o’-lanterns on Halloween are not the best kind to use for cooking because they tend to be stringy and too moist. The small, dull orange, skinny variety called the sugar pumpkin has more pulp and is better to use for cooking. Maine-grown pumpkins are available in September and October.
Nutrition Information
The deep yellow to deep orange colors of pumpkin and winter squash show that they contain carotene, which your body turns into the antioxidant vitamin A. Other varieties of winter squash provide more vitamin A per serving than pumpkins. All varieties of winter squash are good sources of potassium, which is helpful in maintaining a healthy blood pressure.
Selection
Squash: Choose full-sized, mature fruit with a hard, tough rind. Also look for squash that is heavy for its size. Avoid squash with cuts, punctures, or sunken or moldy spots on the rind. A soft rind means that the squash is not mature and therefore not good to eat.
Pumpkin: Choose pumpkins that are firm, heavy, brightly colored, and free from blemishes. Avoid dull-colored pumpkins that have shriveled skin, soft spots, cuts, or breaks.
Storage
Store pumpkins and winter squash in a cool, dry place. If you store them outdoors, make sure there is no danger of frost.
Preparation
Steaming: Both pumpkins and winter squash are excellent steamed. Peel and cut into two-inch cubes, and steam 25 to 40 minutes, until fork-tender. Or steam large pieces with the rind left on. Once cooked, the rind can easily be removed. To steam, bring one inch of water to boil in the bottom of a pan. Place a colander or a collapsible steaming basket in the pan. Then put the vegetables in the colander or steamer and cover it tightly. Reduce heat to medium-low, but make sure it is high enough to keep the water bubbling.
Add a dash of nutmeg to the cooked pumpkin or squash. Serve cubed or mashed.
Baking: Wash small, whole squash, such as acorn or butternut varieties. Cut in half and remove the seeds and fibers. (For an extra treat, you can save the seeds, wash them, add a little salt or cinnamon and sugar, and toast in your oven at 350 degrees F for 20 minutes.) Bake the halves at 400 degrees F for one hour or more. (Larger squash should be cut into individual portions to shorten baking time.) To shorten baking time, bake halves covered for the first 30 minutes. Then take the cover off for the rest of the baking time.
Microwaving: Squash and pumpkin cook much more quickly in the microwave than in the oven. For small squash, such as acorn, cut lengthwise. Scoop out seeds and fibers. Cover each half with plastic wrap and arrange in oven with space between. Microwave at high power five to eight minutes per half. Then let stand covered, for five to ten minutes. For larger squash and pumpkins, cut into individual portions. Arrange in microwave-safe dish. Cover with plastic wrap. Cook three to four and a half minutes per piece. After half the cooking time has passed, rotate the dish so that the squash cooks evenly. Then let stand, covered, for five minutes.
For recipes, visit Bulletin #4176, Vegetables and Fruits for Health: Winter Squash and Pumpkins.
University of Maine Cooperative Extension’s Maine Home Garden News is designed to equip home gardeners with practical, timely information.
Let us know if you would like to be notified when new issues are posted. To receive e-mail notifications fill out our online form.
Contact Lois Elwell at lois.elwell@maine.edu or 1.800.287.1471 (in Maine).
Visit our Archives to see past issues.
Maine Home Garden News was created in response to a continued increase in requests for information on gardening and includes timely and seasonal tips, as well as research-based articles on all aspects of gardening. Articles are written by UMaine Extension specialists, educators, and horticulture professionals, as well as Master Gardener Volunteers from around Maine, with Professor Richard Brzozowski serving as editor.
Information in this publication is provided purely for educational purposes. No responsibility is assumed for any problems associated with the use of products or services mentioned. No endorsement of products or companies is intended, nor is criticism of unnamed products or companies implied.
© 2014
Call 800.287.0274 or TDD 800.287.8957 (in Maine), or 207.581.3188, for information on publications and program offerings from University of Maine Cooperative Extension, or visit extension.umaine.edu.