Maine Home Garden News — May 2020
In This Issue:
- May Is the Month to . . .
- Conway Homestead Garden in Camden: A Dream Come True
- A Review of The Moth Snowstorm by Michael McCarthy (2015)
- Bees of Maine: Family Megachilidae
- Advice for the Transplanted Gardener
- Growing Potatoes in Grow Bags
- Building an Accessible V-Bed Garden
- Learning Opportunities for Maine Gardeners
- “Tick Tock”: Lyme Disease Awareness Month
- NEW monthly features:
May Is the Month to . . .
By Kate Garland, Horticulturist UMaine Cooperative Extension in Penobscot County
- Mentor a new gardener. With a huge spike in gardening interest, there are countless new gardeners in need of reliable advice. Even one simple tip can stick with someone for a lifetime. I know I’ll never forget a grandfatherly college security guard taking the time to show me how to transplant young vegetable seedlings when I was volunteering in the campus garden.
- Be a prepared and considerate customer. Local nurseries, farmers’ markets, farm stands, and other garden supply centers are preparing for a big spring sales season. You can play a part in making this a great shopping season for all gardeners. Please research business-specific shopping protocols by looking online or calling ahead, carefully follow social isolation protocols when you shop, and consider shopping solo or in smaller numbers in order to help businesses serve more people (they, too, need to manage the number of shoppers in their retail space). Your efforts will help make shopping accessible and safe for fellow gardeners and create a safer working environment for garden center staff.
-

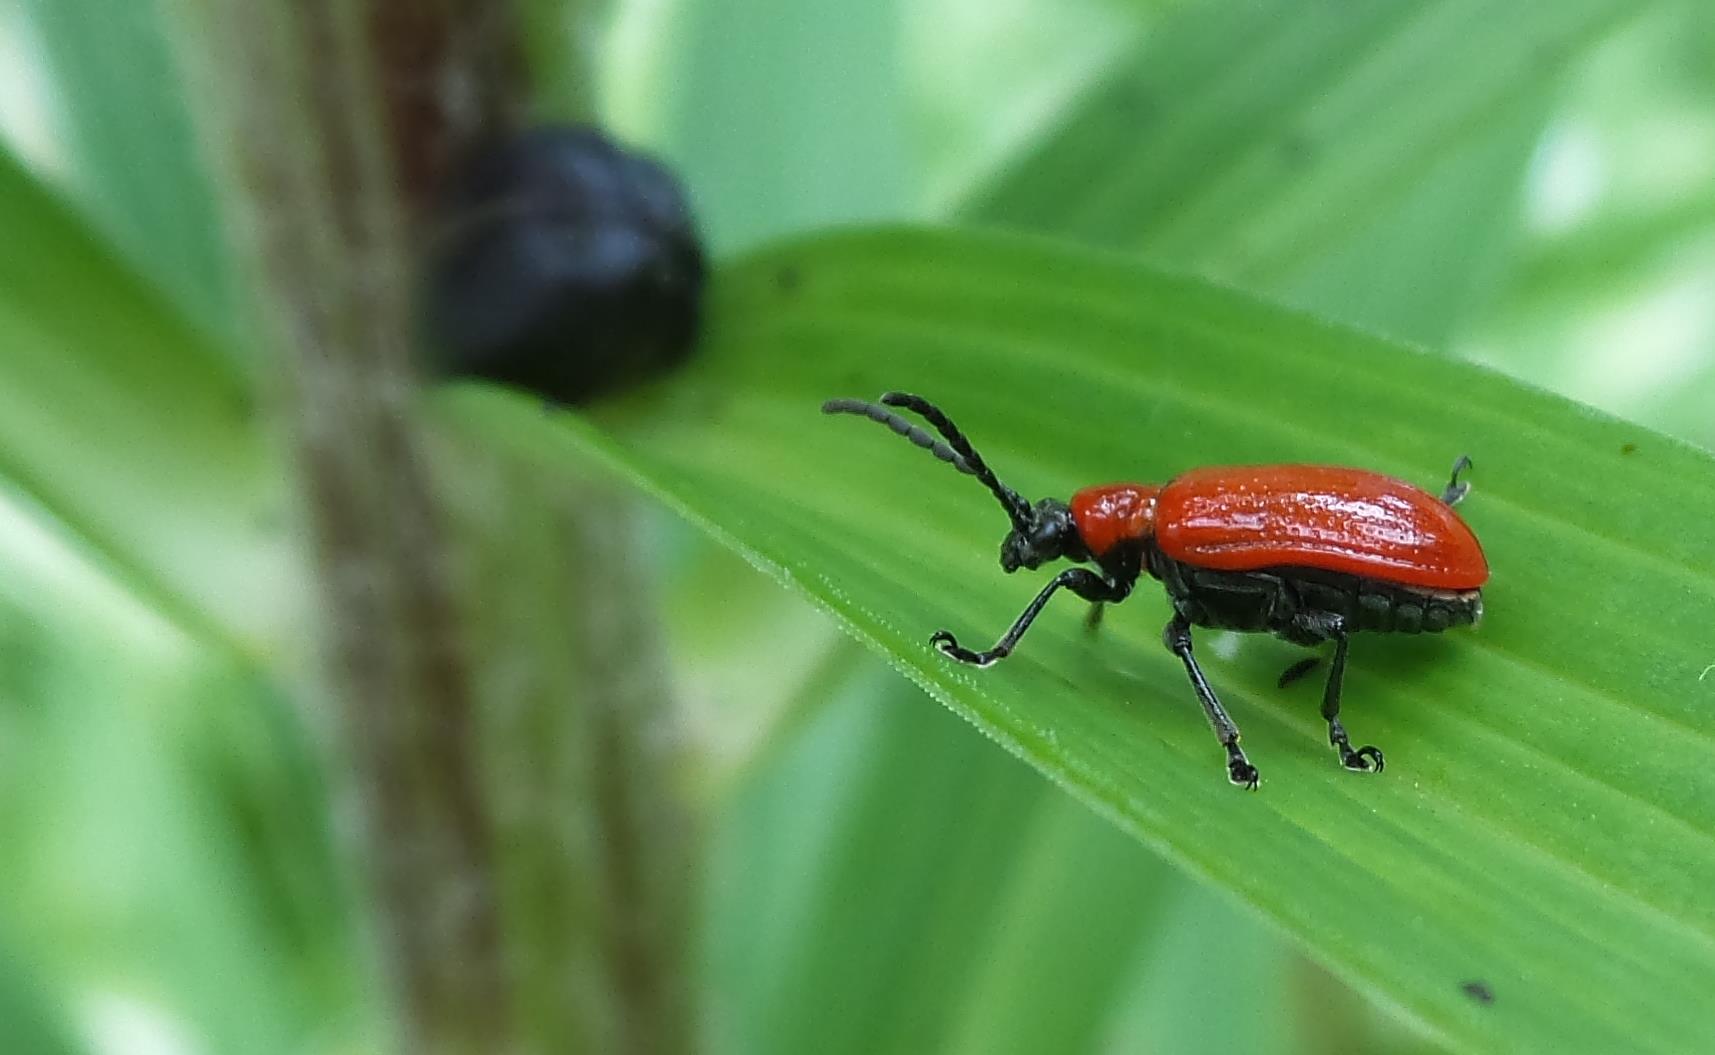
Lily Leaf Beetle. Photo by C. Eves-Thomas. Look for and manage Lily Leaf Beetle. Hand picking the newly emerging adults in May can be an effective management technique. UMass Extension Insect Xaminer website has a great video showing the full life cycle and important facts about the lily leaf beetle.
- Cover areas to prepare new in-ground garden spaces. Generally, the longer you leave an area covered, the more likely you’ll kill off problematic perennial weeds. Opaque plastics, cardboard or a thick layer of newspaper can all work well. All require anchoring. Landscape pins work well for keeping the plastic in place and good options for anchoring cardboard and newspaper include bark mulch, wood chips, straw or shredded leaves. If you don’t want to leave it all season, consider keeping it on until early July. At that point in the season, you can still plant beans, carrots, beets, broccoli, cabbage, leafy greens, and a variety of herbs.
- Make a simple and inexpensive temporary raised bed garden out of bales of straw. Watch the video below and download the instruction sheet (PDF).
- Build a raised bed. With all the downed branches from spring storms, consider partially filling new beds with some of the woody debris. Be sure to use a mix of loam (50%-75%) and finished compost (50%-25%) for the top 6-8″ of the bed. For those looking for a taller bed, see article below on how to construct a unique and very user-friendly v-shaped raised bed.
- Warm the soil with black plastic or employ other season extension strategies.
- Make seed tape to make spacing easy for small-seeded crops such as carrots, lettuce and basil. Watch the video below and download the instruction sheet (PDF).
- Harden off seedlings before planting outdoors. The process of gradually adapting young plants to increased light, wind, colder temperatures and less frequent watering will help them transition more successfully into the “real world.” Skipping this step can result in seedlings experiencing transplant shock and a greater possibly seedling failure.
- Start planting seeds and seedlings. Check out the estimated dates for central Maine. Subtract 10 days for southern Maine and add 10-14 days for northern Maine and be sure to watch the weather forecast carefully before planting. Don’t rush the planting process if the temperatures are unseasonably cold.
| Early May | Mid May | Late May | |
|---|---|---|---|
| Plant directly from seed | endive, lettuce, peas, radish, spinach, turnip | beet, carrot, parsnips, swiss chard | cucumber, squash, zucchini, beans, melons, pumpkin, okra, corn, sunflower, cosmos |
| Transplant outdoors | broccoli, cabbage, onion, seedlings and sets, leeks | cauliflower, perennial herbs, asparagas, rhubarb | tomato, pepper |
| Sow indoors for later transplant | cucumber, squash, zucchini, melons, sunflower, cosmos | broccoli, cabbage, kale, kohlrabi, cauliflower |
- Take photos. Even if there seemingly isn’t much to photograph, it still can be helpful to document the story of your garden all season long. Photos are incredibly helpful resources when it comes to future garden planning.
- Test your soil. The Maine Soil Testing Service is open for business and is sending out dozens of soil test kits to home gardeners daily. They prefer to have samples mailed to them at this time. For more information, see Know Your Soil: Testing Your Soil.
-

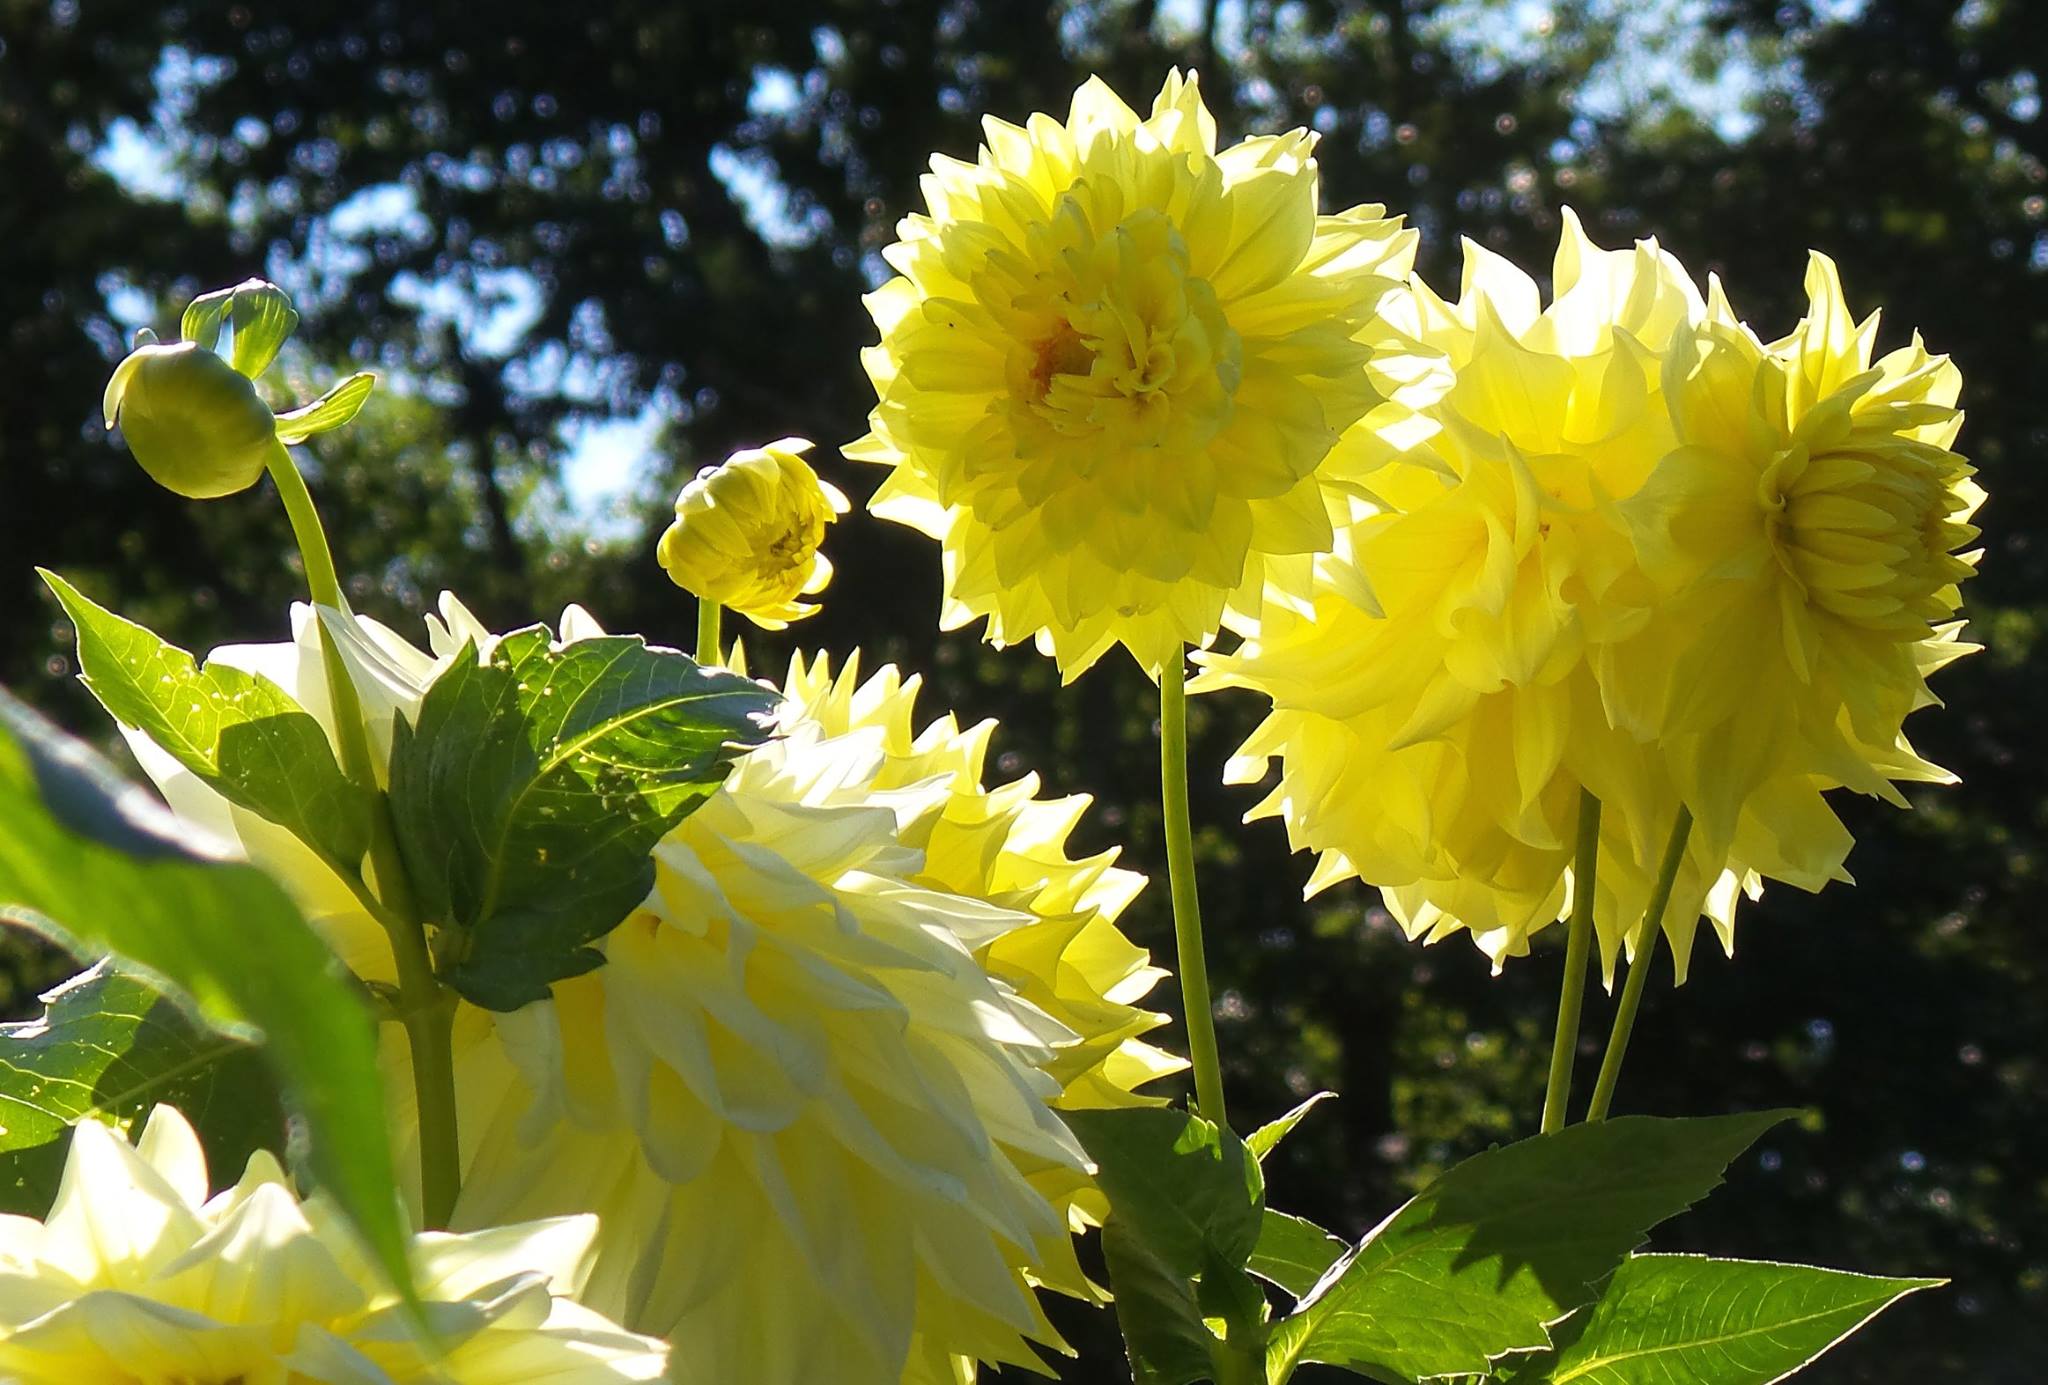
Dahlias. Photo by C. Eves-Thomas. Plant dahlia tubers and canna rhizomes when the soil warms and the danger of frost has passed, likely the very end of May or early June for most of Maine. They may also be started in pots indoors, but be sure to not transplant potted plants outdoors too soon.
- Talk with your local food cupboard, shelter, or free meal site to find out what crops you can grow to support the people they serve. Small-scale gardeners can make a big difference. It’s important to start these conversations now in order to determine the most needed crops and donation logistics (i.e., where/when/how to deliver the produce).
- Select disease resistant crops. One of the very first steps in managing disease is to start with disease-resistant varieties. Cornell offers an extensive list of resistant cultivars for a variety of crops.
Conway Homestead Garden in Camden: A Dream Come True
By Gabrielle Wicklow, Master Gardener Volunteer, Knox-Lincoln
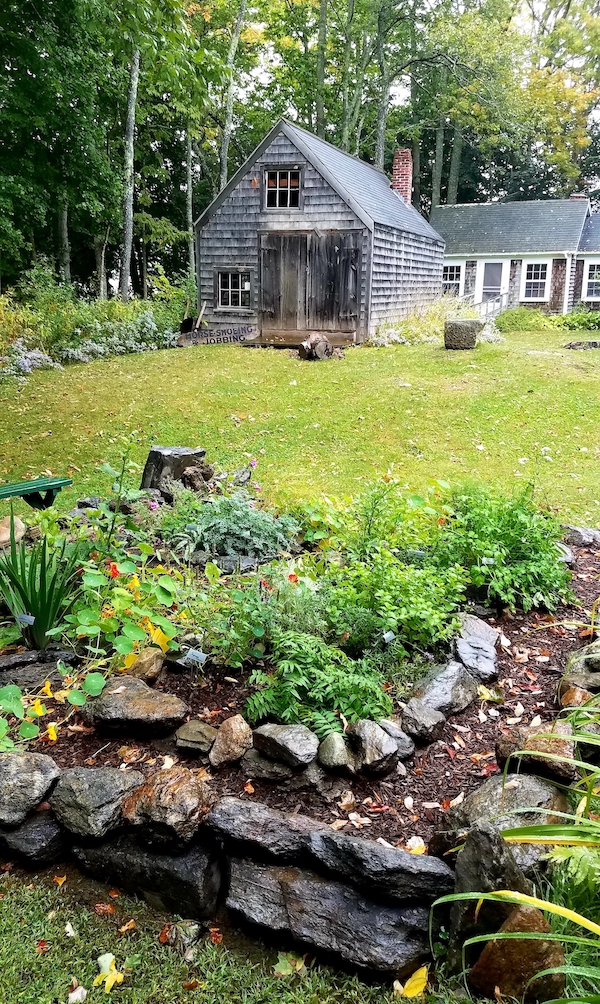
I love to make a garden. So when the opportunity arose to create a historical herb garden at the famous Conway Homestead in Camden, Maine, I jumped at the chance. It has been a labor of love. From choosing the site, to planting herbs and laying of the stone borders, it’s been an exciting, satisfying and, in some ways, a blessed experience.
Let me explain. I frequently begin my gardening projects in quiet prayer. I feel a sacredness when I have my hands in the earth because planting a garden is a blessing. As a result, I went into this project with a positive and confident attitude.
All that changed when I saw two big pallets of stone.
The gentleman who delivered the stone was a giant of a man with arms like tree trunks. I asked myself “How am I going to move this stone?” and told myself not to panic when the man asked who was going to lay the stone and laughed out loud when I softly answered “me.” When the wire was cut to the pile to release the stone, the first to tumble out was a beautiful heart. I immediately knew all would be well and clambered on top of the pallets, tossing the stones to the ground. After placing and re-placing them carefully for 10 hours, I saved the heart stone for last. It is now in full view at the right corner of the garden along with the two largest boulders in the pallets. That corner will always be a reminder to me that this little garden was “Heavenly” inspired.
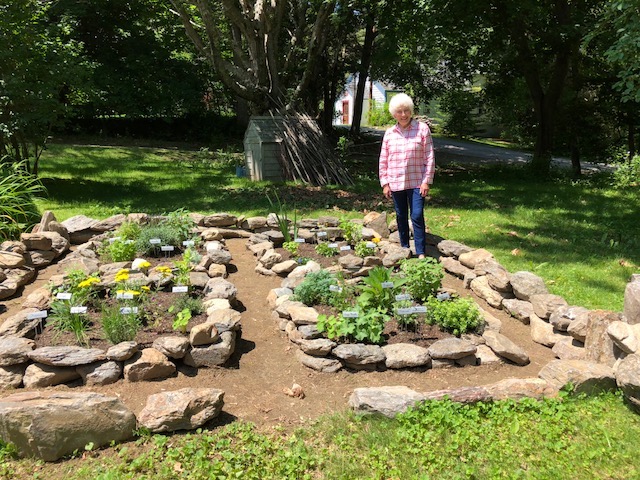
Several people must be given recognition for their support and donations of materials. First, Elizabeth Moran and the Camden Historical Society, for all their support in this endeavor. To Wendy and Bruce Reinemann, owners of Guini Ridge Farm and Garden Center in Rockport for the wonderful selection of plants, to Hammon Buck from Plants-Unlimited for his marigolds, and to Josh Carle the owner of Rockport Granite for his extremely generous donation of stone which line the borders of this garden. Many volunteers wish to help with the maintenance of this garden. I call them “Friends of the Herb Garden.” I’ll continue to look after the garden myself, but be assured you will see many different faces, watering and weeding.
I thank the Board Members for your continued support, and close with a wish list of a water barrel and wood chips for the paths.
With gratitude,
Gaby
What Is It?
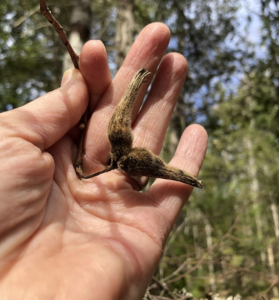

Answer: Corylus cornuta (beaked hazelnut). For more fun plant ID challenges, follow Rogers Farm Demonstration Garden on Facebook or Instagram.
A review of The Moth Snowstorm by Michael McCarthy (2015)

Reviewer: Lavon Bartel, Hancock County Master Gardener Volunteer
Without a doubt, the Hancock/Washington County Master Gardener Book Club members enjoy camaraderie and diversity of thought among our participants. The collegial selection of books results in titles we would never pick for ourselves. Since the Book Club began in the early 2000s, those in attendance welcome the discussions and opportunity to learn from one another’s insights and experiences.
Our February read, The Moth Snowstorm: Nature and Joy, by Michael McCarthy, 2015, was very well received. Many of us shared the author’s experience of “snowstorms” of plentiful insects on the headlights and windshields of cars in the 1960s. This vision, woven in with his other tales of biological reductions, provided sobering reminders of man’s actions resulting in species loss and compromised ecosystems.
McCarthy provides a review of ecology based upon statistics and individual observations. The book covers a diversity of ecological topics (population dynamics, historical development, evolutionary biology) developing a comprehensive appreciative insight in the reader. My personal favorite paragraph (pg 58) describes the deeply imbedded respect we have for nature. While in human history we more recently embraced agrarian values, at our core is the older hunter-gatherer instinct. During this time, we did not seek to subdue the natural world but “lived as an integral part of it.” The loss of “moth (and other insect) snowstorms” created memories of the extremes of nature we once experienced, but have been lost in our lifetimes. Much of the author’s insight seeks balance and diversity; respecting science while still acknowledging the part emotion plays in our perceptions and actions. After setting the stage with intellect and history he delves more deeply into his life and how it has evolved into a respect for the value of the natural world in creating deep joy for each of us who takes time to observe.
The flow of the book club discussion enriched my views. Focusing on destruction made it hard for some of us to fully experience the “joy” the author included until others shared their thoughts. Hearing of others’ joyful experiences in nature (having a baby hare play underfoot on a Maine trail for one member and another seeing alewives en masse as a boy) provoked more wonderful memories of natural experiences and joy. Their recollections, in an instant, generated my memory of the sights and sounds of thousands of spawning sockeye salmon in a stream flowing off Mt. Baker in Washington State.
As we read and discuss, we find joy in relationships, memories, and one another. Life doesn’t get much better than this; through this club and the diverse books and discussions we continue to experience the community spirit and education of the Master Gardener program. Membership is open.
Ask the Expert!
Q: We’re thinking of making three 4’x12′ foot beds, 3′ tall. What type of wood would you suggest we make the boxes out of? We do want to keep the cost down as much as possible and I keep getting mixed opinions when I Google or YouTube videos. Some people are saying pressure-treated wood is now safe for gardening. Do you know if it is? If it is, it’s cheaper than cedar and would last a long time.
A: It’s tough to say for certain whether the pressure treated wood is 100% safe at this point. I, too, have heard rumors that the chemicals that were a concern in the past are no longer being used, but it’s tough to say for certain. Instead, I typically recommend hemlock as a less expensive alternative to cedar. It’s longer lasting than other natural lumber options. The thicker the board, the better. I typically use rough-sawn 2″ boards.
Q: Should we line the raised bed boxes? If so, what material do you recommend?
A: I like to use something that is thick, but biodegradable. Cardboard works well. I don’t know about you, but we suddenly have a huge number of paper bags from the grocery store because we cannot use our cloth bags right now. I just used those instead of cardboard to line an area that I’m using for a straw bale garden. It’s nice to use what you have on hand already!
Q: It seems as though people who have tall beds (which is what we want) don’t actually fill them completely with soil. How much soil (depth) is needed for fruits and veggies (tomatoes, cucumber, carrots, summer/winter squash)? We’re thinking of filling the bottom with branches and sticks since we have lots of it.
A: I’ve had great success with growing in raised beds only 6″ deep. Deeper beds do offer more room for root growth and a larger “sponge” to hold water resources (especially helpful in the summer months). There are many options for filling the deeper parts of the bed, but I especially like your idea of using coarse woody debris. We certainly have a lot of that after the recent spring storms. Be sure to use a mix of loam (50%-75%) and finished compost (50%-25%) for the top 6-8″ of the bed.
Q: Do you have any other suggestions or advice that might be useful for first time garden bed people?
A: For vegetable crops, you’ll want to be sure to site your bed in a location with at least 8 hours of sunlight and reasonable access to water. A great bulletin that covers a lot of other topics to consider is Gardening in Small Spaces.
For more great questions followed by answers from UMaine Extension staff visit, Got questions about gardening in Maine?
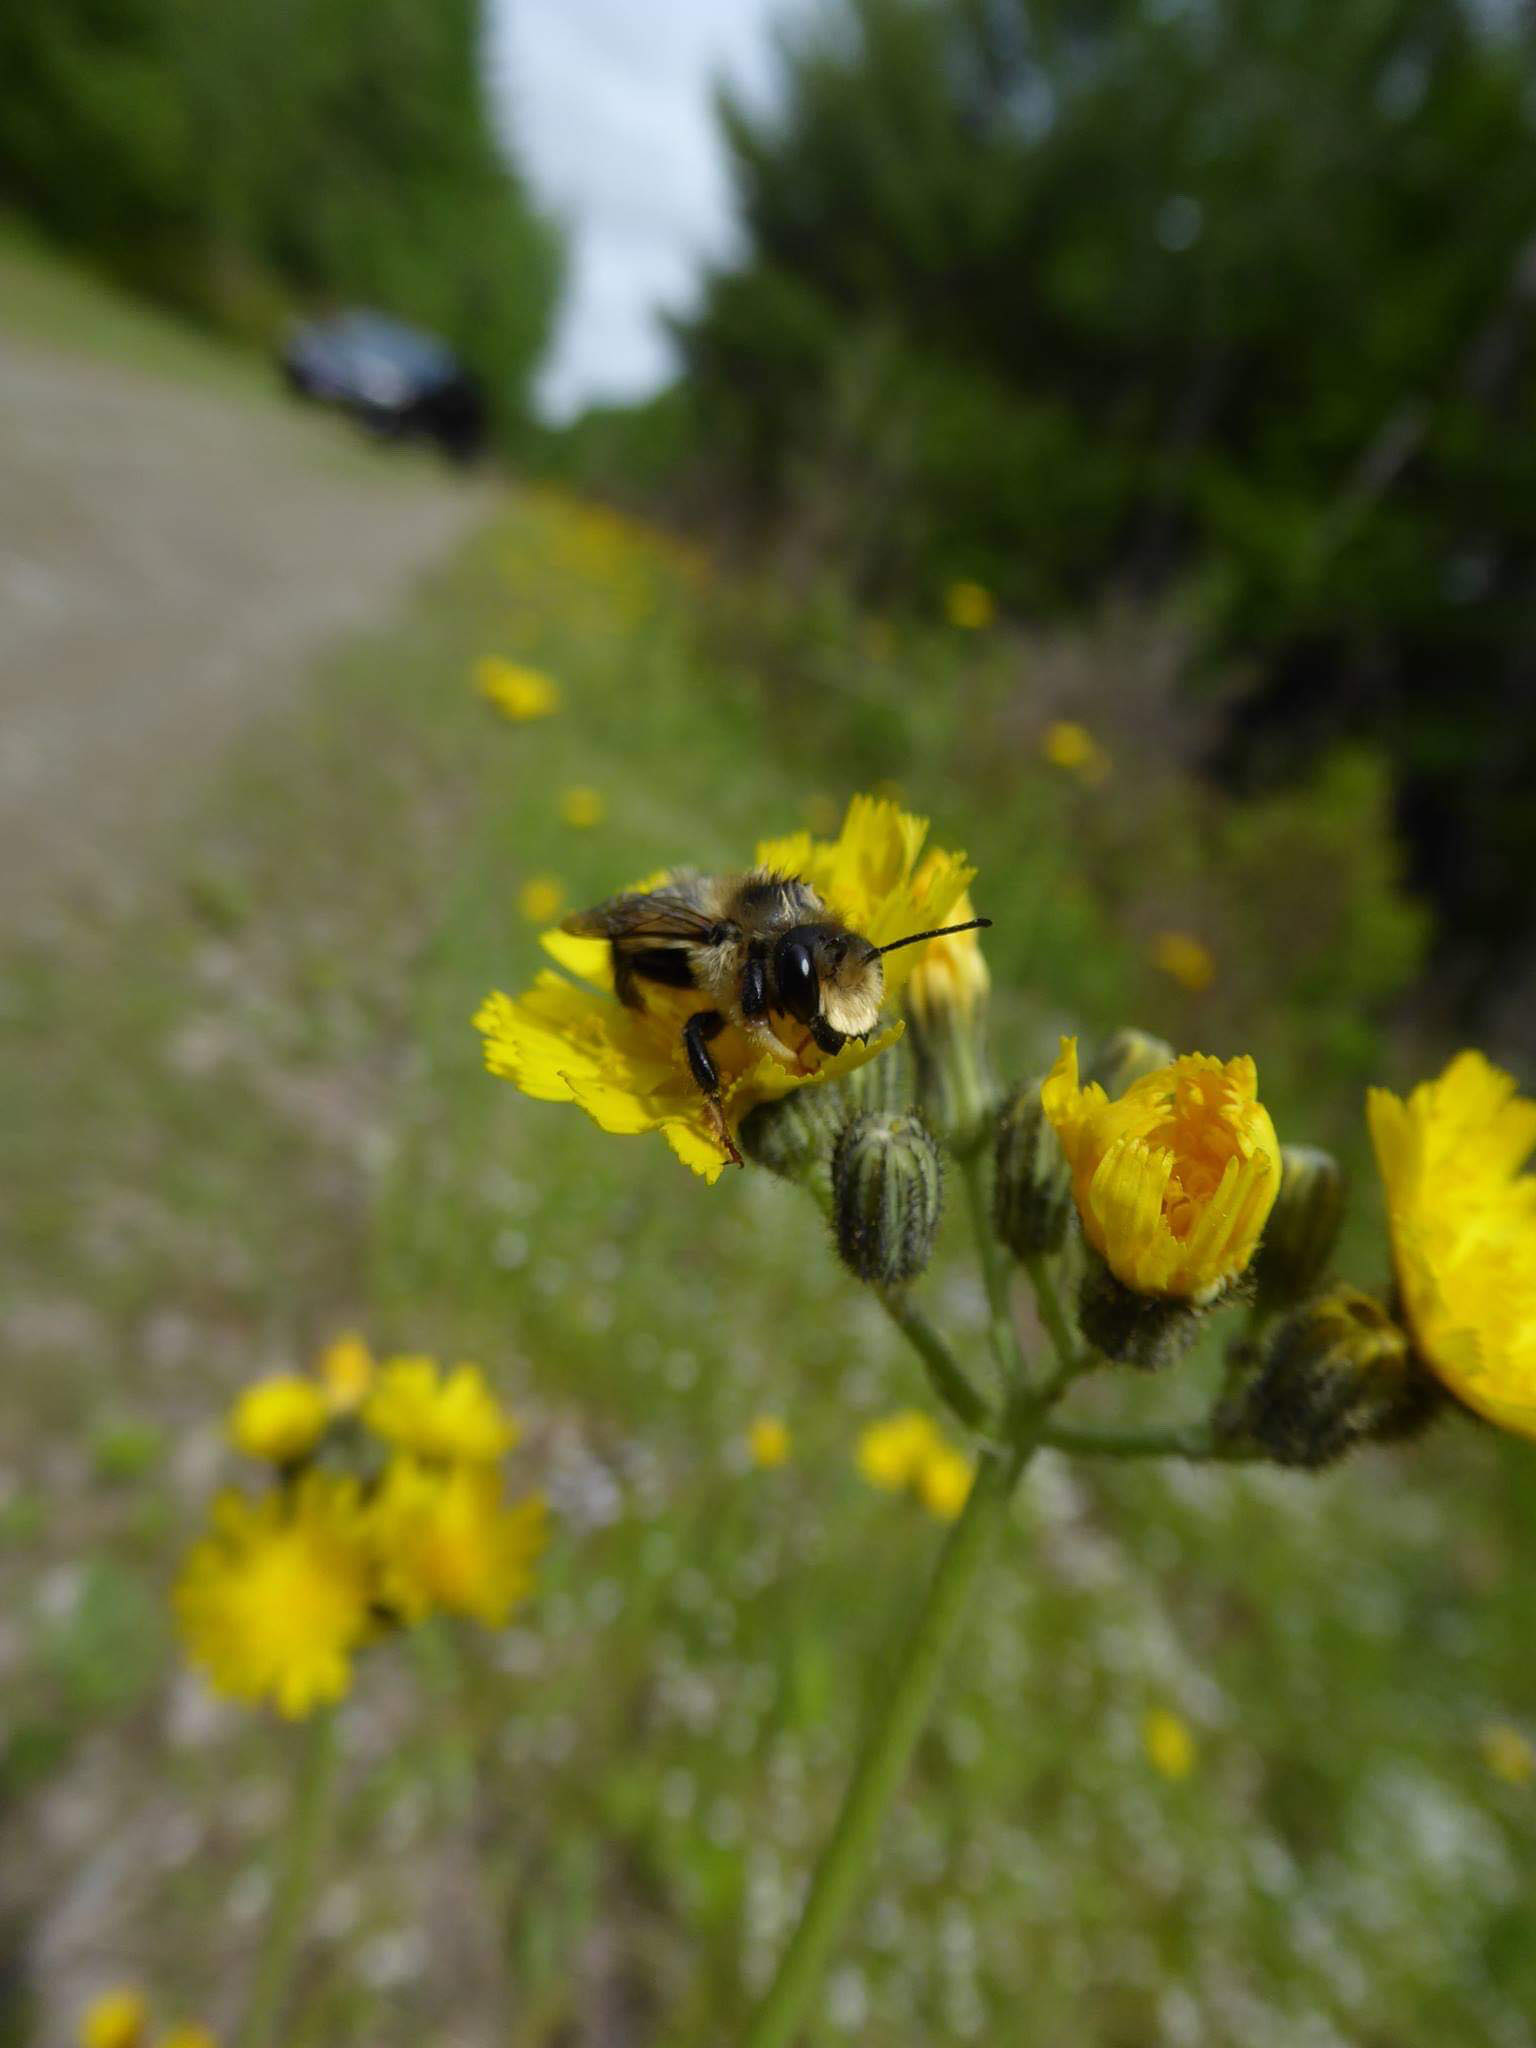
Bees of Maine: Family Megachilidae
By Jennifer Lund, Maine State Apiarist, Department of Agriculture, Conservation and Forestry, Division of Animal and Plant Health, jennifer.lund@maine.gov
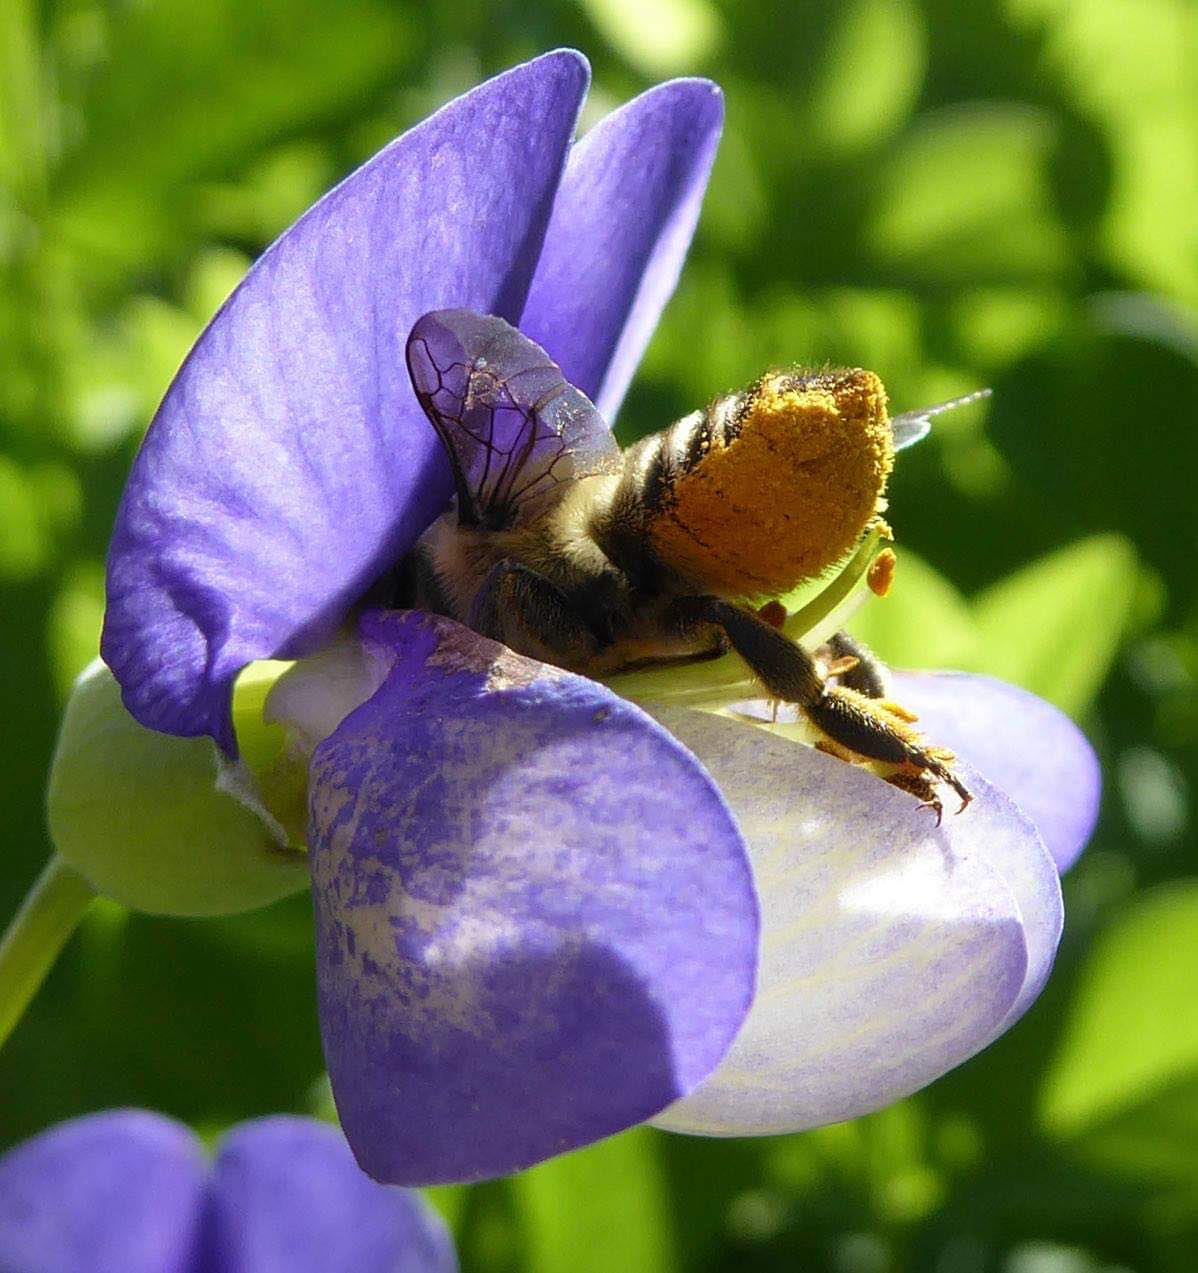
Nearly 4,000 bee species have been identified in the United States. In Maine, there are more than 270 species of bees, representing six families. This is the second of a series of articles where we explore the types of bees found in Maine and learn about their biology, foraging preferences, and nesting requirements.
Family Megachilidae (Leafcutter and Mason Bees)
Most Megachilids are solitary, where each female constructs and provisions her own nest. Their nests are typically divided into cells and each cell is provisioned with food (pollen and nectar) and an egg. Adult females are moderately sized and have rows of hairs under their abdomens called scopa that are used to collect pollen. In Maine, there are approximately 49 species, representing 8 genera. Of these, Osmia spp. and Megachile spp. are the most common.
Not all Megachilids found in Maine are native to the United States. The European wool carder bee (Anthidium manicatum, EWCB) is originally from Europe, Asia, and Northern Africa. It was first discovered in New York State in the early 1960s and is now found throughout the US and Canada. The EWCB is large (0.43–0.67inches long), black with yellow spots, and has dusky wings. They are known as “carder” bees because they scrape hair from leaves such as lamb’s ears and use it to line their nests. Male EWCB are territorial and can cause problems for Maine’s native bees by aggressively chasing other pollinators from their territories, monopolizing foraging resources, and sometimes lethally injuring other pollinators.
Osmia spp. (mason bees) are 0.2 to 0.8 inches long and often metallic blue, or blue-black. They have round, broad heads and abdomens. Osmia are early spring generalist foragers, making them important fruit tree pollinators in many areas. They nest in pre-existing cavities (hollow plant stems, abandoned beetle tunnels, gaps in bark, artificial nesting blocks, etc.) and use mud or chewed plant tissue as dividers between cells. Osmia are very docile and rarely sting when handled. In other parts of the United States, several species of Osmia are commercially grown to provide pollination for fruit and nut production. To gather the Osmia, artificial nesting sites are placed in areas where Osmia populations are high. Once the tubes are filled with Osmia pupa, they can be transported as intact nests (tubes, blocks, etc.), or as loose cocoons to orchards in need of pollination.
Megachile spp. (leafcutter bees) are 0.4 – 0.8 inches long, gray to brown in coloration, and often have abdominal stripes. They have stout bodies with flattened abdomen, are moderately hairy and have large mandibles. Leafcutter bees use cut leaves and flower petals to wrap brood in. Wrapping their brood in leaves protects larva from predators/pathogens and prevents the desiccation of the larva’s food supply. Some species nest in pre-existing cavities (hollow plant stems, abandoned beetle tunnels, gaps in bark, artificial nesting blocks, etc.), while others nest in burrows in the ground.
Did You Know?
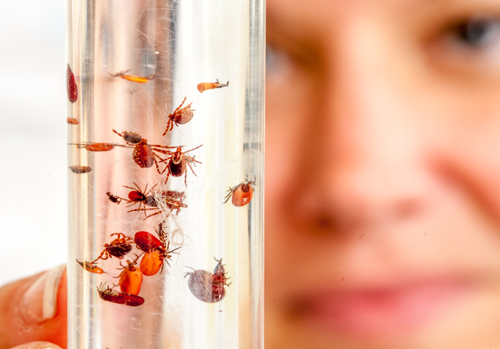
You can submit a tick specimen to the University of Maine Cooperative Extension Tick Lab for identification or disease testing. Learn more about the tick species found in Maine and explore the ways you can prevent tick bites.
Advice for the Transplanted Gardener
By Carla Suel, Penobscot County Master Gardener Volunteer
Before moving to Maine two years ago, I spent 20 years as an Army wife. I’ve gardened in a lot of different environments: from foothills in southern Germany to the desert of El Paso, Texas. I’ve learned a lot along the way. Here are some tips for gardening in a new environment.
Take time to assess your space
Wait a year before making radical changes to your yard. This can save you a lot of time, effort, and money in the long run. You will want to jump right in and it’s hard to keep from gardening if it is your passion, but it’s worth it to take the time to assess what you have and to develop a plan before implementing it.
Start a garden journal
While you are taking the time to evaluate your garden space, keep a journal. Take notes about hours of direct sun, rainfall, and soil drainage. Once you start your garden, maintain your journal and keep it up to date with your experiences.
Develop a short and long-term plan
Don’t try to do everything at once. Make a multi-year plan to implement changes to your landscape. This is the most successful approach for the long-term and will also give you the chance to do new things each year to improve your space.
Research, research, research
Start by looking at what your neighbors grow. Ask them about the successes and difficulties they’ve had and find out their favorite places to get supplies and plants. Make a list of plants, flowers, fruits or vegetables you are interested in planting. Check with the University of Maine Cooperative Extension for expert advice on plant varieties, local resources, soil prep, and pest management.
Have your soil tested
A soil test is one of the best tools a gardener can use to assist in developing a successful garden. The results of a soil test will tell you what changes, if any, should be made to support what you want to plant.
Be flexible
You may not be able to plant the exact same things you had in previous locations, but there may be alternatives suitable for your new site, such as faster developing varieties with fewer days to maturity. Be prepared to suffer some disappointment, especially if you moved from a vastly different environment. Perennials where you lived before may be annuals here in Maine. Decide if buying those plants yearly is worth it to you. Look at native plants that may be new to you, but will be hardy for years to come.
Enjoy the process
See your new garden as an adventure! Don’t expect everything to be perfect with your first attempt. Celebrate your successes and see your difficulties as an opportunity to try something else next year. Once you become more confident in your abilities, branch out into different types of plants and take some risks. Some of those experiments may pay off and give you a more versatile landscape.
Become a Master Gardener Volunteer
You don’t have to be an expert to be a Master Gardener Volunteer. All you need is a desire to learn and a desire to use your knowledge to help others. Master Gardener trainees receive current, research-based training from UMaine Extension educators and industry experts. Once training is completed, Master Gardener Volunteers donate their time in their community in support of a variety of projects.
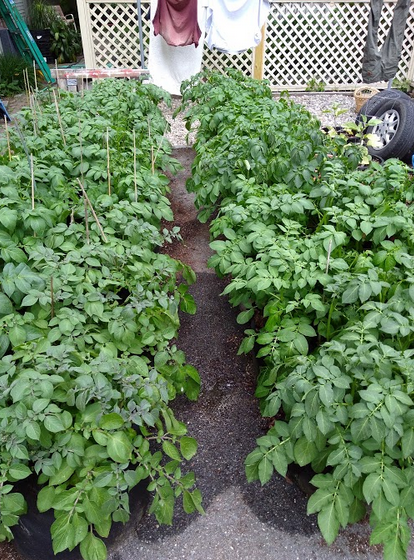
Growing Potatoes in Grow Bags
By Tom Witwicki, Cumberland County Master Gardener Volunteer
My wife, Nancy, and I had tried a number of times to grow potatoes in our backyard garden in Cape Elizabeth with disappointing results. The potatoes always seemed to be scabby and the yield was disappointing. We thought that our soil might not be suited to growing potatoes or contain soil-borne pathogens. So, over the past three seasons, we have been using a technique that allows us to grow potatoes without the use of soil and also have more control over the growing conditions. We plant our seed potatoes in “grow bags” and locate them in a sunny spot directly on a paved former basketball court in our backyard. The results with this technique have been encouraging; the potatoes look good and we’ve had enough to last us well into the winter. In the spirit of passing along our knowledge, I’d like to describe what we’ve learned from our experimentation so you might also think about giving grow bags a try. Because they can be located anywhere, even folks with shade challenged yards can find some sunny location, perhaps even the driveway. Note that many other vegetables can be successfully grown in grow bags — we’ve also used them with tomatoes, eggplants, peppers, and sweet potatoes — but this article will be focused on growing potatoes.

What’s a grow bag?
Almost any larger container with good drainage will work to grow potatoes, but grow bags have the property of admitting air through the material. This has the effect of “air pruning” the roots so they don’t circle the inside of the container, which they would do if it were an impermeable surface. This makes for a healthier plant. A grow bag can be made of many materials: felt, woven plastic or landscape fabric, as long as it is permeable to water and air. These can be readily found for purchase or constructed on your own with a sewing machine and a little creativity. We have mostly used grow bags made of a felt material in a 15-gallon size, although the 10-gallon size is often also recommended. There are also grow bags made with an access flap expressly for potatoes so new potatoes can be harvested from the side without disturbing the other potatoes growing in the bag. We have not yet tried this type and they are more expensive.
Preparing the growing medium
Potatoes are a member of the nightshade family and prefer a light, well-drained medium. Avoid using garden soil in grow bags (or any containers); soil compacts too much. A commercial potting mix will work, but is expensive. To make your own medium, there are many formulas to choose from, but the one we’re currently using for both tomatoes and potatoes consists of two parts compost to one part peat moss. This provides the right balance of good drainage and water retention. We’re also going to try supplementing the medium this year with an organic fertilizer to try to increase the yield. We’ve been able to use the same potato medium for two years before replacing with a fresh mix.
A word about pH
The benefit of creating your own soil medium is to have control over the growing conditions including pH. Potatoes prefer slightly acid soils (pH 5.3-6) and, if grown in soil with a higher pH, will be more susceptible to scab. For more information about pH and scab resistant varieties, check out the UMaine Extension bulletin Growing Potatoes in the Home Garden.

Potato varieties
Growing your own potatoes gives you the option of trying varieties that you might not be able to find in the local store or farmers’ market. We like to grow a mixture of potatoes that mature at different times during the season. For an early potato, we like ‘Satina.’ ‘Magic Molly’ is a good choice for a fingerling with a deep purple skin and flesh. ‘Gold Rush Russet’ and ‘Kennebec’ are our mid-season selections. ‘Green Mountain’ is a great late season potato that has a great yield. We source our seed potatoes from Fedco, which has the option of purchasing them in smaller 2 lb. amounts.
It is very important that you use seed potatoes certified to be disease-free. Using leftover potatoes from the store or your cellar can introduce the late blight pathogen into your garden, which will quickly ruin your entire crop (think Irish Potato Famine). This blight also affects tomatoes and is transmitted through the air.
Seed preparation and planting
Seed potatoes smaller than two inches can be planted as is. Larger ones can be cut into pieces about the size of a lime and should have at least one eye. By the way, these cut pieces of seed potato are called “chits” if you ever need a good Scrabble word. We cut our potatoes about two weeks before planting and put in an empty tray with no drainage holes in a cool location with some indirect light. The cut surfaces will heal and the light will encourage potatoes to sprout.
Select a spot that gets sun most of the day and that has good air circulation. They can be placed on any surface that doesn’t pool water. We stack our bags next to each other in double rows. Plant in the grow bags when danger of frost has passed. Fold down the top edge of the bag to form a 4″ cuff. Fill the bag with the moistened medium until it’s about 4″ deep. Place the seed potatoes on the soil surface, spaced evenly. Cover with another 3″ of soil.
Once the plants have grown to about 6″, it’s time to add more soil. It’s okay if some of the foliage gets buried. Unfold the edge of the bag and add about 4″ of the soil mixture around the growing tips so the tips just show through. Water thoroughly. Allow the plants to grow, adding soil after they’ve grown another 6″. Two “hillings” like this will probably fill the bag although the process can be repeated until the bag is full. This technique encourages the plants to make lots of potatoes, which form along the buried portions of the stem. You may find that some potatoes have developed near the surface of the medium. If that happens, cover them with more medium. Otherwise, those potatoes will turn green and become poisonous to eat.
Watering
Perhaps the most difficult thing about using grow bags is watering. The medium should be kept moist but not over watered. During the growing season the amount of water needed changes depending on the amount of foliage on the plants and the amount of rain that has fallen recently. I check on the need for water by sticking my full hand into the surface of the bag. If dry at this depth, they will need water. In the height of summer, watering will be required every day. It is very convenient to use a drip irrigation system on a timer for watering and this also keeps the foliage dry, which reduces disease pressure. If watering by hand, be sure to avoid wetting the leaves; apply the water directly to the soil without creating a splashing effect. Last year I filled a large watering can from a rain barrel close at hand and watered without the rose on the spout. Towards the end of the growing season when the vines start to shrivel, the plants will not need much watering at all.
Plant pests and diseases
Colorado potato beetles are the most common pest. Inspect your plants regularly, looking under the leaves for the clusters of yellow eggs. If you see them, rub them off with your finger. Adult beetles are easy to identify and control; just pick them off with your hands and toss them into a bucket of soapy water. The beetles might bother your plants for a few weeks; just keep monitoring and hand-picking and your plants will be fine.
We have experienced some problems with premature withering of the vines in the late summer due to what we believe is early blight. Potato plants (and tomatoes) are susceptible to this fungus as the plants mature. In that situation, it’s especially important to sanitize containers and replace media before planting another crop.
Harvesting
Compared with digging potatoes out of the ground, harvesting is a very easy process with grow bags. Before a hard frost and after the vines have turned brown, empty the plants, soil, and all into a wheelbarrow. Dig through the growing medium with your hands and pull out the potatoes; they will be very clean. Handle them like eggs since the skin will bruise easily at this stage. You can expect to harvest about 5-7 lbs of potatoes per bag, although you could get as much as 13 lbs in a good year. Shake out the empty bag and store under cover in a dry location for next year. If stored outside without protection or filled with growing medium, longevity of felt bags will be greatly reduced. Ours have lasted three seasons without deterioration.
Storing potatoes
Ideal storage conditions for potatoes is 38℉ and 95% humidity. Since we don’t have a suitable root cellar, we keep our potatoes in a second refrigerator located in the garage. This refrigerator also serves us very well to store cabbage, sweet onions, radicchio, celeriac, turnips, and beets.
I hope this article has piqued your interest in using grow bags for potatoes or other crops. They are well-suited to urban or suburban gardening and are one more useful tool in the home gardener toolkit.
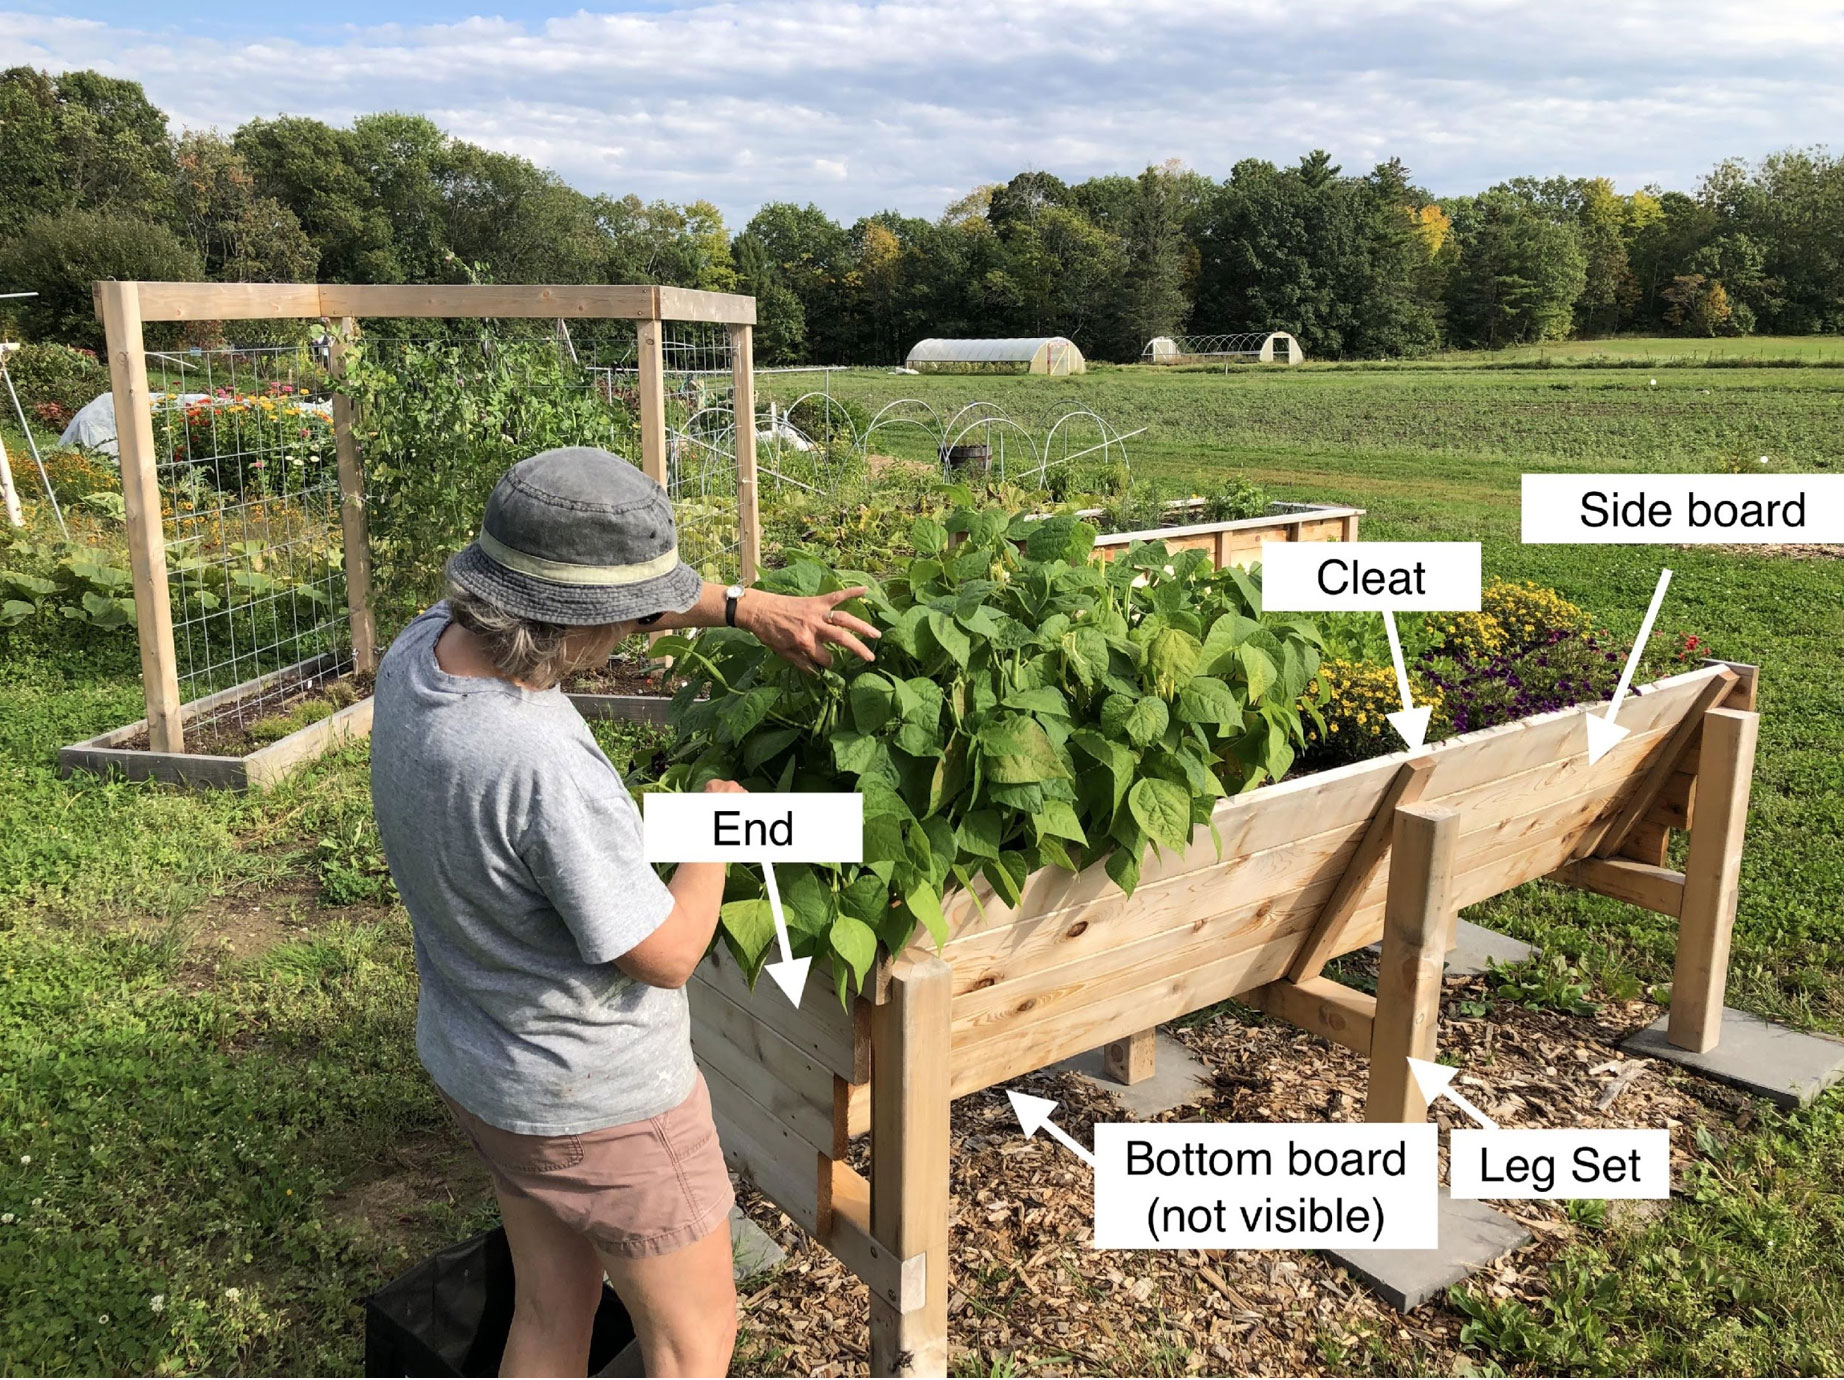
Building an Accessible V-Bed Garden
By Richard J. Brzozowski, Food System Program Administrator University of Maine Cooperative Extension; reviewed by Kate Garland, Horticulturist University of Maine Cooperative Extension
An accessible garden is designed for individuals in wheelchairs or others who may have limited ability to kneel, squat, bend or work at the ground level. Once constructed, the bed should be placed on a site that is fairly level and conveniently accessible. The garden may be lowered by cutting the legs to a suitable length or heightened by placing bricks or blocks under each leg.
Cedar is suggested for the wood to construct this garden bed, as cedar is naturally self-preserving. The life of this accessible garden bed is estimated to be about 10 years. The life of the garden could be extended by placing a concrete paver, brick or a slate piece under each leg.
The cost of the materials for this garden is estimated to be about $200.
Materials
- 12 pieces: 5/4 cedar decking 5 ½” x 8’
- 3 pieces: cedar posts 8’ x 4” x 4”
- Exterior-grade fasteners
- 21 (count) GRK 3” screws (or lag screws)
- 80 (count) 1 ¾” screws (or lag screws)
- 12 (count) 4” screws
Tools needed
- Portable circular saw, chop saw or crosscut handsaw
- Table saw
- Power screwdriver and a bit (or screwdriver)
- Power drill with the appropriate size drill bit and screwdriver bit
- Hammer
- Chisel
- Carpenter square
- Measuring tape
- Safety glasses
Construction Steps
Leg set construction
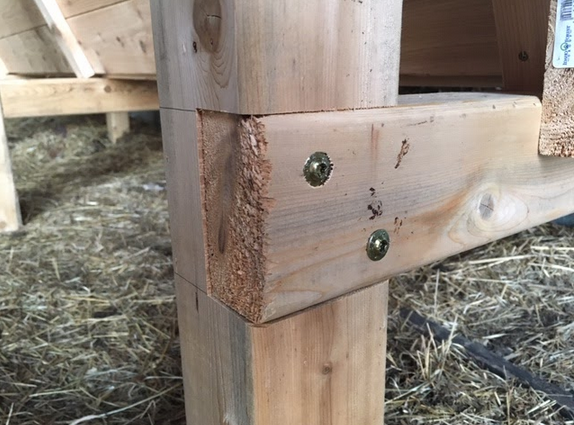
- Cut each of the three 8’ x 4” x 4” posts in 3 equal pieces. This will give you 9 pieces about 32” in length. Select 3 pieces for each leg assembly set.
- For each set of 3 post pieces, measure to cut a dado joint (PDF) on two of the pieces at the 14” mark (these will be the vertical part of your leg sets). The third piece will have lap joints (PDF) cut on each end. The three pieces should fit together to form an “H.” Use the saw, chisel, and hammer to make the joints for a tight fit.
- Fasten the leg sets together using two GRK 3” screws (or lag screws) at each joint. A pilot hole for each screw will reduce the chance of splitting wood when screwing.
Create 6 cleats
- Rip one of the 8’ decking pieces in half lengthwise. Cut these narrow pieces to 22” in length. These 6 pieces will be the cleats for the sideboards of your garden bed (3 on each side of the V-bed).
Fastening of bottom board
- Make sure that nine pieces of the 5/4” decking are 8’ in length
- On a flat floor surface, place the assembled legs evenly apart. The two outer leg sets should be 8’ apart. The middle leg set should be set halfway between the two outer leg sets. With a pencil, mark the center of the horizontal piece on each leg set. Lay one 8’ decking across the leg sets. Make sure each leg set is square to the bottom board. Fasten the bottom board to each leg set using two or three 3” exterior screws or lag screws.
Sideboard assembly
- Lay out 4 pieces of the decking on a flat surface, making sure all ends are flush with each other. With appropriate fasteners (no longer than 2” in length) assemble 4 sideboards of the garden using three pieces 2 ¾” x 22” cleats. One cleat on each end of the assembly and one cleat in the middle. Repeat this for what is to be the other side of the V-bed
- With the cleats on the outside, place each sideboard onto the leg sets forming a “V”. Check again to make sure that the legs are square. Drill pilot holes at the top and base of the sideboard and through cleats at each of the three leg sets (both sides). See red lines indicating pilot hole location in photo. Fasten the sideboards to each leg set using 4” exterior screws (or lag screws) at each pilot hole drilled (at the top and base of the sideboard).
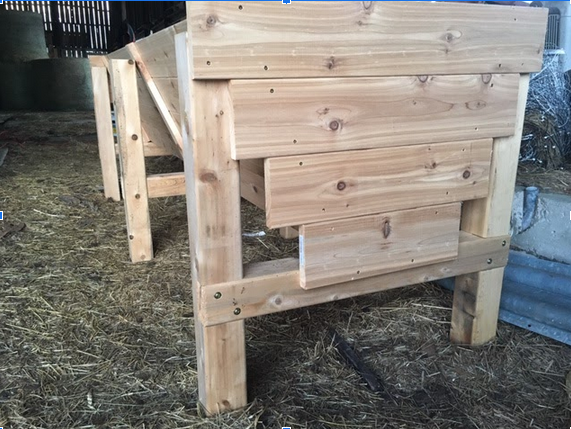
Assembling ends
- Cut each of the remaining two pieces of decking into four pieces: 32”, 26.25”, 21.25”, and 16.5”. Fasten each piece horizontally to the leg sets at each end to enclose the bed.
Filing the garden bed
- Once the garden is located at the selected site (level, receiving full sun, and close to a water source), fill the garden with a mixture of topsoil and compost (50/50).
Learning Opportunities for Maine Gardeners
The UMaine Cooperative Extension team is offering a number of distance learning opportunities for all Maine Gardeners:
- Garden Chats: Growing Resilience From the Ground Up*: live zoom presentations and facilitated discussions three times a week
- Victory Garden for ME series: videos for first time vegetable gardeners
- Growing Maine Gardeners: weekly family-friendly instructional videos
- Garden Mentorship Program: direct technical assistance and encouragement via phone or email throughout the season from trained Master Gardener Volunteers
We continue to also offer this Maine Home Garden Newsletter, Rogers Farm Demonstration Garden Facebook page, and countless bulletins and videos on our website, Garden & Yard. Keep visiting our website or follow our social media pages to learn about new learning opportunities as they become available.
*Those with limited internet access can call the following numbers at the select times to participate.
Garden Chats (Mon 9-10am, Wed 12-1pm and Thurs 6-7pm), call +1 312 626 6799 or +1 646 876 9923. Meeting ID: 786-090-734
Office hours (Mon 10-11 and 1-2, Tues 9-10 and 3-4, Wed 9-10 and 1-2, Thurs 10-11 and 1-2, Fri 10-11 and 1-2 ), call +1 312 626 6799 or +1 646 876 9923 Meeting ID: 965 8976 1572
“Tick Tock”: Lyme Disease Awareness Month
From the Maine Department of Health and Human Services and Maine Center for Disease Control and Prevention
With warmer weather on its way, Lyme Disease Awareness Month is here again! Health care providers reported a record number of Lyme disease cases in 2019 (2,079 cases as of January 15, 2020). The 2020 Lyme Disease Awareness Month theme this May is “Tick Tock.” This reminds us to slow down and practice great tick prevention when spending time outdoors.
Learn more about tickborne disease prevention by downloading the full public announcement and resources list (PDF).
Do you appreciate the work we are doing?
Consider making a contribution to the Maine Master Gardener Development Fund. Your dollars will support and expand Master Gardener Volunteer community outreach across Maine.
Your feedback is important to us!
We appreciate your feedback and ideas for future Maine Home Garden News topics. We look forward to sharing new information and inspiration in 2020.
Subscribe to Maine Home Garden News
Let us know if you would like to be notified when new issues are posted. To receive e-mail notifications, click on the Subscribe button below.
University of Maine Cooperative Extension’s Maine Home Garden News is designed to equip home gardeners with practical, timely information.
For more information or questions, contact Kate Garland at katherine.garland@maine.edu or 1.800.287.1485 (in Maine).
Visit our Archives to see past issues.
Maine Home Garden News was created in response to a continued increase in requests for information on gardening and includes timely and seasonal tips, as well as research-based articles on all aspects of gardening. Articles are written by UMaine Extension specialists, educators, and horticulture professionals, as well as Master Gardener Volunteers from around Maine, with Katherine Garland, UMaine Extension Horticulturalist in Penobscot County, serving as editor. Special thanks to our 2020 Master Gardener Volunteer co-editors Naomi Jacobs and Abby Zelz.
Information in this publication is provided purely for educational purposes. No responsibility is assumed for any problems associated with the use of products or services mentioned. No endorsement of products or companies is intended, nor is criticism of unnamed products or companies implied.
© 2020
Call 800.287.0274 (in Maine), or 207.581.3188, for information on publications and program offerings from University of Maine Cooperative Extension, or visit extension.umaine.edu.
The University of Maine is an EEO/AA employer, and does not discriminate on the grounds of race, color, religion, sex, sexual orientation, transgender status, gender expression, national origin, citizenship status, age, disability, genetic information or veteran’s status in employment, education, and all other programs and activities. The following person has been designated to handle inquiries regarding non-discrimination policies: Director of Equal Opportunity, 101 North Stevens Hall, University of Maine, Orono, ME 04469-5754, 207.581.1226, TTY 711 (Maine Relay System).