By Will Larson, Cumberland County Master Gardener Volunteer
Weed your garden. There are many ways to go about weeding in the garden, but persistence often is the common denominator when it comes to keeping your beds clear. Being mindful of weed growth early on in the season helps keep plants from becoming overrun by undesirable visitors, and June is an especially important time for young or transplanted plants to establish healthy roots and shoots. Here are a few suggestions for how to stay on top of weeding this month:
Use a hoe. Hoes are a valuable asset to any gardener’s toolkit, and there are a variety of different head shapes and sizes to suit your particular weeding style. Some hoes are designed to be used on the push stroke, while others need to be pulled towards the body, and scuffle hoes are used by moving the head back and forth in both directions. For most hoes, weeding can be done early and often, when perennial and annual weeds are still small and poorly rooted. Using a long-handled hoe is often the best weeding method for your body too, as your back and knees are not bent for long periods of time.
Hand weed selectively. While hand-weeding is more often time-consuming and required for pulling out larger weeds, it also provides a good opportunity to get closer to the plants you are removing; you might find that there are unexpected visitors in your garden that are worth keeping around. There are many native herbaceous perennials that form good groundcovers and help fill in low gaps in the garden; viola species, such as Viola cucullata or V. blanda, or the common strawberry Fragaria virginiana, are worth leaving alone for this purpose. These early-blooming plants are often important sources of sustenance for bees and other pollinators waking up from the long winter. Learning to recognize these plants will also make for quicker weeding in the long run, as you will often find it is more beneficial to simply move along rather than tear out a patch of violets.
Green-mulch with your weeds. For those plants that you do end up removing from the garden, use bypass pruners to chop up the leafy green plant material into smaller pieces and spread them across the soil surface between and behind plantings, creating a green mulch. This practice recycles the plant material from unwanted weeds back into the garden, helping retain moisture and returning organic matter back into the soil while suppressing the germination and growth of weed seeds. Avoid mulching with weeds that have gone to seed or are aggressive rooters; these are better suited to be turned into a hot compost pile.
As with any task, finding a proper rhythm that works well with how you move in the garden is the best way to go about weeding. For more information about weeds and weeding methods, watch Victory Garden for ME on Managing Weeds, and see the “Helpful Tips and Resources” section below the video. You can also read more in Bulletin #4311, Section 11: Controlling Weeds in the Garden.
Pinch plants for bushier growth. Many plants benefit from having their tip growth cut back early in the season to encourage a bushier growth form. Particularly tall, late-blooming perennials like asters benefit from pinching as they are less likely to flop over from their weight later on in the season.
Direct sow seeds. Many staples are certainly ready to be sown in the garden at this time: spinach, beans, beets, carrots, peas, radishes, turnips, and more are all fair game! A number of herbs and annual flowers are also very easy to direct seed in the garden, such as marigolds, zinnias, cosmos, dill, cilantro, and basil. Keep newly seeded areas moist by watering 3-4 times a week until the seeds have germinated or covering with a moisture barrier, such as a scrap piece of lumber or cardboard, for 4 days.
Remove spent flowers from spring-flowering bulbs. As you trim off tired daffodils and other early blooms, be sure to leave the foliage in place even if it is also starting to look a little worn out. Leaves of spring-flowering bulbs are working hard to put energy back into the bulb for future flower production.
Transplant seedlings. If you feel like you missed the deadline to plant longer-season vegetables, such as tomatoes, peppers, and eggplant, think again. Planting in early June is a great time to get those seedlings in the ground.
Enjoy a fresh-cut bouquet. This is the time to savor the gifts our garden has to offer. What better way to celebrate the season than with a brimming vase on your dinner table and tiny bud vases tucked throughout the house. Harvesting flowers early in the morning and at the proper stage of development for the specific flower type are two strategies to have longer-lasting displays. Learn more about making those fleeting peony flowers last longer in the article below.
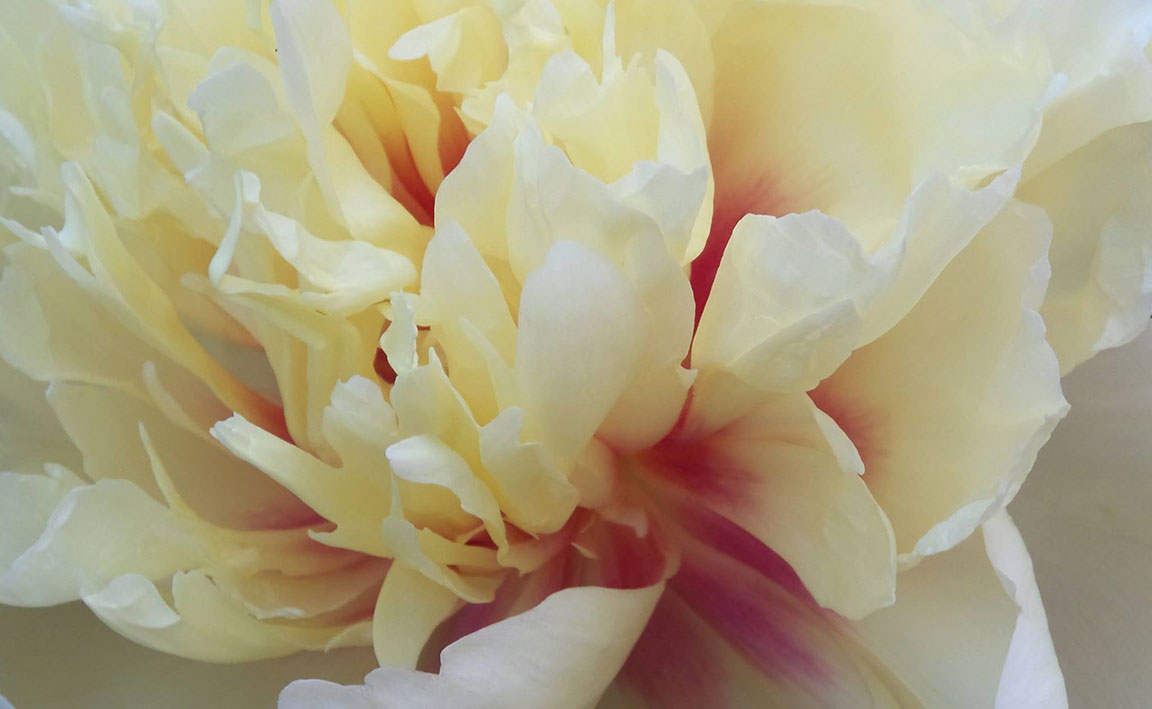
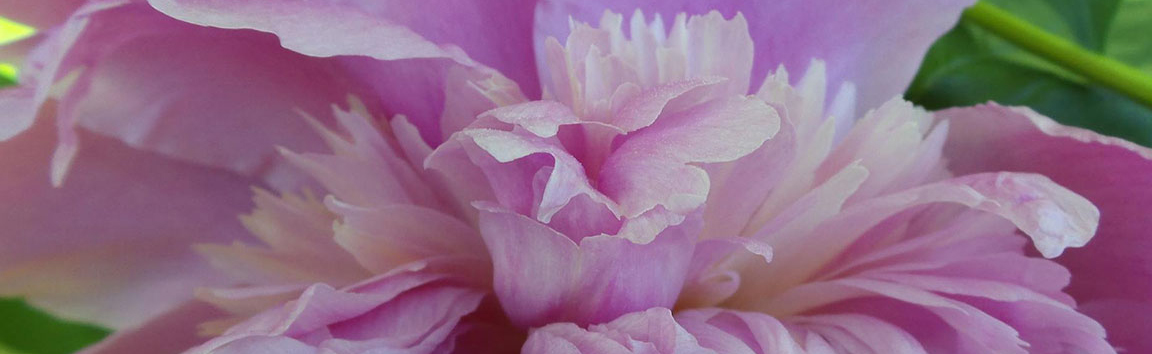
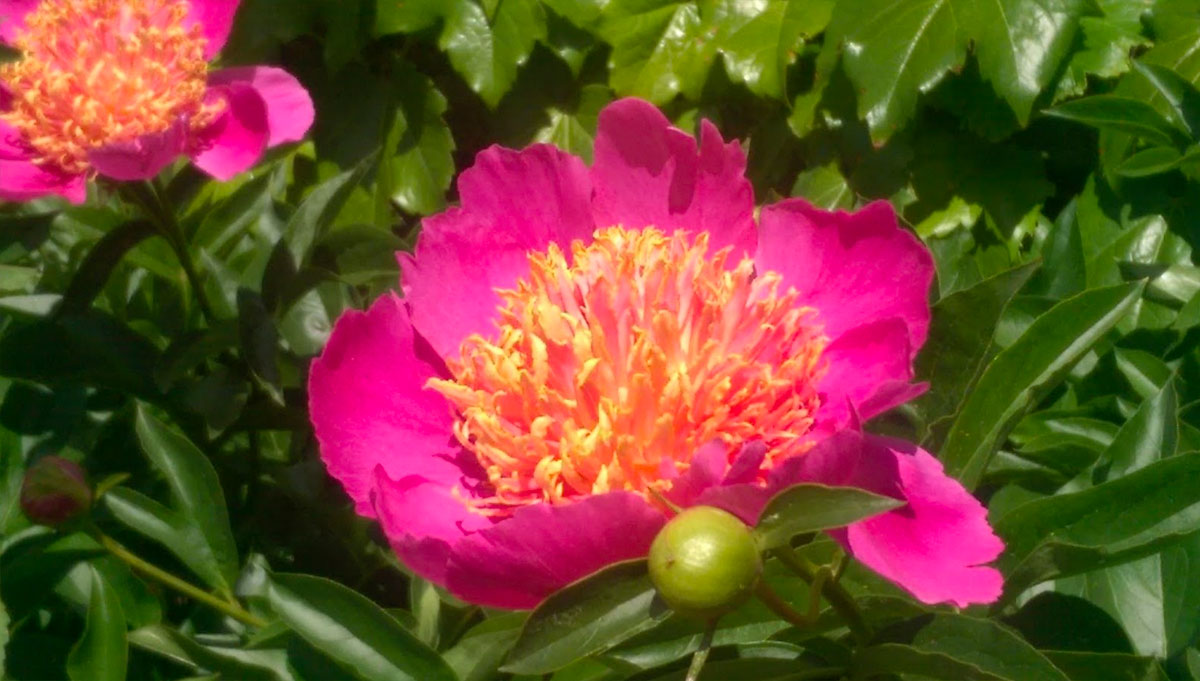
Extending the Peony Season
By Lynne Holland, Community Education Assistant, Androscoggin & Sagadahoc Counties
Few flowers are as recognizable as the Peony (family Paeoniaceae). Blooming generally in very late May to mid-June in New England, peonies are the queen of the late spring garden for a few weeks after the lilacs but before the roses take over completely. From ancient Chinese silk paintings to Japanese ceramics, peonies have been used as decorations, as medicine, and even as symbols of lushness and luxury for hundreds of years. A long-lived plant, the peony has a relatively short-lived bloom period. One storm during that short blooming window and the blooms become bedraggled and drop petals. Capturing the peony in artwork was the only way to enjoy the bloom longer than the weather permitted. If only they could be enjoyed for a longer period of time.
In the early 2000s peonies were developed as a new “crop” for Alaskan growers (PDF). Their season is naturally even later than the New England season, extending well into July. As with most flowers grown for resale, there had to be a way to extend their “shelf life” long enough to account for transportation and wholesaling. Over time a method for “saving” peonies to bloom later in a vase was developed and has been used successfully both in the floral industry and the home.
In 2016, Michigan State published a bulletin that laid out the necessary steps to harvest peonies and store them for several weeks for later blooming in water. The steps refer to a process explained in Lynn Byczynski’s book, The Flower Farmer, An Organic Grower’s Guide to Raising and Selling Cut Flowers (1997, 2nd Edition 2008). The process essentially stores the peonies at normal floral refrigerator temperatures (36-40 degrees) for up to three months in “suspended animation.” This is not science fiction; it uses an understanding of the plant’s life processes and creates conditions that slow those processes down.
When a flower is cut it continues to expend energy when the leaves, petals, and stems release moisture through the stomata as the plant continues to “breathe.” But because the flower has been cut, there is no way to replace that moisture except through the water in a vase. The flower is essentially dying the minute it is cut, but temperature is the controlling factor of how fast that process occurs. Many flowers that are found in mass markets and flower shops are already two or three weeks old when you buy them. Because the temperature in transit and storage is kept near freezing the flower essentially goes to sleep. Ethylene, the gas created by the plant to trigger blooming/maturing of the flower (remember flowers just want to be pollinated), drops to almost nothing below 40 degrees. Below 40, but above freezing, the flower is (almost) frozen in time.
To get the best bloom it is necessary to address the stage at which the flower is cut. The flower has to be open enough so the petals are fully formed but not so much that the petals also release moisture or break down. According to Michigan State, that point is the ”marshmallow” stage. In their bulletin they quote peony grower Wilma Jackson: “To store a peony for proper bloom and achieve a vase life of five to 10 days, you need to cut the flowers when the buds are showing some color and are soft like a marshmallow.”
The right cut at the right time, stored under the right conditions, means peony blooms can be stored and enjoyed much later in the summer. Here are the steps to follow:
Choose the blooms well in advance and remove any side buds as they form. This will put all the energy into producing one large bloom
When the peony is in the marshmallow stage, cut the stem 2-4” longer than your desired stem length in the vase (they will be recut to wake them up).
Cut them early in the day when they are at their coolest and most hydrated.
Remove all the leaves with a sharp knife; do not strip them off the stem.
Make sure the stem is completely dry before wrapping each flower completely in plastic. Gently roll it in plastic and seal the ends. Some sources say you can wrap the stems in small bunches with their ends in newspaper. However, I have found that this can lead to blooms bruising each other and wet spots forming.
Make sure the peonies have cooled down as much as possible before putting them in the refrigerator. If they are warm when they are wrapped condensation will form in the plastic.
Storing stems upright is suggested, but professional growers often store them horizontally, making sure they don’t crush each other.
If you have the luxury of a second refrigerator, store them away from fresh fruits and vegetables to avoid exposure to ethylene. I find they store nicely in the beer fridge.
Take them out and unwrap them a day or so before you want them at their showiest and recut them.
Place them in tepid water in a clean vase and enjoy for a week or so.
By Kate Garland, Horticultural Professional, UMaine Extension Penobscot County
Basil is often sold in tight clumps of multiple plants per pot. While you can get away with planting the tightly packed seedlings together, you can also stretch your dollars and increase your pesto production by cutting the extra stems and simply sticking them in the ground or in pots to create new plants. Basil cuttings do not require rooting hormones to establish new roots. Be sure to select an overcast or rainy day for this activity to minimize water loss in the cuttings. Plant stress is further reduced if rain or cloudy conditions are expected for a few days after the cuttings have been planted directly into the garden. Cuttings placed in pots should be moved to a somewhat shaded location for a few weeks after planting.
The video below walks you through the steps.
Supporting Your Tomatoes 101
You’ve planted your favorite tomato varieties and are now looking forward to snacks, sauces, and sandwiches graced with your future crop. Supporting your tomatoes is key to managing diseases by improving airflow around the plants; making scouting for pests, such as the tomato hornworm, easier; and lastly, properly supporting tomatoes makes it much easier to harvest. Just like many other gardening tasks, there is more than one way to approach this project. Listed below are videos demonstrating four different supporting methods and explaining the two main tomato growth habits: determinant (bush-type) and indeterminate (vining-type).
You’re ready to plant some beautiful new trees and shrubs. Here are five tips to get them off to a good start.
Choose the right plant for the location, and obtain the best specimen available. A healthy specimen thrives if planted properly in the right location, but even the best planting procedures cannot overcome poor plant selection. Shop in early spring for the best plant selection. Native plants are adapted to Maine conditions, of course, but introduced species can be more difficult to evaluate. Visit trial gardens, talk to knowledgeable nursery professionals, read catalogs and gardening books, and call your local UMaine Extension County Office for help.
Use native soil with limited soil amendments. If you have selected the best plant for the location, then soil amendments such as compost or peat moss are not necessary. However, construction site fill sometimes resembles rubble more than soil. If the soil is either gravel or very heavy, and you feel a soil amendment is necessary, then amend the soil not more than 25 percent by volume. This provides a good environment for roots to grow into, yet is not drastically different from the surrounding native soil. If the backfill in a planting hole is too different from the surrounding soil, the roots may not penetrate out of the planting hole, and the resulting root mass may be limited and insufficient to support long-term growth.
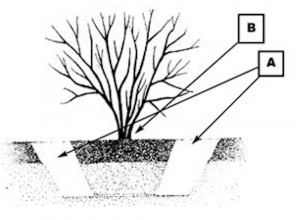
Dig a wide and shallow planting hole, and don’t plant too deeply. Roots grow outward, more than downward. It is important to provide loose soil around the root ball for roots to expand into. For most woody plants, about 90 percent of the root mass is in the top 12 inches of soil. Dig a planting hole at least three times as wide as small root balls, or at least 12 inches wider in all directions than large root balls [A]. While the planting hole can be dug as wide as you are willing to dig, it should not be any deeper than the root ball. If trees and shrubs are planted too deeply, or if they are placed in backfill that later settles and effectively “plants them” too deeply, they are subject to two serious problems. First, roots require oxygen to function, and the oxygen level several inches below the surface is low. If roots cannot access oxygen they cannot grow, and the plant will decline and possibly die. Second, the juncture between the root and trunk of a woody plant should be planted at or even slightly above the ground level. If it is planted too deeply, the plant is subject to decay and damage from girdling root development [B]. In a location with heavy soil, dig the planting hole a few inches more shallow than the depth of the root ball. Remember that you will cover the root zone with two to three inches of mulch after planting. When you plant, dig the hole, place the specimen in it on firm, native soil, and rotate as needed for best visual perspective. Remove the ball and burlap or container as described in Bulletin #2366. Prune off damaged roots and girdling roots, and redirect any roots growing around the circumference of the root ball so that they point outward. Backfill with either native soil or minimally amended soil to fill the hole halfway. Tamp firmly with the shovel handle to remove air pockets, and water thoroughly to settle the soil. Fill the rest of the hole, tamp, and water thoroughly. Most nursery-grown trees and shrubs do not require any pruning of branches at planting time, because they were pruned for form during nursery production. Most trees also do not require staking, unless they are sited in a very windy location or in heavy clay soil. If you do stake, be sure to remove the stakes and cushioned wires one year after planting.
Care for the specimen for at least the first three seasons to promote good establishment. Of course, you will want to perform ongoing maintenance as needed, but long-term maintenance will be less if you take special precautions during the first three years. Mulch around the base of the plant to prevent weed growth, preserve soil moisture, protect the bark of the trunk from lawnmowers, and eliminate competition from the turf. If possible, mulch with two to three inches of organic matter, such as bark chips, at least as wide as the drip line of the plant. Pull the mulch away from the base of the plant, since the addition of the mulch would be the same as planting too deeply. Watering and mulching at planting time is only the first step in a successful maintenance program. If the planting site does not receive at least one inch of rainfall per week during the first few growing seasons, supplement with slow soaking irrigation. Base the amount of irrigation on prevailing conditions. Always water thoroughly, but water more frequently in hot weather and on sandy sites, and water less often in cool weather and on heavy clay sites. Fertilize for the first time in spring of the year after planting. Prune for form during the second or third year. (Refer to Cooperative Extension Bulletin #2169, Pruning Woody Landscape Plants, for more information about pruning.)
Identify problems and resolve them before they become serious. Proper plant selection, good planting procedures, and attentive early care are the keys to healthy plantings. Still, problems can develop. Monitor your plants and get to know what they look like when they are healthy and vigorous. If you notice any changes that suggest a problem, identify the problem, and resolve it before it becomes serious. Seek professional assistance if needed. Spot treating a problem early can reduce maintenance labor and pesticide use, and can prevent major damage.
Now is the Time to Be Thinking About Saving Seed
By Mark Hutton, UMaine Cooperative Extension Vegetable Specialist; Photos by Mark Hutton
Introduction by Kate Garland, Horticulturist
Seed saving allows gardeners to play a role in the evolution of their crops by selecting seed from the plants with the most desirable traits such as flavor, ripening time, disease resistance, and color. The act of collecting seed is relatively simple, but the quality of the seed collected depends on the genetics of the parent plant(s) that created that seed. As our crops begin to flower, seed savers will need to pay attention to whether plants are receiving their own pollen or pollen from another plant as well as whether plants are considered hybrids.
Plants are broadly classified by their method of reproduction as either self-pollinating or cross-pollinating. Self-pollinated plants have flowers with both male and female parts (“perfect” flowers), and typically have flower structures that prevent the introduction of pollen from other plants. Cross-pollinating crops have mechanisms that encourage pollination by other plants of the same species. These may include separate male and female flowers on the same plant (“monoecious” plant sexuality, as in pumpkins), separate male and female plants (“dioecious” plant sexuality, as in asparagus), or some form of self-incompatibility. Cross-pollinated plants are pollinated either by wind or insects. The list below lists common vegetable garden plants and their modes of reproduction.
Plants that are not self-pollinating are susceptible to cross-pollination. In other words, if two varieties of squash bloom near each other, the resultant seed is likely to be a cross between the two. Some plants will also cross with wild varieties (for example, carrots can be cross-pollinated by the wild carrot known as Queen Anne’s lace). With the exception of the self-pollinators, it is a good idea to grow only one variety of any plant from which you want to save seed that season. Learning how your plants are pollinated will help you avoid accidental crosses.
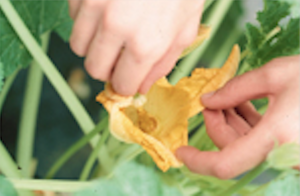
Plants pollinated by insects can be hand-pollinated. To do this you must protect the opening bud from contact with the bees. In the morning, pluck the male blossom and touch the cluster of pollen (called anthers) to the center of the female flower (called the stigma). Close the female flower again so bees can’t get in. Tag the blossom. Grow the fruit to maturity for the desired seed.
Hybrid or open-pollinated?
Hybrid varieties
Many vegetable and flower varieties sold today are hybrids. Hybrid varieties are produced by controlling pollination and crossing two different but genetically uniform parents to produce the hybrid seed—known as the F1 generation—that gardeners purchase. F1 hybrids are typically uniform and vigorous. However, F1 hybrids are not true-breeding: seed produced by the hybrid, which is known as the F2 generation, will produce a population of plants displaying traits covering the full genetic range of the two parents of the F1 hybrid. The fact that the offspring of the hybrid parent will not be identical to the parent has advantages, particularly if you are interested in a breeding project. Plant breeders often create a range of characteristics in a population by crossing together two parent lines and then selecting ideal types from the subsequent generations. The amount of variation decreases with each subsequent generation and selection of desirable plant traits (color, size, yield, etc.).
Open-pollinated varieties
Open pollination refers to seed produced without control of the pollen source. Open-pollinated cultivars may be either self-pollinating or cross-pollinating. Breeders must isolate cross-pollinating cultivars from other varieties of the same species to obtain the desired result. Open-pollinated cultivars will usually produce offspring that are very close to the parent plants, provided the parents were kept separated from other varieties. Isolation is especially important with cross-pollinated crops.
Classification of vegetable crops by pollination method
Self-pollinated plants
Legume Family, Beans, Peas, Composite family, Lettuce, Endive, Chicory, Radiccio, Solonacious, Tomato (many heirlooms cross-pollinate at a high frequency)
Annual crops are the most common choice for seed savers. Annual crops complete their life cycle in a single growing season, simplifying the breeding and seed-saving process. Seed can be saved from biennial crops, but more planning will be needed.
Biennials take two years to complete their life cycle. In the first year, the plant is said to be in a juvenile growth stage and is unable to flower. During the second year, after the proper environmental cue (often day length or a period of cold weather) the plant flowers (bolts). In mild climates biennials are often left in the field to overwinter. Here in Maine, most biennial crops will need to be dug in the fall and stored at or near freezing until spring, when they can be replanted and then allowed to go to seed. Beets and cabbage, for instance, need to be handled this way to produce seed.
Selecting Mother Plants
Throughout the growing season, evaluate plants for characteristics such as disease presence/absence, growth rate, color, height, early blooming, late bolting, weather tolerance, insect tolerance, maturity date, yield, and quality. Tag or mark those plants that you feel are superior and thus possible candidates for seed saving. Save seed from healthy, disease-free plants. With fruiting crops like tomato, pepper, squash, and cucumber, harvest seed from only disease-free, damage-free fruit. Wash soil or plant tissue from the fruit before cutting the fruit to extract seeds.
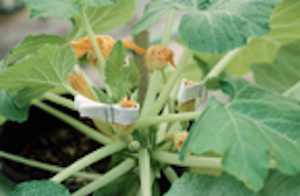
Looking to temporarily fill a blank spot in your garden with something bold? Check out this impressive shrub-like container garden in Orono. Solenostemon ‘Redhead’ (coleus) can grow up to 48” tall. It’s so big, it almost outcompetes the equally stunning and exotic looking ‘Tropicanna’ canna peeking out from the back with its cheerful orange blooms.
The Sunflower is one of the most popular genera of flowers to grow in your garden. Novice to experienced gardeners gravitate to these bold, easy-to-grow flowers.
Sunflower Types:
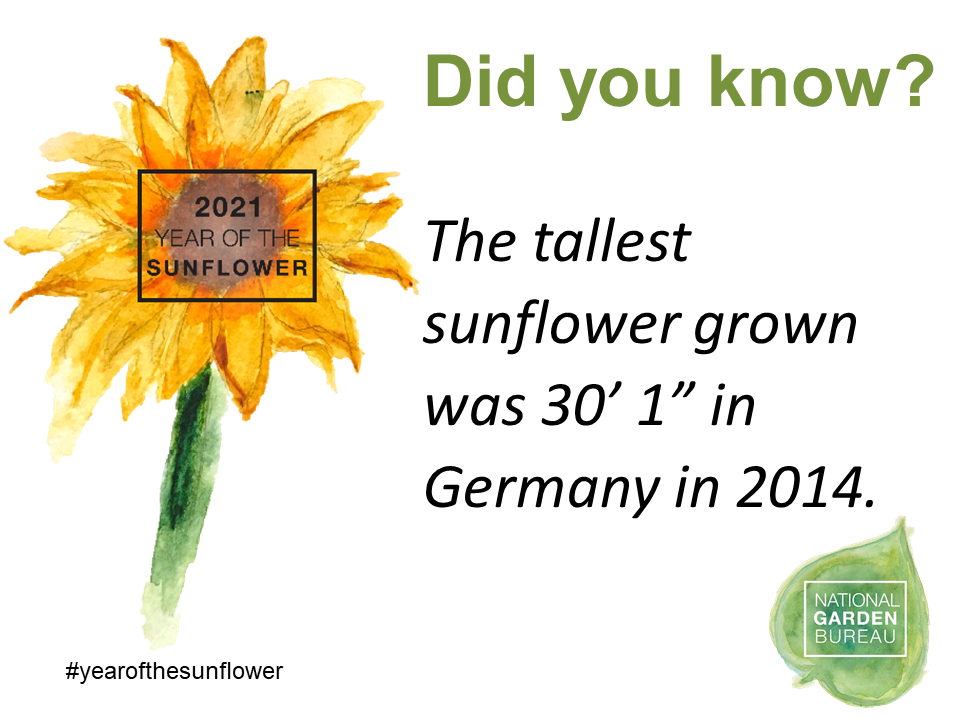
Sunflowers can be annual(Helianthus annuus) or perennial(Helianthus maximiliani), but most modern sunflowers are annuals.
Single Stem vs Branching Sunflowers:
Single stem sunflower varieties are best for high-density plantings and produce consistently beautiful flowers on tall stems. Succession planting will be needed for continuous blooms.
Branching varieties produce flowers on multiple shorter stems throughout the season, which makes them ideal for sunflowers all season long.
Single stem: ProCut® Series, Sunrich™ Series, Vincent® Series
Sunflowers that produce pollen are a great option for gardeners focused on supporting pollinators or for those looking for a lower price point.
Many modern sunflower varieties are bred to be male sterile, or pollen-free, to help foster extended vase life and a nice, clean appearance. These also keep your table clean from pollen!
Luckily, there are many varieties of both pollen and pollen-free:
Pollen-free: Moulin Rouge, ProCut Series, Sunbuzz, Sunrich Series, Vincent Series
Pollen: Soraya (AAS Winner), Ring of Fire (AAS Winner), Valentine
Height/Size of Sunflowers:
Another way to distinguish sunflowers is by their height and size. Smaller, ornamental sunflower varieties, such as the Sunrich or ProCut Series are only a few feet tall, while American Giant sunflowers can grow to be 15+ feet. Depending on their height, the size of the flower will also change with larger flowers on the taller varieties.
Tall: American Giant, Kong, Mammoth, Sunforest
Dwarf: Smiley, Sunbuzz, Suntastic, Teddy Bear, Suntastic Yellow with Black Center (AAS Winner)
Sunflowers for Edible Seeds:
Some varieties have been bred to produce large, edible seeds that are great for snacking. The seeds are ready to harvest once the petals have withered and the seeds can be seen.
Edible seed types: Feed The Birds, Mongolian Giant, Skyscraper, Super Snack Mix, Titan
How to Grow and Care for Sunflowers:
Sunflower seeds can be direct sown after the risk of frost has passed, or started indoors. Seeds should be sown ¼” to ½” deep and kept moist. Taller, larger sunflower varieties have a large taproot to keep them rooted and do not do well when they are transplanted so direct sowing of those varieties is recommended. Choose a site, or a container, in full sun, with average fertility and good drainage.
Recommendations for the best vase life:
If you’re growing sunflowers for cuts, here are some recommendations to extend the vase life of your flower.
Cut when the petals or ray flowers just begin to open, before they have opened off the disc completely. It is recommended to cut in the early morning before the heat of the day.
Remove the leaves below the water line and place in freshwater or properly measured fresh flower food solution.
Check water regularly; sunflowers are heavy drinkers and can empty a bucket or vase overnight.
Change water daily; sunflowers have what some call a dirty stem, as the water quickly turns cloudy with potential for bacterial issues.
By Dave Fuller, Agriculture and Non-Timber Forest Products Professional, UMaine Extension Franklin County
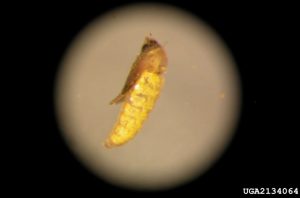
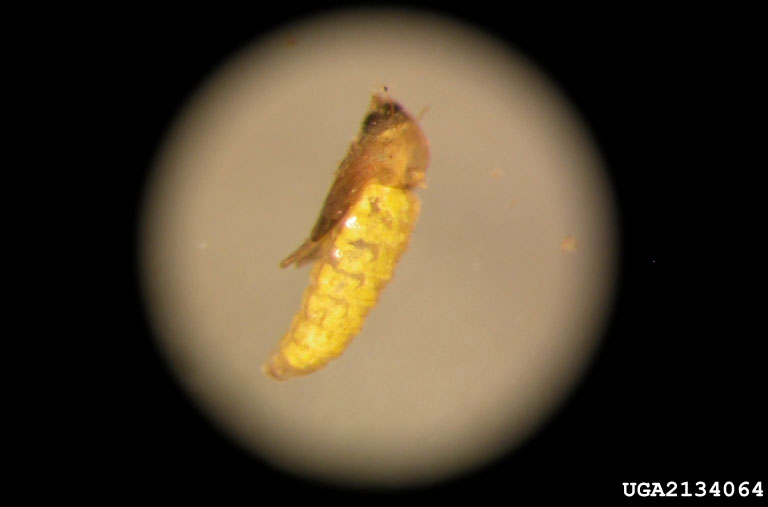
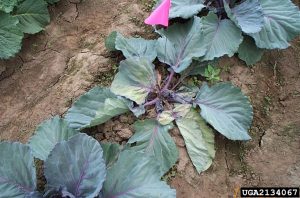
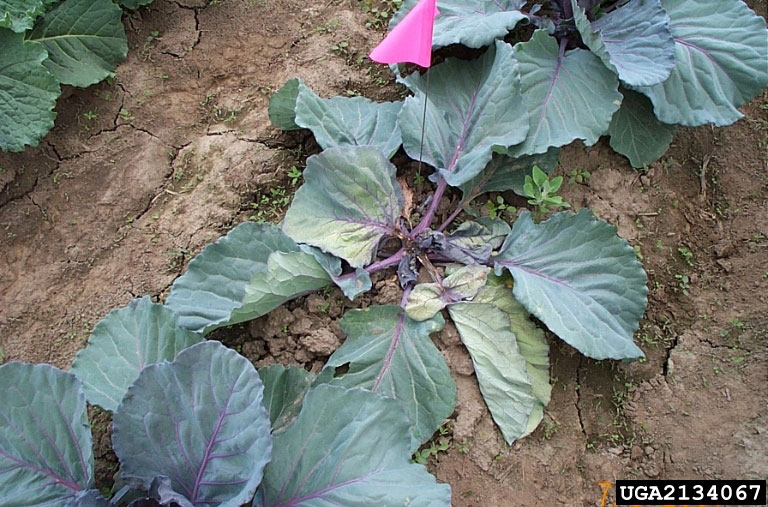
First found in commercial farms in Farmington and Hodgdon in the summer of 2019, Swede midge larvae cause significant and persistent crop losses in broccoli, cauliflower, kale, collards, kohlrabi, and other members of the brassica family.
Swede midge (Contarinia nasturtii) has 3 or 4 overlapping generations in Maine. They emerge in May when nighttime temperatures reach 50 degrees and remain active until late September. Adults are tiny, slender flies only 1/16th of an inch long; the light yellow larvae (maggots) are but 1/8th of an inch long. Adults lay eggs on the active growing points of brassicas. In the case of broccoli and cauliflower, this point is deep in the center of the plant where sprays cannot reach. Newly hatched larvae feed on the tender plant tissue which causes curling and distortion. Plant damage by Swede midge is caused only in the larval stage. Examples of the resulting damage include:
Broccoli has badly distorted or missing heads. Side shoots are attacked by later generations of Swede midge.
Cauliflower heads are distorted and scarred.
Leafy brassicas are distorted and unmarketable.
Brussels sprouts have missing sprouts.
Cabbage plants have numerous, smaller heads.
Swede midge (Contarinia nasturtii) adult. Photo by Susan Ellis, USDA APHIS PPQ, Bugwood.org.
Swede midge larva. Photo by Mao Chen, Cornell University, Bugwood.org.
Management strategies for Swede midge include three-year rotations, which are marginally effective in small gardens; and lightweight row cover where Swede midge has not been detected (brassica crops would suffer from accumulated heat under heavier-weight row cover). Brassica transplants are also at risk of Swede midge damage. For this reason, transplants from affected areas may be a source of Swede midge movement to unaffected areas. There are no effective spray options for home gardeners. Once Swede midge has been established in your area, make sure you remove harvested brassica plants and bury, chip, or cover them in compost to prevent Swede midge numbers from building. Weeds in the brassica family such as rocket, shepherd’s purse, and mustard should be controlled as Swede midge will use these plants in their life cycle, as well.
Swede midge is expected to continue to spread in Maine. Being informed and prepared is the best way to deal with this new and destructive pest.
Consider making a contribution to the Maine Master Gardener Development Fund. Your dollars will support and expand Master Gardener Volunteer community outreach across Maine.
Maine Home Garden News was created in response to a continued increase in requests for information on gardening and includes timely and seasonal tips, as well as research-based articles on all aspects of gardening. Articles are written by UMaine Extension specialists, educators, and horticulture professionals, as well as Master Gardener Volunteers from around Maine, with Katherine Garland, UMaine Extension Horticulturalist in Penobscot County, serving as editor. Special thanks to our 2020 Master Gardener Volunteer co-editors Naomi Jacobs and Abby Zelz.
Information in this publication is provided purely for educational purposes. No responsibility is assumed for any problems associated with the use of products or services mentioned. No endorsement of products or companies is intended, nor is criticism of unnamed products or companies implied.
Call 800.287.0274 (in Maine), or 207.581.3188, for information on publications and program offerings from University of Maine Cooperative Extension, or visit extension.umaine.edu.
The University of Maine is an EEO/AA employer, and does not discriminate on the grounds of race, color, religion, sex, sexual orientation, transgender status, gender expression, national origin, citizenship status, age, disability, genetic information or veteran’s status in employment, education, and all other programs and activities. The following person has been designated to handle inquiries regarding non-discrimination policies: Director of Equal Opportunity, 101 North Stevens Hall, University of Maine, Orono, ME 04469-5754, 207.581.1226, TTY 711 (Maine Relay System).
 Few flowers are as recognizable as the Peony (family Paeoniaceae). Blooming generally in very late May to mid-June in New England, peonies are the queen of the late spring garden for a few weeks after the lilacs but before the roses take over completely. From ancient Chinese silk paintings to Japanese ceramics, peonies have been used as decorations, as medicine, and even as symbols of lushness and luxury for hundreds of years. A long-lived plant, the peony has a relatively short-lived bloom period. One storm during that short blooming window and the blooms become bedraggled and drop petals. Capturing the peony in artwork was the only way to enjoy the bloom longer than the weather permitted. If only they could be enjoyed for a longer period of time.
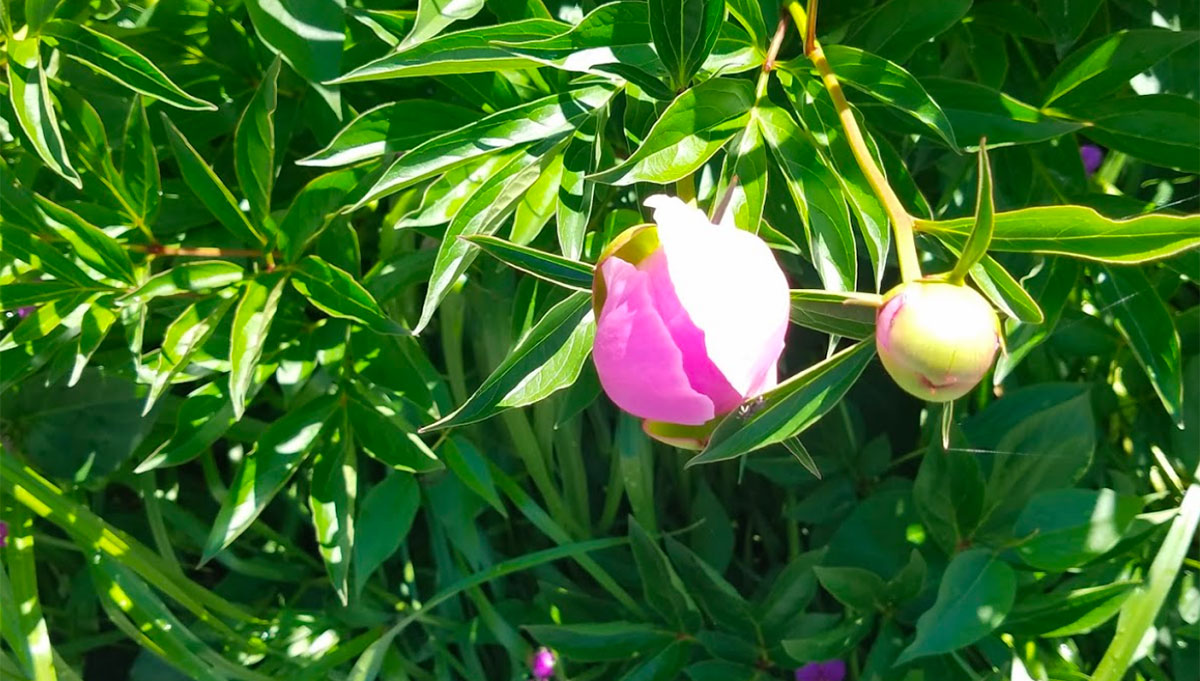 To get the best bloom it is necessary to address the stage at which the flower is cut. The flower has to be open enough so the petals are fully formed but not so much that the petals also release moisture or break down. According to Michigan State, that point is the ”marshmallow” stage. In their bulletin they quote peony grower Wilma Jackson: “To store a peony for proper bloom and achieve a vase life of five to 10 days, you need to cut the flowers when the buds are showing some color and are soft like a marshmallow.”
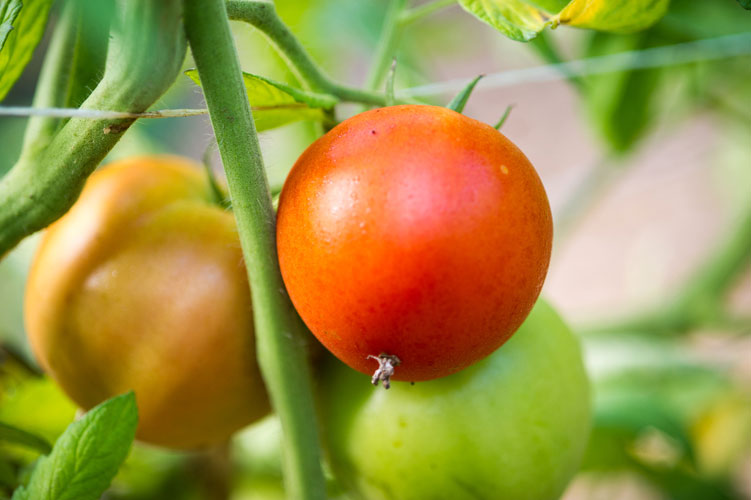 You’ve planted your favorite tomato varieties and are now looking forward to snacks, sauces, and sandwiches graced with your future crop. Supporting your tomatoes is key to managing diseases by improving airflow around the plants; making scouting for pests, such as the tomato hornworm, easier; and lastly, properly supporting tomatoes makes it much easier to harvest. Just like many other gardening tasks, there is more than one way to approach this project. Listed below are videos demonstrating four different supporting methods and explaining the two main tomato growth habits: determinant (bush-type) and indeterminate (vining-type).
 Dig a wide and shallow planting hole, and don’t plant too deeply. Roots grow outward, more than downward. It is important to provide loose soil around the root ball for roots to expand into. For most woody plants, about 90 percent of the root mass is in the top 12 inches of soil. Dig a planting hole at least three times as wide as small root balls, or at least 12 inches wider in all directions than large root balls [A]. While the planting hole can be dug as wide as you are willing to dig, it should not be any deeper than the root ball. If trees and shrubs are planted too deeply, or if they are placed in backfill that later settles and effectively “plants them” too deeply, they are subject to two serious problems. First, roots require oxygen to function, and the oxygen level several inches below the surface is low. If roots cannot access oxygen they cannot grow, and the plant will decline and possibly die. Second, the juncture between the root and trunk of a woody plant should be planted at or even slightly above the ground level. If it is planted too deeply, the plant is subject to decay and damage from girdling root development [B]. In a location with heavy soil, dig the planting hole a few inches more shallow than the depth of the root ball. Remember that you will cover the root zone with two to three inches of mulch after planting. When you plant, dig the hole, place the specimen in it on firm, native soil, and rotate as needed for best visual perspective. Remove the ball and burlap or container as described in Bulletin #2366. Prune off damaged roots and girdling roots, and redirect any roots growing around the circumference of the root ball so that they point outward. Backfill with either native soil or minimally amended soil to fill the hole halfway. Tamp firmly with the shovel handle to remove air pockets, and water thoroughly to settle the soil. Fill the rest of the hole, tamp, and water thoroughly. Most nursery-grown trees and shrubs do not require any pruning of branches at planting time, because they were pruned for form during nursery production. Most trees also do not require staking, unless they are sited in a very windy location or in heavy clay soil. If you do stake, be sure to remove the stakes and cushioned wires one year after planting.
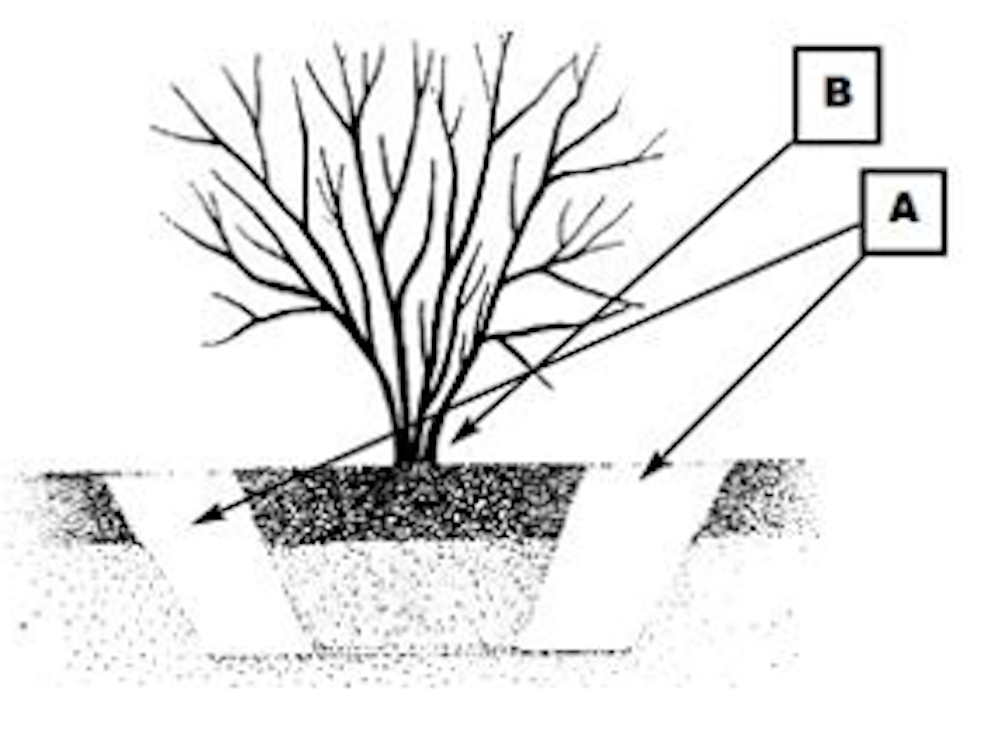

 Sunflower Types:
 Pollen vs Pollen-free Sunflowers:
 How to Grow and Care for Sunflowers: