Maine Grain and Oilseed Newsletter, Vol. 2, No. 1 — May 2014
In this issue:
- Assessing Winter Grain Stands
- 2013 Grain Pea Demonstration Trial Results
- Achieving Proper Seeding Rates for Small Grains and Oilseeds, 2014
Dear Grower,
This is the first issue of the newsletter for the 2014 season. Notifications of new issues of the newsletter will be sent through e-mail, and will be posted online. If you do not want to receive the newsletter, or know of someone who would like to receive the newsletter, please contact me at aplant@maine.edu to be removed from or added to the e-mail list.
This first issue contains information on seeding rates and planter calibration, assessing winter grain stands, and a report on last year’s pea grain demonstration trial.
Sincerely,
Andrew Plant, Extension Agriculture Educator
Ellen Mallory, Extension Sustainable Agriculture Specialist
57 Houlton Road, Presque Isle, ME 04769
207.764.3361 or 1.800.287.1462
extension.umaine.edu/aroostook
Assessing Winter Grain Stands
Ellen Mallory, Extension Sustainable Agriculture Specialist, University of Maine
Once the snow melts and temperatures rise, it’s time to look at how well our fall-seeded grains, like winter wheat, triticale and spelt, survived the winter. Winter grains have many advantages over their spring counterparts (less weed pressure, higher yield potential, lessened spring workload), but over-wintering is not always assured. Late fall planting, poorly adapted varieties, and adverse weather conditions can all contribute to poor stands in the spring. Like last winter, this winter’s weather conditions were challenging for winter grains with intermittent snow cover and periods of surface melting followed by icing. Low lying areas of fields are likely to be most affected.
When assessing winter survival in the spring at greenup, first get a sense of how patchy the field looks, and then focus initially on the worst-looking areas. If those areas turn out to be OK, the rest of your field should also be fine. As you scout, be aware that dried, brown leaves do not necessarily indicate that the plants are dead. Likewise, green leaves do not necessarily indicate the plants have survived. The only way to know the status of individual plants is to peel back any dead, outer leaves and examine the crown. A healthy plant should have a bright, white crown. Once temperatures have been warm enough for new growth, they should also have new white roots.
Is the stand worth keeping?
Having a good stand in the spring is key to a productive winter grain crop. Counting plants per square foot at greenup can help you decide if the stand is worth keeping. To do this, take a foot-long ruler and lay it along an average looking row in the field, count the number of healthy plants in that one-foot length, and write it down. Be sure to count individual plants, not tillers. You may need to dig up the plants to count them accurately. Do this in several areas that are representative of the field or the patches you are examining. Calculate the average of these numbers, then multiple that number by 12 and divide by your row width. This will give you the average number of plants per foot. For example, 14 (plants per 1- foot length) x 12 ÷ 7 (inch rows) = 24 plants per square foot. Plant stands with 20-30 plants per square foot are considered optimum. Stands with 12-15 should be adequate, especially if nitrogen can be applied to stimulate tillering (see below). If the number of plants per square foot is less than 8-12, consider replanting the field to another crop.
If you determine the crop is worth keeping, but are concerned about bare patches, consider underseeding clover to compete with weeds. Do not inter-seed spring wheat into winter wheat as they will ripen at two different times.
Is additional nitrogen needed, and when?
For winter grains, it is recommended to delay the application of a portion of nitrogen until spring to avoid over winter loss. At what point in the spring you make this topdress nitrogen application will depend on your tiller numbers at greenup. If tiller numbers are low, there’s a 2-3 week interval in early spring when N applications will stimulate tillering and increase the number of heads per square foot. However, early spring nitrogen applications are susceptible to leaching losses if spring rainfall is heavy. Therefore, if tiller counts are good, it’s better to topdress a bit later in the spring for the most efficient use of nitrogen by the crop.
To decide if early nitrogen topdressing is necessary, count the number of tillers per square foot. Use the same counting method as above, but count all main stems and tillers with three or more leaves in the 1-foot length of row. Calculate tillers per square foot also as above. If tiller numbers are less than 70 tillers per square foot, consider topdressing additional nitrogen while the crop is in the early tillering stage. If tiller counts are above 70 tillers per square foot, delay your spring topdressing until just before the plants start to joint (i.e. stems elongate), which is when the plants enter their most rapid stage of growth.
For a video of how to conduct tiller counts, see Counting Tillers to Optimize Spring Nitrogen Rates & Timing by Randy Weisz at North Carolina State University.
2013 Grain Pea Demonstration Trial Results
Tom Molloy and Ellen Mallory, University of Maine
Introduction
Organic field peas are of interest in Maine as a high protein feed source and a rotation crop for cereals. A trial was established at the University of Maine’s Aroostook Farm in Presque Isle in 2013 to demonstrate organic grain pea production. The variety DS Admiral was planted alone and in mixes with barley and oats. Funding for this trial was provided by Organic Valley and the Grantham Foundation.
Field Pea Types
The variety DS Admiral is a yellow cotyledon, determinant, semi-leafless variety that is suitable for grain production. Grain-type field peas tend to be determinant types that have a fixed flowering period and shorter vines (2-4 feet). DS Admiral is also one of the semi-leafless types with modified leaflets that act like tendrils. Both the shorter vine length and increased tendrils greatly improves the standability of determinant, semi-leafless peas making them much easier to dry down and harvest. In contrast, forage-type peas are indeterminate, have normal leaves, and produce vines up to six feet long. Field peas are also classified based on their cotyledon or seed color. Yellow and green types can be grown for either food or feed markets, depending on the variety. The DS Admiral for this trial was sourced from Johnny’s Selected Seeds.
Growing Peas with Cereals
Growing peas in mixes with cereals is commonly done for cover cropping or for forage production. In regions where peas are grown for grain, they are usually grown as a monocrop. However, it is thought that growing peas in mixes with cereals could help reduce lodging and weed pressure. Designing the right mix requires matching the pea and cereal varieties for maturity and mixing the seed at a ratio that benefits both crops. For instance, work done in Maritime Canada showed that going above 20% of peas in the seed mixture increases lodging potential (OACC interim report E2006-11).
Methods
In this trial, DS Admiral field peas, three varieties of barley, and one variety of oats were grown in monocrop and in mixtures (Tables 1 and 2). The barley varieties were Conlon, Newdale and Kawartha, and the oat variety was Colt. In addition, the barley/pea mixes were planted at two different mix ratios, one where the pea seed made up only 10% of the seeds planted and another where the pea seed made up 19% of the seeds planted. The Colt oat/pea mixture was planted with 21% peas in the mix.
The field where this demonstration took place had been in conventional potatoes the previous year. The soil type is Caribou gravely loam. Chicken manure was spread at a rate of approximately 3 tons per acre on May 13 and immediately incorporated with a disk harrow. Because peas can fix most of their own nitrogen, spreading manure ahead of field peas is not a recommend practice, but due to other experiments occurring in the same field, manure had to be spread uniformly throughout the field. Final seedbed preparation was done with a Vibrashank seedbed conditioner and planting occurred on May 14. Peas, barley, oats, and mixtures were seeded with an Almaco small-plot cone seeder with 6.5-inch row spacing. Plots were tine weeded on June 5 with a Lely weeder when the peas were approximately 3 inches tall. The plots were harvested on August 31 with a Wintersteiger small-plot combine.
Table 1.Seed characteristics and monocrop seeding rates.
| Crop | Variety | Germination (%) |
Number of seeds/pound |
Seeding rate (#/square foot) |
Seeding rate (lbs/acre) |
|---|---|---|---|---|---|
| Field Pea | DS Admiral | 85 | 2,318 | 9 | 199 |
| Barley | Conlon | 97 | 12,077 | 33 | 121 |
| Barley | Newdale | 96 | 8,887 | 33 | 103 |
| Barley | Kawartha | 90 | 11,068 | 33 | 142 |
| Oat | Colt | 90 | 15,569 | 33 | 101 |
Table 2. Seeding rates of pea/cereal mixes.
| Varieties | Percentage of pea seed in the mix (%) |
Seeding rate (#/square foot) | Seeding rate (lbs/acre) | ||||
|---|---|---|---|---|---|---|---|
| Pea | Cereal | Mixture total | Pea | Cereal | Mixture total | ||
| DS Admiral/Conlon | 10 | 3 | 28 | 31 | 66 | 104 | 170 |
| DS Admiral/Newdale | 10 | 3 | 28 | 31 | 66 | 142 | 208 |
| DS Admiral/Kawartha | 10 | 3 | 28 | 31 | 66 | 122 | 188 |
| DS Admiral/Conlon | 19 | 6 | 23 | 29 | 123 | 86 | 209 |
| DS Admiral/Newdale | 19 | 6 | 23 | 29 | 123 | 119 | 242 |
| DS Admiral/Kawartha | 19 | 6 | 23 | 29 | 123 | 102 | 225 |
| DS Admiral/Colt | 21 | 4 | 14 | 18 | 82 | 43 | 125 |
Results and Discussion
The results from this trial are from non-replicated demonstration plots, so this information should be used only for getting a general estimate of the potential for organic field pea production in northern Maine.
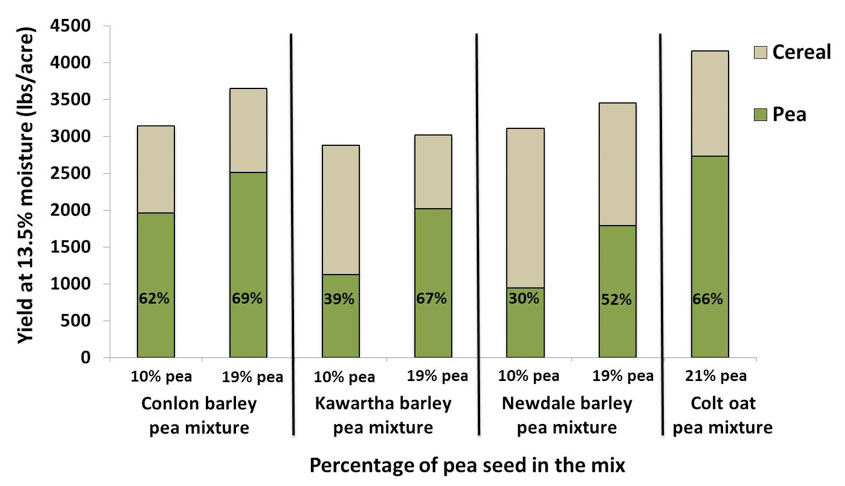
The yield of DS Admiral grown as a monocrop was quite good at 4,022 lbs/acre. The barley variety yields ranged between 1,940 and 2,407 lbs/acre and the oat yielded 3,161 lbs/acre when grown alone (Graph 1). The yields of the various cereal/pea mixes were greater than the cereals when grown alone, but similar to the monocrop pea.
Graph 2 shows the total yield of the mixes as well as the yield of the individual components of each mix. Increasing the amount of pea seed in the planted mix by 90% (from 10% to 19% of the mix) increased the portion of the pea grain in the harvested crop by about 70% with the Kawartha and Newdale barley varieties but only by 11% with Conlon. Peas made up 52-69% of the harvested grain at the higher pea mix and 30-62% at the lower rate. The Colt oat/pea mix had yields similar to the pea monocrop with the peas making up 66% of the harvested grain.

Summary
In this demonstration trial, the yield of the field pea variety grown alone was quite good and comparable to hard red spring wheat yields here in Maine. Mixing field peas with cereals did give an improvement in yield over the monocrop cereals, but the monocrop field peas still out yielded the pea/cereal mixes with the exception of the pea/oat mix. Lodging of the pea plots was noted throughout the field and could not be linked to any one seeding practice. Excessive rainfall and the use of manure as a fertility source could have exacerbated the lodging problem. Because peas are not as competitive with weeds as cereals, there still might be a system level benefit of growing peas in mixtures with cereals.
Additional Resources
For more information on grain pea varieties and production practices see the following publications.
- Field Pea Production, Bulletin A-1166 (PDF), North Dakota State University.
- North Dakota Dry Pea Variety Trial Results for 2013 and Selection Guide (PDF), NDSU.
- Alternative Field Crops Manual, University of Wisconsin Extension.
- Growing Field Peas in Montana (PDF), MT 9520, Montana State University Extension Service.
Achieving Proper Seeding Rates for Small Grains and Oilseeds, 2014
Andrew Plant, Extension Ag. Educator
A number of different reports have surfaced regarding the variable germination rates of small grain seed this coming growing season. This is likely a result of the wet conditions many of us experienced last harvest period. Because of this, knowing your germination rates and calculating seeding rates maybe more important this year than in comparison to others. An easy way to know your germination rate is to buy certified seed. If you plan on sowing your own seed, conduct a home germination test. If germination rates are less than 80% or are slow to germinate, one should consider avoiding sowing that seed.
Planting small grains and oilseed crops properly and on-time can produce a target population density that maximizes growth and cost efficiencies. Crop seeding rates can vary significantly owing to a number of different factors, including but not limited to variety, growing season, location, fertilization, quality of cleaning, and seed treatment use. Because of all these variables and their effects upon seed size, test weight, and vigor, it is not feasible to plant small grains simply based upon a bushels/acre seeding rate. Instead, seeding rates should be based upon
crop-appropriate target populations, as can be seen in Table 1. There are several variables that farmers can account for when attempting to achieve these populations: seed viability (germination), historic stand loss of fields, number of seeds per pound, and grain drill operation (1).
Table 1. Target Population Densities for Selected Small Grains and Oilseed Crops
| Crop | Plant Population Target* |
|---|---|
| Winter Wheat | 0.90–1.00 million/acre |
| Spring Wheat | 1.30–1.40 million/acre |
| Barley | 1.25–1.30 million/acre |
| Oats | 1.25–1.30 million/acre |
| Canola | 0.3–0.6 million/acre |
| Soybean | 0.13–0.175 million/acre |
*Rates listed are typical for conventional production. For organic production, it is recommended to increase these rates by a range of 15%-25%.
By taking some simple measurements and using some basic math, you can determine an estimate of the proper seeding rate for your small grain and oilseed crops.
Tools:
- Jack
- Buckets
- Tarp/plastic
- Tape measure
- Scales
- Calculator
- Grain drill manual
Determining Seeding Rates:
In general, optimum planting dates for small grains in this part of Maine occur from roughly April 23 through May 8. To account for the decreased potential for tillering of small grains after this date, growers should increase their population targets by 1% for each day past May 8, up to a maximum of 1.6 million plants/ acre. Given the late start to our 2013 season, this rule should likely come into play. Past June 1, small grain growers should consider changing mindsets from one of harvesting a grain crop to one of producing a green manure plow-down. Oilseed crops do not follow the same general rule. Instead, planting should occur when soil temperatures reach a minimum of 40°F for canola or 50°F for soybeans.
The formula below depicts the variables growers should use to calculate the proper seeding rates of their small grains1.
Seeding rate (lb/ac) =
(target population/(1- % stand loss))
seeds/lb x % germination
- Select proper target population per acre (example wheat @ 1.5 million plants/ac, May 15 sowing).
(1.4 million + 1% for each day past May 8) = 1.5 million plants/ac - Use germination percentage printed on seed lot tag (example 90%, convert to proportion = 0.9). Or do your own germination test.
- Use historical stand loss of field to be planted (example 10%, convert to proportion = 0.1).
- Count out 1000 seed pieces and weigh them (example 1000 seeds = 1.2 oz). This should be done for each different crop, each different variety, and each different known seed lot source.
- Convert to seeds per pound (example seeds/lb = (16/1.2)*1000= 13,333 seeds/lb).
Example: Target Seeding Rate:
(1,500,000/(1 – 0.1)) = 139 lb/acre
(13,333 x 0.9)
Calibrating The Grain Drill:
- Determine effective width of grain drill (e.g., 13 ft).
- Measure diameter of drive wheel tire (for example 37 in = 3.08 ft).
Estimate 1/10 acre planting.
1/10 acre = 43560 sq ft per acre/10 = 4356 sq ft
4356 sq ft/13 ft (width of drill) = 335 ft (the distance the drill must travel to cover 1/10 acre) - Determine the number of revolutions of the tire in 335 ft.
(Example: Circumference of tire = pi x diameter = 3.08 ft x 3.14159 = 9.68 ft/revolution, 335/9.68= 34.6 revolutions) - Set your initial drill calibrations as specified in your manual to get the seed rate you want. (e.g., 140 lb/ac)
- Jack up the drive wheel so that it can spin freely, mark a line on the wheel, or use the valve stem of the tire for a reference point to count the number of times you spin it.
- Use a 5-gallon bucket, or a tarp, to catch seed dropping out of seed tubes. You will have to pull out seed tubes from openers and place them into buckets if checking individual tubes. The more seed tubes you collect seed from, the more accurate your estimate will be. (Record the number of seed tubes that you sample.)
- Fill bin with seed (only over the seed tubes you will be using to measure). Prime the seed tubes by spinning the drive wheel a few times unit seed starts to drop out of the tubes.
- Place your bucket/tarp under the tubes you will use and spin the drive wheel the number of revolutions you calculated above. (e.g., 34.6 revolutions; eyeball the 0.6.)
- Collect the seed from the buckets/tarp and weigh out.
Example: We sampled a total of 6 seed tubes and had a total weight of 3.24 lb of seed in the bucket after our 34.6 revolutions.
3.24 lb/6 seed tubes = 0.54 lb/ seed tube x 26 seed tubes = 14.04 lb/0.1ac = multiply by 10 for lb/ac = 140.4lb/ac seeding rate.
You probably don’t need to adjust the seeding rate.
Repeat 1–2 more times to determine reliability of the output. In the end, you want to be within 5% of your target seeding rate. - If you need to adjust the setting on the drill, you can use a simple formula to get you closer to your target rate.
For example, if you had the drill adjustment lever set at “20” (as that is where the manual suggested you set it), and you only got 120 lb/ac of seed, you need to set it at ”X” to get 140 lb/ac. Use the following formula:
New setting = A
lb/ac for target = B (e.g., 140 lb/ac)
Initial setting = C (ex.20)
lb/ac at this setting = D (e.g., 120lb/ac)
A = (B x C)/D
For this example:
A= (140 xc20)/120 = 23.33, so the new setting will be somewhere between 23 and 24, in order to get 140 lb/ac target rate.
NOTES:
- Some drills are easier to calibrate than others, and all tend toward difficulty as they age.
- Prior to calibration, make sure your drill is in good working order; fix, adjust, and verify that all components are in working condition.
- Different crops tend to differ in the way they flow in a grain drill, and some may be more difficult to calibrate.
- It is still important to ground-truth your calibration once you’re in the field planting. It’s also the time to check for uniform seeding depth. All of the small grains and soybeans should be seeded into a firm seedbed, at a depth of 1”-1.5”. Canola, owing to its small seed size, should be planted at a depth of 0.5”-1”.
- For those that are using fertilizer and/or grass seeding boxes to apply fertility or underseeding at planting; the same methodology described above can be used to calibrate these rates as well, and can typically be done at the same time as the grain calibration. Just be sure to use separate catches for each component you’re calibrating.
Broadcasting:
If you choose to utilize a broadcaster to sow your small grains, there are several considerations to take into account. Broadcast sowings have less seed-to-soil contact than grain-drill sowings, so you will want to increase seeding rates by 10–20% over what you have calculated for a grain drill. As well, it is important to follow the broadcasting with a light harrowing or disking of the field in order to achieve appropriate soil contact to the seed. Uneven stands and lower yields are typical for broadcast sowings as compared to drills.
1 Wiersma, J.J. and Ransom, J.K. The Small Grains Field Guide (North Dakota State University and University of Minnesota, 2005), 27–33.
Information on this website is provided purely for educational purposes. No responsibility is assumed for any problems associated with the use of products or services mentioned. No endorsement of products or companies is intended, nor is criticism of unnamed products or companies implied.
© 2014
Call 800.287.0274 or TDD 800.287.8957 (in Maine), or 207.581.3188, for information on publications and program offerings from University of Maine Cooperative Extension, or visit extension.umaine.edu.