Maine Grain and Oilseed Newsletter, Vol. 2, No. 3 – August 2014
In this issue:
- Seedbed Preparation: Why It is Important
- Cover Crops: What Can Tillage Radish Do For You?
- Harvest Efficiency and Combine Adjustment
Dear Grower,
This issue of the Maine Grain and Oilseed Newsletter contains articles on seed bed preparation, tillage radish cover crops, and a reprint of last year’s article on harvest efficiency and combine adjustment.
Sincerely,
Andrew Plant, Extension Agriculture Educator
Ellen Mallory, Sustainable Agriculture Specialist
57 Houlton Road, Presque Isle, ME 04769
207.764.3361 or 1.800.287.1462
extension.umaine.edu/aroostook
Seedbed Preparation: Why It Is Important
John Jemison, Extension Professor of Soil and Water Quality, University of Maine
All well constructed buildings start with a strong foundation. A successful crop also depends on a good foundation. While the foundation of a home is often constructed of cement, key parts of a crop’s foundation include fertile soil, properly placed seed (depth, rate, spacing), and moisture to get the plant started.
Soil fertility (pH, P, K, Ca, and Mg levels) are always important, and they can be determined through soil testing. This is best done in the fall before the start of the next cropping season. But, beyond that, seed size plays a big role in how important seed placement is. Generally, the larger the seed, the more forgiving soil preparation and seed placement will be. A corn seed can likely emerge from a three inch depth. It is not desirable to sow that deeply, but in most cases it could still emerge. The seed the size of canola is very small – it takes about 120,000 canola seeds to make a pound. So, with a diameter as small as 1/32 of an inch (< 1 mm in size), seed placement is very important.
Likewise, timeliness of rainfall is a key consideration in germination and emergence. Generally speaking, the deeper you can plant a seed, the more available water will be there for plant germination and emergence. With a seed considerably smaller than a BB, you can imagine that a seed can easily be sown too deeply or dry up before it can absorb enough water to emerge, leading to a poor stand.
Growers constantly face the question: How much energy do I put into seedbed preparation? We conducted a soil management demonstration a few years back for an “oops plot” demonstration. We intentionally tried to vary management and get our consultants to figure out what might have happened. We harrowed the field and then split the field in thirds. Using a grain drill, we sowed canola with essentially no soil preparation in one area; in another, we drilled the seed and then rolled it; in the third area, we packed the field, drilled the seed, and rolled the field again. It did not rain after planting for 5 or 6 days. It made for a great demonstration because the third of the field where we packed, planted and packed came in perfectly, the middle plot (drilled then packed) did fairly well, and the drilled seed germinated very poorly. It was a great demonstration that I have tried to mirror in the field in a replicated research project, but I have not been able to repeat it. The reason has likely been rainfall timing. Both years, the experiment has received (unwelcomed) reasonably intensive rainfall within 24 hours, effectively packing the soil in the experiment. But, what we noticed this year was improved winter survival where we rolled the field compared to where we did not pack.
The take-home message is this: a good soil foundation is important. Fertility, seeding rate and placement are especially important with small seeded oilseed crops. If you invest time and energy to pack your fields at least following drilling, you will likely be rewarded. Seed to soil contact is so important with small seeded crops.
Cover Crops: What Can Tillage Radish Do For You?
John Jemison, Extension Professor of Soil and Water Quality, University of Maine
Interest in using radish as a cover crop or late season forage has waxed and waned a couple of times in my 20+ years working for Cooperative Extension. Mary Wiedenhoeft evaluated it as a late season forage extender and found it to be effective. Recently tillage radish or groundhog radish, a dicon radish, has been evaluated as a soil building/tillage pan breaking cover crop. Growers have raised several questions as to how to appropriately manage this crop related to soil preparation, fertility, etc. If you are growing this crop for a forage, you would likely benefit from soil preparation, fertility, and an early planting date. For a cover crop, you have to balance multiple priorities: if you till the soil, you burn up organic matter; if you add nitrogen (N) fertilizer, it’s expensive; and if you delay planting your cover crop due to weather or other issues on the farm, yields may be reduced. Lastly, this crop is an annual and will winterkill; it might be important to know how much effect there is if you leave the crop to winterkill compared to disking in the cover crop and leaving the field ready to plant potatoes the next spring. Would it be better to leave the radish to winterkill, and protect your fields from soil erosion?
Last fall we conducted three experiments to evaluate tillage radish (TR) as a cover crop. In each of these trials, we varied one or more conditions to address these production issues. In the first study, (the planting date and soil management trial), we wanted to know what produced more biomass, red clover (undersown below the barley crop) or TR drilled or broadcast into a minimally tilled, but nitrogen (N) fertilized field. With this experiment, we planted tillage radish (TR) alone (9 lbs/ac) vs. TR sown with oats (4.5 lbs TR/ac + 50 lbs oats/ac) planted on August 7 vs. August 21. In the second study, we planted only TR (6 lbs/ac) on one date (8/28) with no added fertilizer N, but the soil was well worked as a wheat stubble had to be plowed down to sow the TR. In the third study, we tilled the field, applied N fertilizer and drilled in TR (6 lbs/ac) on three dates: 8/8, 8/16, and 8/24. Oats were sown at 100 lbs/ac as a check along with four other mustard crops. These studies were all done at the Rogers Farm in Stillwater Maine on reasonably similar soil types. We evaluated above ground dry matter yield, weed biomass, and depth to 300 psi (measured using a soil penetrometer). On the first study, we also measured soil moisture content before planting potatoes.
Based on what we know about crop production, logic would have it that the TR planted as early as possible (in this case on 8/8) in a well managed and prepared field with fertilizer N would yield the greatest amount of cover crop biomass. The later we plant, the cooler the soil tends to be and the less heat there is to push production; so, we generally expect reduced yields. In 2013, sowing TR anytime in August into a well fertilized, properly prepared soil led to above ground biomass yields of TR exceeding 2.5 – 3 tons/ac. This shows the production potential of TR, planted in August into a well prepared, fertilized soil. If the TR were left to winter kill and disintegrate over the spring, this could be a soil building practice. However, due to the other mustard cover crops in the study needing to be incorporated (part of another study), we mowed and disked the field in late fall. Using a soil penetrometer in the spring, we did not find any appreciable differences in depth to 300 psi. In each case, depth of penetration across all the planting dates and treatments was similar (between 11 and 12 inches deep). Weed biomass was low in this study (generally less than 1% of total biomass).
The TR planted on 8/28 into a well worked soil, but with no added N fertilizer, did not yield nearly as well, likely due to limited N. Plants showed lower leaf yellowing, typical of N stress. In that study, half the plots were disked in the fall and half were allowed to winterkill. We did not find differences in depth of penetration by tilling in the fall compared to leaving the field to winterkill. We hoped that the water would flow into the holes left by the dead radish and that freezing would further loosen the soil. But this did not seem to happen. Dry matter yields in this study were limited to 1 ton/ac. So … if biomass production is your goal, adding fertilizer N will be helpful to you. If your goal is simply to have a cover crop that will winterkill, maybe you can save some cash and not buy N fertilizer.
The red clover treatments in the third experiment (the planting date trial) yielded quite well producing more than 3350 lbs/ac above ground dry matter yield. With an additional ton and a half of below ground biomass, it is no wonder that the practice of growing barley undersown with red clover remains a popular practice for potato producers. It is productive, protective against fall soil loss, and extremely competitive with weeds. Tillage radish sown alone (without oats) led to higher weed biomass than where TR was planted with oats. The addition of the fast growing oats served to help suppress weeds compared to TR sown alone. Overall yields of both TR alone (sown at 9 lbs/ac) and TR (4.5 lbs/ac with 50 lbs/ac of oats) were lower that expected. Above ground biomass was a bit more than a ton/ac with the TR sown alone or with oats. The minimal tillage likely hurt biomass production and reduced root depth penetration. We did not find any difference in depth to 300 psi caused by TR breaking up plow pans. We also found higher soil moisture in plots with clover (disked in the fall or spring) than we did where we planted TR.
So, out of all this work, we learned that if you want to maximize yield of TR cover crops, prepare a good seed bed and apply 60 – 70 lbs of N fertilizer/ac, and pack the soil after planting to achieve good seed to soil contact. The same holds for other mustard cover crops. Planting as early in August as possible should help, but with a good seedbed and adequate fertility, planting any time in August should be reasonably productive for cover crop yield. Leaving TR to winterkill will reduce soil loss, and you will burn up less organic matter. If your fields are ever rotated to broccoli, I would not advise planting TR. Tillage radish appears to be an effective crop choice for biomass production, and reducing soil loss, but may not effectively break up plow pans if planted at the later August dates that we used in these studies.
Harvest Efficiency and Combine Adjustment
Andrew Plant, Ag Educator, UMaine Extension
At the beginning of the season we discussed seeding rates and grain drill calibration. Now, at the other end of the season, combine setting and adjustment is equally important to putting a high quality, cost-efficient crop into storage. Modern combines do a great job with threshing and cleaning grains. Invariably though, a portion of the crop will still be left in the field or damaged due to crop conditions or improper combine adjustment. Our goal is to minimize this loss. Beyond the initial settings provided in your combine manual, there are several things you can do to assess your combine operation and make corrections if needed:
Combine efficiency during grain harvest is assessed by estimating loss behind the header and behind the separator. In order to determine a percentage of loss we need to estimate harvested yield, lost yield behind the separator, lost yield behind the header, and pre-harvest loss (loss not due to the actions of the combine).
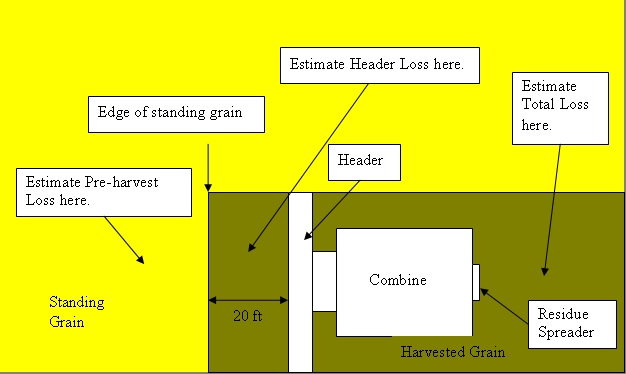
Figure 1. Assessing Grain Harvest Efficiency.
Harvested Yield Estimate
To estimate harvested yield (bu/ac), you can do so by judging the amount of crop going into the combine after starting to harvest. Most combines are equipped with an acre counter and one can judge by the number of acres to fill a known volume with grain.
To determine harvest efficiency and loss, cut up to a certain point in a representative portion of the field so that there is still standing grain. Back up 20 ft (or at most the length of the combine) from that point and do counts behind the residue spreader first, and if needed, between the header and standing grain, and in the standing grain (Figure 1).
Table 1. Square foot seed count estimates for 1 bushel harvest loss of selected small grains and oilseeds. The numbers below represent typical grain seed counts per square foot for different grains that would represent 1 bu/ac, depending on the location you are doing counts. When conducting counts for total harvest loss, use the number that corresponds to the type of residue spreader you use.
| Seed Count per square foot = 1 bu/ac | ||||||
|---|---|---|---|---|---|---|
| Total Harvest Loss (Residue Spreader Type) | ||||||
| Pre-harvest Loss | Header Loss | Windrow | Batwing | Chopper | Chop + Spread | |
| Wheat | 20 | 20 | 80 | 65 | 50 | 25 |
| Barley | 15 | 15 | 60 | 49 | 38 | 19 |
| Oats | 11 | 11 | 44 | 36 | 28 | 14 |
| Soybean | 4 | 4 | 16 | 13 | 10 | 5 |
| Canola* | 1g | 1g | 4g | 3.25g | 2.5g | 1.25g |
| *by weight using a 1 sq. ft. catch pan, equates to approx. 100 lbs/ac | ||||||
Total Harvest Loss
Check for total harvest losses in back of the combine first (behind residue spreader). This will save time; if seed counts (the number of grain kernels either loose or in heads on the ground) behind the combine are below one’s threshold for harvest loss, there is no need to do counts elsewhere. Counts should be taken from 3 different spots behind the separator, 1 ft2 each, and averaged together. A handy tool to have is a square foot frame built out of some spare lumber or lathes.
Total harvest losses shouldn’t exceed 1%-2% of total yield. To estimate the percentage loss:
| % Total Harvest Loss = | 100 x ((Ave. Seed Count/ft2 behind spreader) / (Seed Count in Table 1)) |
| Harvested Yield Estimate |
If the total percentage loss behind the combine separator is above one’s threshold, you should now do counts to determine header loss and pre-harvest loss to see where the actual grain loss is coming from.
Pre-Harvest Loss
Take seed counts like you did behind the residue spreader, but do so now in the standing (uncut) portion of the field.
| % Pre-harvest Loss = | 100 x ((Ave. Seed Count/ft2 in uncut portion) / (Seed Count in Table 1)) |
| Harvested Yield Estimate |
Header Loss
Between the header of the parked combine and the standing grain, repeat the counting procedure by taking 3, one square foot counts of seed.
| % Header Loss = | 100 x ((Ave. Seed Count/ft2) / (Seed Count in Table 1)) – % Pre-harvest Lost |
| Harvested Yield Estimate |
Header losses shouldn’t exceed 0.5%. If losses are exceeding, see below for combine adjustment tips and consult your manual.
Separator Loss
At this point you’ve completed all of the counts that you need to take, but you need to determine the percentage loss occurring due to the separator.
% Separator Loss = % Total Loss – % Pre-harvest Loss – % Header Loss
Separator Loss shouldn’t exceed a range of 0.5% to 1.5%, depending on the comfort level of the farmer. If losses are exceeding, see below for combine adjustment tips and consult your manual.
Once losses are determined, corrections can be made on a systematic basis depending on where the losses are coming from, and observations of the condition of grain kernels and straw:
Key to Combine Adjustment:
1. Is header loss greater than 0.5%? If NO, go to #2. If YES, What type of loss?
a.) Shattered Kernels? Check reel speed (too fast), Check ground speed (too fast), Poor knife condition (sharpen knives)
b.) Whole Heads? Check cutterbar height (too high), Check reel speed (too slow), Check reel height (maybe too high or low).
2. Is separator loss greater than 0.5%-1.5%? If YES go to #3. If NO, keep harvesting.
3. Are engine and separator speeds “OK” (according to manual)? If YES, go to #4. If NO, adjust speeds.
4. Is ground speed too fast? If NO, go to #5. If YES, slow down.
5. What type of loss are you observing?
a.) Unthreshed kernels? Increase cylinder speed or decrease clearance.
b.) Loose kernels? Go to #6.
6. Are you observing pulverized straw or cracked grain? If YES, reduce cylinder speed or increase clearance. If NO, go to #7.
7. Check the chaffer opening. Is it too narrow? If YES, adjust. If NO, go to #8.
8. Check the fan setting.
a.) Too strong? Kernels will blow out the back, and will be observed to drop off the chaffer. Adjust fan speed down.
b.) Too weak? Observe chaffer filling up with chaff, grain will ride out back on top of chaff, unable to fall through to sieve. Adjust fan speed up.
c.) Fan speed OK? Go to #9.
9. Chaffer extension OK? Adjust if needed.
Information on this website is provided purely for educational purposes. No responsibility is assumed for any problems associated with the use of products or services mentioned. No endorsement of products or companies is intended, nor is criticism of unnamed products or companies implied.
© 2014
Call 800.287.0274 or TDD 800.287.8957 (in Maine), or 207.581.3188, for information on publications and program offerings from University of Maine Cooperative Extension, or visit extension.umaine.edu.