Bulletin #2616, Tips for Growing Houseplants in Maine: FAQs About Houseplants in Maine

Tips for Growing Houseplants in Maine: Caring for Houseplants in Maine (PDF)
Tips for Growing Houseplants in Maine: This newly revised and expanded fact sheet series addresses the basics of keeping houseplants. It will help you diagnose common problems with your houseplants, such as insects and diseases; overwatering or underwatering; improper lighting, temperature, or humidity; and insufficient pot size (root-bound). The series addresses how to start new plants from old plants, and also the unique challenges of growing houseplants in Maine, including the use of artificial light.
Adapted by Donna Coffin, Extension Professor, and Rebecca Long, Extension Professional, University of Maine Cooperative Extension
Reviewed by Matt Wallhead, Extension Ornamental Horticulture Specialist, University of Maine Cooperative Extension
For information about UMaine Extension programs and resources, visit extension.umaine.edu.
Find more of our publications and books at extension.umaine.edu/publications/.
People frequently seek the advice of UMaine horticulture extension personnel about the care of certain common but persnickety plants. We’ve collected answers to some of the most frequently asked questions here.
- What’s wrong with my spider plant?
- How should I care for a poinsettia after Christmas?
- Why isn’t my Christmas cactus flowering?
- Why isn’t my African violet flowering?
- How Should I Care for an Air Plant?
- How Can I Use Moss with House Plants?
- Should I Fill the Bottom of My Pot with Stones for Drainage?
What’s wrong with my spider plant?
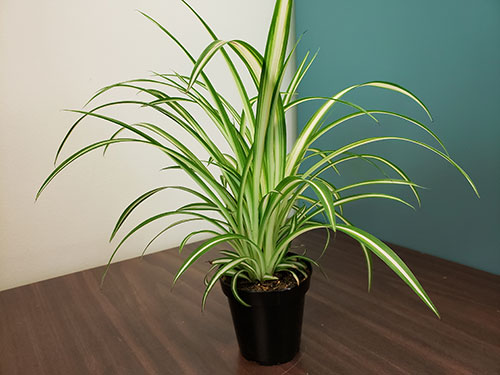
Plant enthusiasts and even professionals who grow spider plants (Chlorophytum comosum) frequently ask two questions: “Why don’t I get baby spider plants or runners developing from the original plant?” and “What causes the leaf tips to burn?” Spider plants need short day length (8 hours) to produce flower stalks (the runner on which plantlets form). The flowers are inconspicuous and open only during the day. After flowering, the plantlets develop. By having lights on in the evenings (thus increasing the day length during the winter months), the development of flowering stalks and ultimately the plantlets is inhibited and the plant produces an excessive amount of vegetative leaf growth. The plant must also be mature before it will produce runners (having it root-bound can sometimes help).
There are several causes of leaf-tip burn. When fertilizing, use a formula higher in phosphorus than nitrogen or potassium (use a 1 – 2 -1 or 5 – 10 – 5 fertilizer ratio). Improper watering and too much fertilizer can cause a soluble salts buildup in the soil. Never allow the plant to dry out excessively. Stick your finger into the pot and if it is dry down an inch or more you need to water. Another way is to lift the pot to see how light or heavy it feels. And a third way is if the leaves start to wilt, a sure sign it needs more water.
When you do water, water thoroughly from the surface, allowing plenty of water to drain out. Minute amounts of fluoride added to public drinking water can also cause tip burn. Keep the soil pH up around 6.3–6.5 to increase the amount of calcium in the soil available to the plant and to decrease the fluoride availability. Small amounts of lime can be used to increase the pH of the soil.
How should I care for a poinsettia after Christmas?
With a little bit of special treatment, you can keep your poinsettia (Euphorbia pulcherrima) and bring it into flower again for next Christmas.
As the flowers pass maturity, the leaves and bracts (the colored leaves that serve as the “flower” on a poinsettia) will fall. When about half of them have fallen off, gradually reduce the amount of water you give the plant until the soil is completely dry. The plant is now in a state of dormancy and can be stored in the basement or a dark room at 50°F without watering for the winter.
Spring and Summer Care:
When new shoots begin to grow on the old stems, move into the light, and start to water again. Cut back the stems to approximately 4 inches and repot the plant in fresh, clean soil. This soil should be porous to allow free drainage and to avoid waterlogging. (You will notice that there are usually three to four separate plants that make up one poinsettia plant). Leave a space of 0.5–1 inch between the top of the soil and the rim of the pot for watering. If the night temperature outdoors still falls below 50°F, keep the plant indoors in a sunny position.
When the danger of late spring frost has passed, prepare to plunge the poinsettia pot into the ground in your garden, in a place that receives full sunlight all day. First, line the bottom of the hole with an inch or two of gravel, to ensure the pot does not stand in a puddle of water. Then place the pot in the hole and fill it with soil to the top of the pot. Turn the poinsettia pot regularly to prevent rooting through the bottom holes; a quarter turn each week should accomplish this, and will also help to keep the plant growth even all around the pot. If the pot is not turned, one side may get more sun than the other.
Summer Care:
Pinching—If you prefer a short plant with many flowers, pinch out the growing shoots to encourage branching. This should be done at 3–4 week intervals, according to speed of growth. Remove the top 0.25 inch by hand or with a clean, sharp knife. Two large fully expanded leaves should be left below the pinch; this serves as a guide for knowing when the shoots are ready for pinching. Continue this way until mid-August, when the plant should have a satisfactory shape and number of shoots. For a tall Christmas poinsettia plant, do not pinch the shoots.
Fertilizer—Give a soluble complete fertilizer (for example, 20-20-20), “meaning 20% nitrogen (N), 20% phosphorus (P), and 20% potassium (K)” once each month at the rate recommended by the manufacturer.
Disease and Pest Control—Outdoors, your poinsettia will be exposed to a number of garden diseases and pests. Spray it regularly to prevent damage and subsequent death of the plant. A spray containing both insecticide and fungicide can be used on your poinsettia. Read and follow manufacturer’s directions.
Fall Care:
At about the end of August, bring the plant indoors. Spray well for pests and diseases beforehand because all plant pests and disease organisms will multiply more quickly indoors or in a greenhouse and will invade any other growing plants. Place the poinsettia in a sunny position at room temperature.
Flowering is photo-periodically induced in the poinsettia. This means that flowers begin to form when the nights are long enough. Poinsettia is a short-day or long-night plant. Flower initiation begins about early October or late September. Because flower initiation depends upon the length of the dark period, your poinsettia must be kept completely dark from 5 p.m. to 8 a.m.
The time to give this treatment is from the end of September until December 15. Once you can see the flowers developing on the growing plants—that is, when the floral bracts start to show definite color—it is not as important to continue giving the dark period, though it is advisable to continue until the bracts are almost fully expanded. If at all possible, do not spray the plant with chemicals after the bracts begin to develop color.
Temperatures should be no less than 60°F, but not more than 70°F at night. During the day, give the plant as much sunlight as possible. Reduce the amount of fertilizer given by bringing the plant indoors. Growth is slower in the lower light intensity inside the house so the plant will need to be fertilized less frequently.
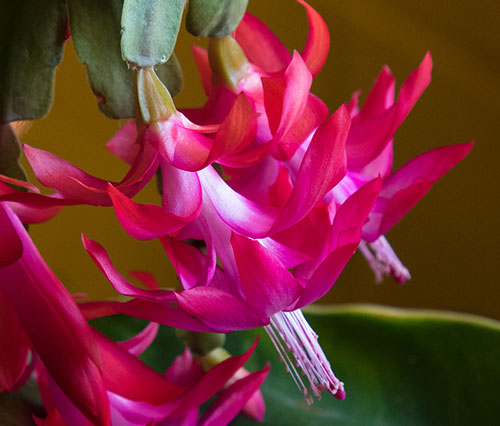
Why isn’t my Christmas cactus flowering?
To bloom, Christmas cacti (Schlumbergera bridgesii) require bright, indirect light or filtered light and enough moisture that the potting material does not dry out. However, plants can be too wet as well as too dry. To prevent buildup of mineral and soluble salts, it is best to water with rainwater, distilled water, or melted snow at room temperature. If using rainwater isn’t possible, the plant can be repotted in new, clean organic soil once a year.[1]
We need to understand the conditions Christmas cacti need to rebloom each year. Much like a poinsettia, the Christmas cactus requires certain light and dark periods in late fall to bloom. Cool nighttime temperatures (about 50–55°F) and warmer daytime temperatures (65°F) in October and November, along with 14 hours of uninterrupted darkness and bright light for the remaining 10 hours will initiate bud formation by December. This is why Christmas cacti in offices seem to have no problem blooming, but those kept in homes struggle to bloom.
It is easy to confuse Christmas cacti with Thanksgiving cacti (Schlumbergera truncata) and Easter cacti (Rhipsalidopsis gaertneri). The difference is in the shape of the leaves (Figure 3) and the time of bloom. The leaf segments, botanically termed “phylloclades,” are serrated or “toothed” on Thanksgiving cacti as compared to the more rounded leaf margins of Christmas cacti. Easter cacti bloom, of course, in spring, and have leaf margins with small bristles. Easter cactus leaves are more three-dimensional than on the other two cacti, have a thick ridge on one side, and the flowers are more star-shaped.
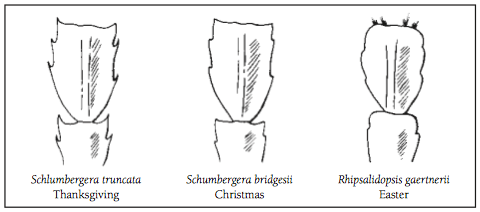
Thanksgiving cacti[2] need to start 12–14 hours of darkness in mid-September to bloom around Thanksgiving. Easter cacti need to start 14–16 hours of darkness the first of January to set buds so the plant can bloom near Easter. These plants can otherwise be treated as Christmas cacti are.
Why isn’t my African violet flowering?

To keep your African violet (Saintpaulia ionantha) flowering year-round, it’s all about balance.
Light: Although lack of light may be the reason your African violet isn’t blooming, you don’t need to put them in your brightest southern-facing window. African violets prefer bright, indirect sun, like a sunny east or west window. Excessive light can burn leaves. The use of sheer curtains in a sunny window can help diffuse intense light. They also need at least 8 hours of dark to trigger blooming, so if you use supplemental lights, limit their run-time to 16 hours or less a day.
Water: African violets prefer soil that is evenly moist at all times. Both excessively dry and wet soil can damage the root system, which can delay or prevent flowering.
Nutrients: Fertilizing regularly can ensure your African violet has the nutrients it needs to flower. Use either a fertilizer specifically for African violets or any complete balanced fertilizer (containing equal amounts of nitrogen, phosphorus, and potassium). Avoid fertilizers that contain urea, which can burn sensitive roots. Be cautious not to over-apply nitrogen, which can cause the plant to focus on new leaf growth at the expense of flowering.
Pot size: A snug pot will encourage flowering. African violets that have been recently repotted or potted into too large of a pot may not flower. Too large of a pot may also retain too much moisture and lead to root rot. You can repot plants into the same pot with fresh soil once a year, when lower leaves drop too fast, and/or when soil becomes depleted.[3]
Temperature and Humidity: African violets are sensitive to temperatures below 60°F, and they prefer humid conditions, although they can survive at the typical humidity levels found in homes.[4]
Homes heated with wood heat can be especially dry. African violets and other houseplants can be grouped together to increase the humidity around the plants. Also, placing the African violet pot on top of stones in a tray of water will also increase humidity.
How can I get my Phalaenopsis orchid to rebloom?
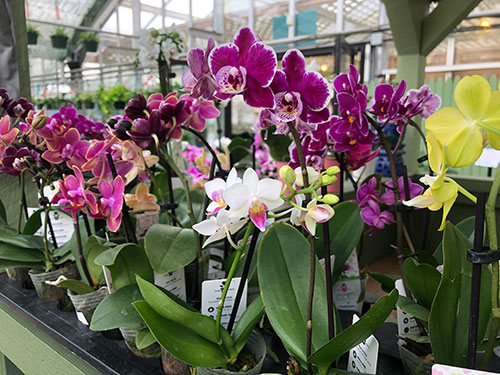
Whether you received one as a gift or couldn’t resist purchasing one for yourself, you may be wondering what to do with your Phalaenopsis orchid now that it’s done flowering. Start by removing the old flower stalk at the base. Now that it has finished blooming, it’s also a good time to repot it. Healthy orchid roots will be greenish-white. Cut off any dead or dried-out roots. You can repot it in the same pot or, if you choose to use a larger one, size up by no more than an inch or two. Specially designed orchid pots have holes in the sides to provide airflow, which will prevent root rot. You can also use unglazed terracotta.[5]
Figure 5: Phalaenopsis orchid.
Next prepare your potting medium by mixing equal parts of sphagnum moss and orchid potting mix, which should have bark in it. Because these orchids are epiphytic—meaning they grow in trees—this mix more closely mimics their natural growing conditions than your standard soilless potting mixes.[6] Presoak your mixture and then squeeze out any excess water before repotting the orchid.
To ensure your orchid reblooms, provide bright indirect light, such as in an east window. Bud formation is triggered by the shorter days and cooler nights of fall. Providing nighttime temperatures of 55°F, like in a cool window, will help trigger bud formation, but be cautious because extreme changes in temperature could result in bud drop. Orchids also appreciate high humidity like African violets, regular fertilizing during the active growing season, and being repotted in fresh growing medium yearly.
How Should I Care for an Air Plant?
Air plants are in the Tillandsia genus of the bromeliad family that are native to tropical and subtropical climates. These epiphytic plants cling to tree trunks and branches or nonliving structures such as rocks or buildings. They don’t need soil to sustain them because they have special cells in their leaves that absorb moisture from air or rain.
They can be grown indoors in bright, indirect light. Because they don’t need soil and our homes are a much drier environment than a tropical forest, providing consistent moisture is a challenge. Spraying or misting on a regular basis is not enough. Air plants should be submerged in room-temperature water for 20 minutes and drained upside down for 30 minutes or shaken so water doesn’t accumulate in the leaves. If you are on a public water supply, allow the water to sit overnight to reach room temperature and to allow the chlorine to dissipate before submerging your air plant. Generally plan to water weekly when plants are in bright locations or every two weeks when in cooler, darker locations.
Every third or fourth time that they are watered, a half- or quarter-strength of the manufacturer recommendation of soluble balanced fertilizer can be used. Air plants can be set outside during summer when the danger of frost has passed, but must be brought back in before frost in the fall. Air plants can bloom, but as with all bromeliads, they die after flowering. New offsets (or pups) form to replace the original plant before the bloom.[7]
How Can I Use Moss with House Plants?
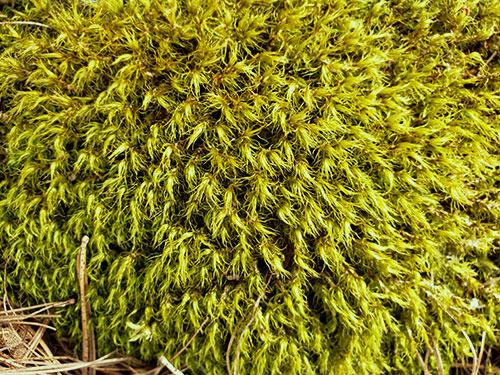
Using moss in a horticulture project is not new. Moss has been used to line hanging baskets, cover soil in potted plants or terrariums, or in plant balls or Kokedama (Japanese moss ball string gardens.) Gardeners can either harvest their own moss (with the property owner’s permission) or buy fresh, dry, or preserved moss.
Forest mosses[8] can be collected from rotting logs, rocks, or the forest floor. Sheet moss are the most commonly gathered moss because they can be easily peeled in loose sheets from rocks or logs.
Mosses are likely to be found in moist low areas near streams and rivers that have a large number of fallen trees and rocks. Mosses reproduce with tiny seedlike spores that are in small pockets on stalks that turn yellow, orange, red, or brown as they mature. When harvesting, leave behind patches with many capsules so these spores can “reseed” the area. Most regrowth comes from the fragments that are left behind.
Mosses regrow slowly, between 0.25 and 2.5 inches each year. Recovery is slowest (about 20 years) when all the moss is removed from a log or rock. But recovery can happen more quickly (about 10 years) when only a third to a half of the sheet moss is left behind in patches.
Moss harvesting is easiest when done after a heavy rain so the moss is fully hydrated. Freshly harvested moss can be used immediately for your craft projects. You can gently shake out the mosses to remove excess soil and leaves. Care must be taken to be sure the mosses are not exposed to excess heat or light and are kept moist. Sheet moss can be dried to keep longer.
To keep moss alive and growing, it must be placed out of direct sunlight and kept evenly moist by watering regularly.
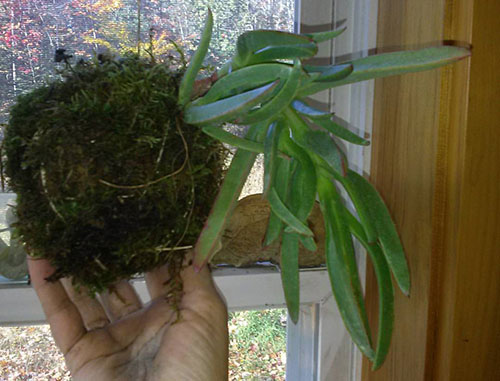
To make a Kokedama,[9] start with a well-rooted cutting or root-bound houseplant. The best plants are those that can tolerate dry conditions. You can use potting soil mixed with bonsai soil or kitty litter to form a ball and pack around the roots and then wrap with moistened sheet moss and secure with twine. You can display your Kokedama on a tray, saucer, or other interesting vessel. Some enthusiasts cover their plant with a cloche to conserve moisture. They can also be hung from twine. Misting can keep the moss in good shape, but occasionally submerging the entire ball in a bowl of water to rehydrate the soil and moss is also done.
Should I Fill the Bottom of My Pot with Stones for Drainage?
It seems to make perfect sense—to improve drainage, why not add gravel or stones to the bottom of your pot? Thanks to soil scientists, we know that this may not have the intended effect. When moving down through soil, water cannot easily move from a layer of finer soil to a distinct layer of coarse soil. In fact, the water will fill up the pore space in the finer top layer before water begins moving down through the coarse layer, resulting in what is known as a perched water table. This can have the unintended consequence of moving the saturated zone up higher, resulting in roots staying wet longer.[10] To ensure soil is adequately well-drained, use only containers with proper drainage holes and make sure your potting medium is well mixed and contains coarser materials such as sand, perlite, or bark. Avoid placing plants in pots that are too large, because this can cause the medium to stay wet longer, resulting in root rot.
[1] Voyle, G., How to Care for and Reflower your Christmas Cactus, 2015, Michigan State University Extension, https://www.canr.msu.edu/news/how_to_care_for_and_reflower_your_christmas_cactus
[2] Perry, L. Easy Houseplants: Thanksgiving Cactus, University of Vermont Extension, The Green Mountain Gardener, https://pss.uvm.edu/ppp/articles/thankcac.html
[3] Feather, S., 2015, Why Isn’t My African Violet Flowering, Penn State Extension https://extension.psu.edu/why-isnt-my-african-violet-flowering
[4] Thomas, P., Growing African Violets, Cir. 660, 2016, University of Georgia Extension, https://extension.uga.edu/publications/detail.html?number=C660&title=Growing%20African%20Violets
[5] Finneran, R., 2012, Repot Orchids for Encore Bloom Performance, Michigan State Extension, https://www.canr.msu.edu/news/repot_orchids_for_encore_bloom_performance
[6]Orchid Care and Repotting, 2019, UCONN Extension, Lady Bug Blog, http://www.ladybug.uconn.edu/FactSheets/orchid-care-and-repotting.php
[7] Steil, A., 2019, All About Air Plants, Iowa State University Extension, https://hortnews.extension.iastate.edu/2019/12/all-about-air-plants
[8] Peck, J., et al. Nontimber Forest Products (NTFPs) from Pennsylvania 3. Forest Moss, Penn State University, 2011, https://www.rootreport.frec.vt.edu/docs/LogMossPSU.pdf
[9]Gucker, D. et al., 2019, Kokedama String Garden, Illinois Extension, https://extension.illinois.edu/blogs/know-how-know-more/2019-01-07-kokedama-string-gardens
[10] Chalker-Scott, L., 2015, The Myth of Drainage Material in Container Plantings, Washington State Extension https://s3.wp.wsu.edu/uploads/sites/403/2015/03/container-drainage.pdf
Additional Resources
- Bulletin #2611, Caring for Houseplants in Maine
- Bulletin #2612, Dealing with Houseplant Problems in Maine
- Bulletin #2613, Controlling Insects and Disease in Houseplants
- Bulletin #2614, Growing Houseplants Under Artificial Lights in Maine
- Bulletin #2615, Creating New Plants from Old Plants
Sources
Houseplants in Maine by Lois Stack, Ornamental Horticulture Specialist, University of Maine Cooperative Extension
House Plant Tips by Gleason Gray, Extension Educator, Penobscot County, University of Maine Cooperative Extension
Information in this publication is provided purely for educational purposes. No responsibility is assumed for any problems associated with the use of products or services mentioned. No endorsement of products or companies is intended, nor is criticism of unnamed products or companies implied.
© 2021
Call 800.287.0274 (in Maine), or 207.581.3188, for information on publications and program offerings from University of Maine Cooperative Extension, or visit extension.umaine.edu.
University of Maine Cooperative Extension is an equal opportunity institution and provider committed to nondiscrimination. For more information, visit extension.umaine.edu/nondiscrimination.