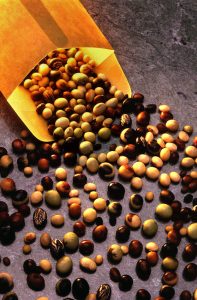
Bulletin #2750, An Introduction to Seed Saving for the Home Gardener
By Mark Hutton, Extension Vegetable Specialist, University of Maine Cooperative Extension
For information about UMaine Extension programs and resources, visit extension.umaine.edu.
Find more of our publications and books at extension.umaine.edu/publications/.
Rediscovering Seed Saving
Seed saving is an ancient art that enabled humans to cease being hunter-gatherers. Up until the end of World War II, home gardeners typically saved their own seeds, because high-quality seeds at affordable prices were generally not available. However, seed saving declined with the development of the commercial seed industry, which made low-cost, high-quality vegetable and flower seeds readily available. Presently, renewed interest in heirloom, unique, and locally adapted vegetable and flower varieties is sparking a resurgence in seed saving.
Seed-saving is a natural next step for passionate gardeners. Saving seeds not only allows home gardeners to save money; it provides them with an opportunity to express their creativity! This is because saving seed is a form of selection—the very basis of plant breeding. When choosing which plants to save seed from, a gardener must decide which plants have the most desirable characteristics in terms of meeting their goals for plant size, yield, fruit quality, maturity date, attractiveness, etc., thus helping to improve the offspring. When you save seed from your garden, you can create a cultivar uniquely suited to your location, your aesthetic sensibilities, and culinary tastes. Saving seeds takes time, planning, and attention to detail. Here are some basics to get you started on your seed saving adventure.
Plant Reproduction Basics
Self-pollinating or cross-pollinating?
Plants are broadly classified by their method of reproduction as either self-pollinating or cross-pollinating. Self-pollinated plants have flowers with both male and female parts (“perfect” flowers), and typically have flower structures that prevent the introduction of pollen from other plants. Cross-pollinating crops have mechanisms that encourage pollination by other plants of the same species. These may include separate male and female flowers on the same plant (“monoecious” plant sexuality, as in pumpkins), separate male and female plants (“dioecious” plant sexuality, as in asparagus), or some form of self-incompatibility. Cross-pollinated plants are pollinated either by wind or insects. Table 1 lists common vegetable garden plants and their modes of reproduction.
Plants that are not self-pollinating are susceptible to cross-pollination. In other words, if two varieties of squash bloom near each other, the resultant seed is likely to be a cross between the two. Some plants will also cross with wild varieties (for example, carrots can be cross-pollinated by the wild carrot known as Queen Anne’s lace). With the exception of the self-pollinators, then, it is a good idea to grow only one variety of any plant from which you want to save seed that season. Learning how your plants are pollinated will help you avoid accidental crosses.
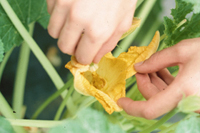
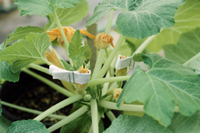
Plants pollinated by insects can be hand-pollinated. To do this you must protect the opening bud from contact with the bees. In the morning, pluck the male blossom and touch the cluster of pollen (called anthers) to the center of the female flower (called the stigma). Close the female flower again so bees can’t get in. Tag the blossom. Grow the fruit to maturity for the desired seed.
Hybrid or open-pollinated?
Hybrid varieties
Many vegetable and flower varieties sold today are hybrids. Hybrid varieties are produced by controlling pollination and crossing two different but genetically uniform parents to produce the hybrid seed—known as the F1 generation—that gardeners purchase. F1 hybrids are typically uniform and vigorous. However, F1 hybrids are not true-breeding: seed produced by the hybrid, which is known as the F2 generation, will produce a population of plants displaying traits covering the full genetic range of the two parents of the F1 hybrid. The fact that the offspring of the hybrid parent will not be identical to the parent has advantages, particularly if you are interested in a breeding project. Plant breeders often create a range of characteristics in a population by crossing together two parent lines and then selecting ideal types from the subsequent generations. The amount of variation decreases with each subsequent generation and selection of desirable plant traits (color, size, yield, etc.).
Open-pollinated varieties
Open pollination refers to seed produced without control of the pollen source. Open-pollinated cultivars may be either self-pollinating or cross-pollinating. Breeders must isolate cross-pollinating cultivars from other varieties of the same species in order to obtain the desired result. Open-pollinated cultivars will usually produce offspring that are very close to the parent plants, provided the parents were kept separated from other varieties. Isolation is especially important with cross-pollinated crops.
| Self-pollinated plants | Cross-pollinated plants pollinated by wind | Cross-pollinated plants pollinated by insects |
|---|---|---|
| Legume Family | Grasses | Asparagus |
| Beans | Corn | Allium family |
| Peas | Chenopods | Onion |
| Composite family | Beets | Shallot |
| Lettuce | Swiss chard | Leek |
| Endive | Spinach | Umbel family |
| Chicory | Carrot | |
| Radicchio | Celery | |
| Solonacious | Parsley | |
| Tomato (many heirlooms cross-pollinate at a high frequency) | Dill | |
| Parsnips | ||
| Brassica family | ||
| Broccoli | ||
| Brussels sprouts |
||
| Cabbage | ||
| Cauliflower | ||
| Chinese cabbage | ||
| Collards | ||
| Radish | ||
| Rutabaga | ||
| Cucurbit family | ||
| Cucumber | ||
| Melon | ||
| Watermelon | ||
| Summer squash | ||
| Zucchini | ||
| Pumpkin | ||
| Winter squash | ||
| Solonacious family | ||
| Pepper | ||
| Eggplant |
Annuals, or biennials?
Annual crops are the most common choice for seed savers. Annual crops complete their life cycle in a single growing season, simplifying the breeding and seed-saving process. Seed can be saved from biennial crops, but you will need more planning.
Biennials take two years to complete their life cycle. In the first year, the plant is said to be in a juvenile growth stage and is unable to flower. During the second year, after the proper environmental cue (often day length or a period of cold weather) the plant flowers (bolts). In mild climates biennials are often left in the field to overwinter, but here in Maine, most biennial crops will need to be dug in the fall and stored at or near freezing until spring, when they can be replanted and then allowed to go to seed. Beets and cabbage, for instance, need to be handled this way to produce seed.
Selecting Mother Plants
Throughout the growing season, evaluate plants for characteristics such as disease presence/absence, growth rate, color, height, early blooming, late bolting, weather tolerance, insect tolerance, maturity date, yield, and quality. Tag or mark those plants that you feel are superior and thus possible candidates for seed saving. Save seed from healthy, disease-free plants. With fruiting crops like tomato, pepper, squash, and cucumber, harvest seed from only disease-free, damage-free fruit. Wash soil or plant tissue from the fruit before cutting the fruit to extract seeds.
Processing the Seeds
The methods used to harvest, extract, and clean seeds depend on whether the seeds are produced within seed pods (dry seed) or fleshy fruits (wet seed).
Dry (pod) seed
Saving seeds from dry seed crops (peas, beans, brassicas, and most flowers) is a simple, straightforward process. Allow the seed structures to remain on the plant until the seed pod or head begins to dry and turn brown. At this stage, harvest the seed pods or heads and place them into a paper bag that is labeled with the type of seed, seed source, and time of collection. Plants — like lettuce — that produce many flowers on a seed stalks should be harvested before the seeds fully mature and the white “feathers” developed. Cut each flower stalk below the lowest flower and place into a paper bag head first. Place the bag with the top open in a warm, dry area with good air circulation for one to two weeks, or until the seed pods or seed heads are completely dry and starting to shatter (shed seed). Seeds can be thrashed from the pods or seed heads by breaking open the seed pods or rubbing the seed heads between your palms. A good pair of gloves is important. Seeds can be separated from the chaff by first picking out larger pieces of pod and flower structures, and then winnowing.
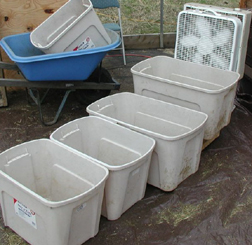
Winnowing is the process of separating the seed from the pieces of the seed pod and other plant debris. Winnowing is best done in a large open area, like a garage, in front of a small variable speed fan set on low or medium. Always winnow on top of a cloth or plastic tarp in order to be able to recover seeds that may accidentally be blown away as you work. To winnow the seed, slowly pour seeds from one container into a catch container placed on the ground. The idea is to allow wind to blow away small pieces of debris and lighter, undeveloped seed. This takes some practice. You may want to start out with several catch containers placed downwind of each other. Ideally, the heaviest and best seed will fall straight down; slightly lighter seed and debris should land in the second container, still lighter material in the next downwind container, and so on.
Wet (fleshy-fruit) seed
To save seed from fruited crops (tomato, melons, cucumbers, squash, and pumpkins), begin by selecting clean, disease-free, fully ripe fruits as seed sources. Cut the fruit open using a clean knife and scoop or squeeze the seeds into a clean container. Add water to the container and keep the container at room temperature, allowing the mixture to ferment for several days. Stir daily to help separate seed from the pulp.
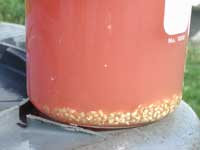
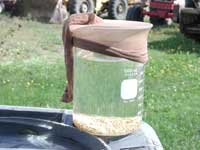
After several days the mixture should be good and frothy (Figure 3). You will notice many seeds floating to the top of the container: these ‘floaters’ are nonviable, or at best will produce weak seedlings. Strong, viable seeds will sink to the bottom of the container. Pour off the pulp and floaters, leaving the good seeds in the bottom of the container (Figure 4.). Repeat this process several times, adding fresh water each time and allowing the seeds to settle before pouring off the water.
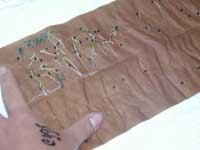
Once you have clean seeds in the container, put them into mesh bags (the feet of old stockings work well)—or spread them on paper towels—to dry. (Figure 5.) If you put the seed into bags you’ll need to hang them up to dry. Shake each bag several times a day to speed the drying process. Dry seed as quickly as possible, but the temperature must not go over 96°F. Do not dry in direct sun. Many people find that the top of a refrigerator is warm and has a lot of air circulation.
Caution: Tomato seed can be difficult to remove from paper or cloth towels, as well as paper plates or non-rigid plastic: you may want to test a few drying surfaces. Many tomato seed savers have good success with coffee filters.
Note: Pepper seed, although harvested from a fruit, does not require fermentation. Harvest seed from mature colored peppers, such as red or yellow, not from immature green fruit. Cut open the fruits and scrape the seed onto a paper towel or plate to dry. If saving seed from hot peppers, wear gloves and handle the cut fruit carefully to avoid skin and eye irritation.
Storing Seeds
Store dry seed in clearly marked containers with the species, variety of seed, and collection date, as well as a brief description, written on the outside of the container and on a slip of paper within the container. Small seed is best stored in coin envelopes; use clasp envelopes or a paper clip to hold the envelope closed rather than pasting it shut. Large-sized seed or greater quantities of seed can be stored in any airtight container. Store seeds in a cool, dry location with constant temperature and humidity. The longevity of seed in storage is dependent on storage conditions, the initial quality of the seed, and the seed species. In general, large seeds can be stored longer for longer periods of time than small seeds.
Before planting in the spring, you should consider testing the germination of the seed you have saved. Count out up to 100 seeds of small-seeded species, or 25 seeds of larger-seeded types, for the germination test. Fewer seeds can be used if you have limited numbers. Lay the seeds in a line on a paper towel about 2 inches from the edge of the towel. Fold the towel over the seeds and then roll it up like a jellyroll. Moisten the towel, squeeze out excess water, and place it in a plastic bag set in a warm location out of direct sunlight. After 7 days, remove the towel from the bag, unroll it, and count the number of germinated seeds. Determine the germination percentage and adjust your planting plans; over-seeding if need be to make up for poor germination. If the germination is less than 50 percent, you will want to be sure to save increased amounts of that variety in the coming growing season.
You may want to start a notebook or journal to record information about the seeds you are collecting.
Resources
Seed Savers Exchange. 3094 North Winn Road, Decorah, Iowa 52101. 563.382.5990.
Restoring Our Seed. P.O. Box 520, Waterville, ME 04903. 207.872.9093.
Ashworth, Suzanne. Seed to Seed: Seed Saving and Growing Techniques for Vegetable Gardeners, 2nd ed. Decorah: Seed Savers Exchange, 2002.
Maynard, Donald N., and George J. Hochmuth. Knott’s Handbook for Vegetable Growers. New York: John Wiley & Sons, 1997.
| Vegetable | Number of Seeds per ounce | Expected storage life (years) |
|---|---|---|
| Beans | 100 | 3 |
| Beets | 2,000 | 4 |
| Broccoli | 8,100 | 3 |
| Brussels sprouts | 8,500 | 5 |
| Cabbage | 7,700 | 5 |
| Carrots | 2,200 | 3 |
| Cauliflower | 8,600 | 5 |
| Celery | 76,000 | 5 |
| Chinese cabbage | 7,000 | 5 |
| Collards | 7,700 | 5 |
| Cucumbers | 1,100 | 5 |
| Eggplant | 7,200 | 5 |
| Endive | 17,000 | 5 |
| Kale | 10,000 | 5 |
| Kohlrabi | 9,200 | 5 |
| Leeks | 9,900 | 3 |
| Lettuce | 26,000 | 5 |
| Muskmelons | 1,000 | 5 |
| Mustard | 15,000 | 4 |
| Onions | 8,500 | 1–2 |
| Parsley | 18,000 | 2 |
| Parsnips | 6,800 | 1–2 |
| Peas | 200 | 3 |
| Peppers | 4,500 | 4 |
| Pumpkins | 200 | 4 |
| Radishes | 3,100 | 5 |
| Rutabagas | 11,000 | 5 |
| Spinach | 2,900 | 5 |
| Squash | 300 | 5 |
| Sweet corn | 100–200 | 1–2 |
| Tomatoes | 10,000 | 4 |
| Turnips | 14,000 | 5 |
| Watermelons | 300 | 5 |
Information in this publication is provided purely for educational purposes. No responsibility is assumed for any problems associated with the use of products or services mentioned. No endorsement of products or companies is intended, nor is criticism of unnamed products or companies implied.
© 2010
Call 800.287.0274 (in Maine), or 207.581.3188, for information on publications and program offerings from University of Maine Cooperative Extension, or visit extension.umaine.edu.
In complying with the letter and spirit of applicable laws and pursuing its own goals of diversity, the University of Maine System does not discriminate on the grounds of race, color, religion, sex, sexual orientation, transgender status, gender, gender identity or expression, ethnicity, national origin, citizenship status, familial status, ancestry, age, disability physical or mental, genetic information, or veterans or military status in employment, education, and all other programs and activities. The University provides reasonable accommodations to qualified individuals with disabilities upon request. The following person has been designated to handle inquiries regarding non-discrimination policies: Director of Equal Opportunity and Title IX Services, 5713 Chadbourne Hall, Room 412, University of Maine, Orono, ME 04469-5713, 207.581.1226, TTY 711 (Maine Relay System).


