Bulletin #2702, Landscapes for Maine: Adding a Rain Garden to Your Landscape

Bulletin #2702, Landscapes for Maine: Adding a Rain Garden to Your Landscape (PDF)
Developed by UMaine Extension Assistant Scientist Laura Wilson and Water Resource Specialist Mary Wicklund of the Portland Water District, with landscape diagrams by Kirsten Reberg-Horton
For information about UMaine Extension programs and resources, visit extension.umaine.edu.
Find more of our publications and books at extension.umaine.edu/publications/.
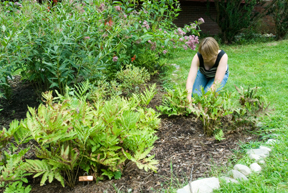
Table of Contents:
- What Is a Rain Garden and Why Would You Want One?
- Planning for Your Rain Garden
- Designing Your Rain Garden
- Installing Your Rain Garden
- Example of a Sunny Rain Garden Design
- Example of a Shady Rain Garden Design
- Resources
- Need an expert?
- References
- Full Graph and Plan Descriptions
What Is a Rain Garden and Why Would You Want One?
A rain garden is a depression in the ground that is planted with water-loving native perennials and shrubs. Water from a downspout or other source flows into the rain garden, where it soaks into the ground and is used by the plants.
Rain gardens make sense
Rain gardens help protect the water quality in our lakes, streams, and rivers by reducing the amount of polluted runoff reaching these resources. If designed and installed correctly, rain gardens reduce the amount of runoff from hard, impervious surfaces by up to 98 percent. As this water is no longer running over the surface of the land, it cannot transport pollutants to nearby streams via surface runoff or storm drains.
Rain gardens are easy and inexpensive to install and maintain. Since they are flexible in size, shape, and appearance, they can fit into almost any landscape and lifestyle.
Rain gardens are beautiful
In addition to adding beauty to lawn areas with height and color, rain gardens can replace lawn areas, which would otherwise need mowing, with an interesting combination of native plants. Rain gardens can also eliminate unsightly erosion problems on your property by reducing excess water from rooftops or driveways. They can complement any home style, as there are many choices of shapes and plants that can be incorporated into your garden. Rain gardens can even attract birds and butterflies!
| Pollutant Removal Mechanism | Pollutants Removed |
|---|---|
| Absorption to soil particles | Dissolved metals and soluble phosphorus Small amounts of nutrients including phosphorus and nitrogen |
| Microbial processes | Organics, pathogens |
| Exposure to sunlight and dryness | Pathogens |
| Infiltration of runoff | Minor abatement of localized flooding, minor increase in the localized base flow of groundwater, allowing some nutrients to be removed when groundwater flows through buffer |
| Sedimentation and filtration | Total suspended solids, floating debris, trash, soil-bound phosphorus, some soil-bound pathogens |
| Brix, H. “Wastewater treatment in constructed wetlands system design, removal processes, and treatment performance.” In Constructed Wetlands for Water Quality Improvement, ed. G.A. Moshiri, 9–22. Boca Raton, Fl: CRC Press, 1993. Adapted in W. Hunt and N. White, Designing Rain Gardens. NC State University Cooperative Extension, 2001. | |
Planning for Your Rain Garden
Choose a location
Follow these placement guidelines to help make the rain garden more enjoyable for you and your neighbors:
- Remember that the purpose of the rain garden is to put water into the ground! Place your garden at least ten feet away from your foundation in order to avoid water seepage in your basement.
- Do not place a rain garden over a septic tank or leach field.
- Do not place a rain garden near your drinking water well.
Do rain gardens harbor mosquitoes?
A properly constructed rain garden will drain water, not hold it. In a well-designed rain garden, water will soak into the ground in a day. Mosquitoes will not survive in areas that dry out in seven days or less after a summer rain, because the development of a mosquito from egg to adult takes longer than seven days.
- Be aware of and avoid underground pipes and utilities. If you don’t know where they are, call Dig Safe® at 1.888.DIG.SAFE (344.7233) at least three days before digging. Outline the proposed area with white paint. Dig Safe® will automatically notify all of its member utilities (gas/oil/steam, electric, communications, water, and sewer) that own underground facilities in the area of the excavation so that they can mark their facilities.
- Check for any private wiring or underground utilities. Look around for lights in the yard, such as spotlights on flagpoles or signs, lights at the end of the driveway, and sheds with electricity.
- Place the rain garden in a flat area if possible to make installation easier.
- Do not place the rain garden in a naturally wet area. Wet spots may seem ideal, but they will drain too slowly.
- Avoid trees and tree roots, as they may be injured by nearby digging and may not tolerate additional moisture in the soil.
- Maine has mandatory protective Shoreland Zoning regulations. If you are working on lakefront, stream front, or coastal property, contact your local code enforcement officer before you begin. If you live in Maine’s unorganized territory, contact the Land Use Regulation Commission (LURC) at 207.287.2631.
Determine how big your rain garden should be
For the best water quality treatment benefits, the rain garden should hold the water from a one-inch rainstorm. An easy way to ensure this is to make the rain garden 30 percent of the drainage area. To calculate that volume, figure out the size of the rooftop, driveway, or other impervious surfaces that will drain into your garden in square feet, and make the garden area 30 percent of that area. For example, a 1000-square-foot rooftop would require a 300-square-foot rain garden.
You can make the rain garden larger than 30 percent of the drainage area, or as small as 20 percent. Simply use 30 percent as a guideline.
Decide how to channel the water
How you direct water from the downspout, driveway, or other hard surfaces to the rain garden is a matter of choice. Some common methods include gutter extensions, piping, and ditches.
Gutter extensions are simply metal gutter pipes attached to the ends of your downspouts. They must be angled downward slightly for the water to flow. The advantage of gutter extensions is that they are easy to install. However, some people find them unsightly. You may prefer to carry your water underground via plastic or PVC pipe.
I have a lot of standing water on my property. Can I still have a rain garden?
Rain gardens are designed to infiltrate water. Standing water indicates poor infiltration, and we do not recommend directing additional water to these naturally wet areas.
Grass-lined shallow ditches, or swales, can be used to direct water to the rain garden. These ditches should be gently sloped to avoid erosion. The side slopes of the ditch should be no steeper than a 2:1 ratio (a one-foot rise for every two feet across).
If you expect heavy flows of water (e.g. from a large driveway area), a rock-lined ditch is advisable. Line the ditch with landscape fabric in order to prevent it from eroding.
Stabilize the area where the water enters your rain garden with stone to prevent erosion of the rain garden. Watch this area carefully during the first few rainstorms following installation.
Plan ahead for grass removal
If the rain garden is located in an existing lawn, you may want to kill the grass before digging. This takes some forethought, as you will need to lay black plastic or a tarp on the lawn until the grass dies (doing this over the winter works best).
Do NOT use a weed killer such as Roundup® to kill the grass. You can always simply remove the sod as you excavate the garden, and use it elsewhere if possible.
Estimate your cost
The cost will depend on how much work you decide to do yourself. If you do all of the work — digging the garden, buying the plants, planting, and mulching — your costs will range from three to five dollars a square foot. If you hire a landscaper to do some or most of the work, such as design work, excavation, or planting, the total cost could approach ten to fifteen dollars a square foot.
Designing Your Rain Garden
Determine shape and placement
Once you have calculated the size of your rain garden, determine a general shape, and position the garden within your landscape. Have fun, and explore two or three options before making a final design decision.
Rain gardens can be circular, kidney-shaped, or long and narrow. The shape of the garden depends on your wants and needs. Just remember that a central portion of the garden must be six inches below the grade of the surrounding land in order to temporarily hold water. Gently slope the garden to this lowest point to avoid erosion within the garden. A one-inch drop for every foot across is a good rule of thumb. For a 300-square-foot rain garden, choices include a circular garden with a 20-foot diameter, or a longer, narrower garden approximately 10 feet by 30 feet.
Remember that rain gardens on slopes will need to be dug more deeply into the high side of the slope to produce a level bottom. You will need to build a berm, or hump, on the lower end to keep the water in the garden.
The design stage provides an opportunity to get creative. While thinking about the shape of the garden as well as the color, shape, and height of the plants, consider adding elements such as stone or fencing, or set a bench nearby. Personalize your garden!
Select plants for your design
When selecting plants, consider
- zone hardiness,
- sunlight needs,
- moisture needs,
- soil type needs,
- height and width,
- color,
- texture, and
- whether they are native.
Is your site shady or sunny? Remember that it takes more than six hours of sunlight to be considered “full sun.” Choose plants that will perform well in the light you have available. Choose water-loving plants for the lowest portion of the rain garden, and dry-tolerant plants for the edges.
Use native plants whenever possible. Native plants will survive better in our environment. For help selecting native plants that meet your light, moisture, and height requirements, consult with staff at your local county Cooperative Extension office.
Another good resource is The Buffer Handbook Plant List, which indicates whether plants will do well in wet, moist, or dry conditions, and includes native as well as noninvasive, nonnative plants.
Buying your plants
Buy plants with healthy root systems. The healthier the root system, the quicker your plants will become established. Use only nursery-propagated plants or those from your own garden. DO NOT collect plants from the wild. If you buy bare-root perennials, be sure to keep the roots moist until you plant them.
“Plugs” will get you more plants for less money. These small-sized seedlings grown in trays take longer to fill in the space in your garden, but plugs can help keep costs down.
Most reputable nurseries have selections of native plants. If you are unsure, ask the nursery staff! They are very knowledgeable, and will often have other suggestions if a particular plant is not available. Also, asking for native plants may convince nurseries to offer more of them. For sources of native plants, consult our Bulletin #2502, Native Plants: A Maine Source List.
Plan ahead. Nurseries will have a larger selection in the spring than at the end of the summer. You may have to visit multiple nurseries if you want a large number of a particular plant.
Installing Your Rain Garden
Avoid wet conditions
Be sure to install your rain garden when the soil is dry. If you disturb wet soils, you compact the soil to the point that water can no longer infiltrate — which will defeat the entire purpose of a rain garden!
Dig your garden
Once you know the size, shape, and location of the rain garden, it’s time to get your hands dirty! If you do all the work yourself, it may take the better part of a day. Consider inviting friends to make the work faster and more fun.
First, delineate the outline of the rain garden on the ground. You can use a garden hose, string, or spray paint. Be flexible. Even the most carefully sketched plan may need to be adjusted to fit the area.
Soil mix matters
The rain garden should allow water to easily seep into the ground. If your soil is mostly clay, you may need to amend the soil to make it more permeable. A recommended soil mix is 50 to 60 percent sand, using native soil for the remainder. Adding up to 20 percent compost in place of native soil will enhance initial plant growth, and high-clay soils will need even higher amounts of compost, organic matter, or topsoil to increase soil permeability.
If you have not already killed the grass in your garden area with a black plastic or other covering, you will need to remove the sod as you excavate the garden. Do NOT use a weed killer such as Roundup® to kill the grass.
Try not to compact the soil as you dig the rain garden. Work from one side to the other side, or from the center to the outside, so you don’t pack down the soil.
Loosen the soil at least two feet deep. Even though the garden will only be six inches deep in the center, loosening the soil will help your plants establish root systems in this new environment. Now is the time to add compost or other soil amendments if needed.
Use extra soil to create a berm on the downslope side of the garden. The berm will act as a wall to hold water in the garden during storms. Make the berm three to six inches high and eight to twelve inches wide, with gently sloping sides. Taper it off as it wraps around to the inlet of the rain garden. Now stomp on it! This soil needs to be compacted to hold the water in the garden before it soaks into the ground.
Cover the berm with grass or mulch to prevent erosion. If you seed the berm, use straw to prevent it from eroding until the grass takes hold.
Plant your rain garden
This is the fun part!
Set your plants out in the garden to match your design. Now you can adjust the position of the plants, if necessary before you start planting. If possible, keep the plants in their pots to prevent them from drying out before they are planted. Wrap bare-root plants in wet newspaper until planting.
Remember that you don’t want to compact the soil. Work from one side of the garden to the other to reduce the amount of foot traffic in the garden. If you think that you have packed the soil down too much, use a rake to loosen it.
Dig each hole twice as wide as the pot and deep enough to keep the crown of the plant level with the ground. Make sure your plant is level, then fill the hole with soil and pack the soil around the plant to remove any air pockets.
Water immediately after planting. Giving the plants a good soaking will give your rain garden a good start. Use a watering can if possible: a high-pressure blast from a hose will push the soil away from the plant and keep the water from soaking in, doing more harm than good. Water the new plants before adding mulch to ensure that the maximum amount of water reaches the roots.
Mulch your garden
The value of mulch is often overlooked. Mulch is important in any garden to keep plants moist and discourage weeds. Layering sheets of newspaper around the plants before adding mulch will provide an added weed barrier.
Apply a three- to four-inch layer of mulch to your rain garden. Be sure to keep the mulch away from the crown of each plant. Add some additional mulch each year for a few years, until the plants have matured, so the soil does not dry out too quickly. After a few years, mulch is not necessary, unless you prefer its more formal appearance.
How much mulch will you need? A cubic yard1 of mulch will cover a 100-square-foot area with about three inches of mulch.
With the exception of bark chips and artificially colored mulches, you can generally use any type of mulch that will stay in place and retain moisture. Bark chips don’t work because they tend to float away in rain gardens, and artificially colored mulch will leach color into the soil. We have used Superhumus and Erosion Control Mix — blended products from earthlife™ — in our test rain gardens with success. If you are unsure, ask your nursery professional.
Nurseries sell mulch by the bag and by the cubic yard. If you don’t have access to a truck, most nurseries will deliver for a nominal fee.
1 27 cubic feet, or about what will fit in the back of a pickup truck
Maintaining Your Rain Garden
Watch your rain garden the first time it rains. Where does the water go? Does it pond where you intended it to? Or are the moisture-loving plants left high and dry? Does the force of the water erode the mulch and soil at the entrance to the rain garden? Use the first few storms to evaluate your garden. If the contours need to be adjusted, use a rake or shovel as needed. Strategically placed rocks can slow the force of the water.
If you have used shallow ditches or swales to direct water to the rain garden, inspect these ditches often to be sure that the bottoms are not eroding. Keeping the side slopes of the ditches no steeper than 2:1 (for every two feet across, a one-foot rise) will help prevent erosion.
Keep in mind that during the first year, especially during the dry summer months, you may need to water the rain garden so that the plants can get established. Use a rain gauge to keep track of the rainfall. Your rain garden will need one to two inches of water per week the first year.
Frequent weeding will be necessary in the first few years before plants become established. In order to distinguish between weeds and young plants, consider adding plant labels next to each plant.
Once the plants mature and become established, maintenance of a rain garden is nothing more than routine landscape maintenance: weeding, pruning, plant replacement, mulching, and supplemental watering during dry spells.
While some people trim dead stems and leaves from their perennials before winter, you can leave them over the winter to provide food for birds and wildlife. Once new growth appears in the spring, remove the dead stems and leaves.
Solving plant problems
Here are some considerations if your rain garden plants fail to thrive:
- New plants need a consistent supply of water until their roots are established — even though your rain garden catches stormwater. Your rain garden will need one to two inches of water per week during the first year.
- Consider the location of each plant within the garden. Some plants will not tolerate having their roots dry out, while others do not like them to be moist all the time.
- Double-check the hardiness zone rating of your plants. If you end up replacing plants, choose plants rated for a colder zone than yours, to ensure that they can survive the very coldest temperatures they might experience.
- Make sure that you have used plants well suited to the light levels and light duration of your garden’s location.
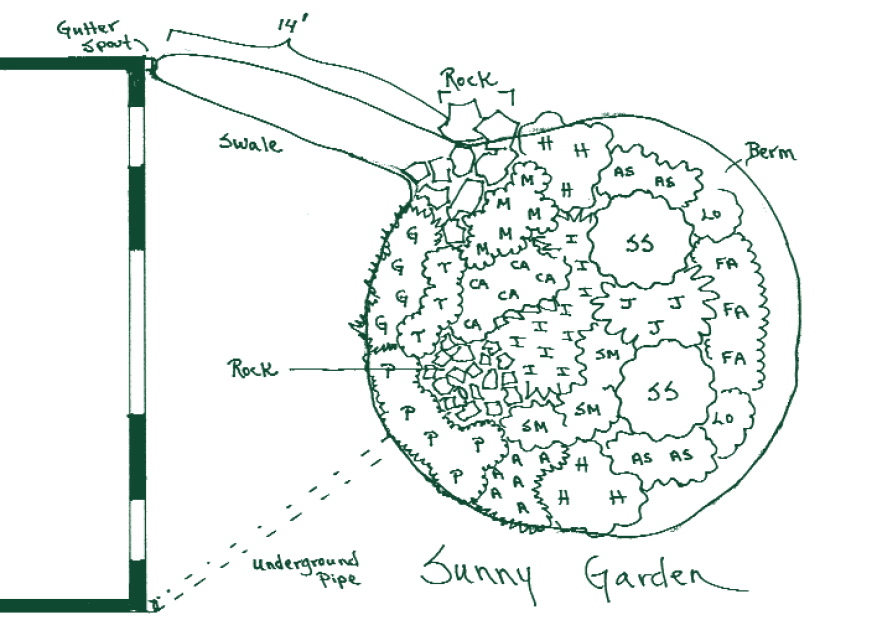
Example of a Sunny Rain Garden Design
(Click on the images to see enlargements.)
(full chart description below)
(full plan description below)
(full plan description below)
Plant List for a Sunny Rain Garden
Plants for the wetter center of the garden:
Woody shrubs:*
- SS: Clethra alnifolia, summersweet. 5–6’H x 4–6’W. Late-to-emerge foliage. Fragrant, large, white flower stalks in summer.
Perennials:**
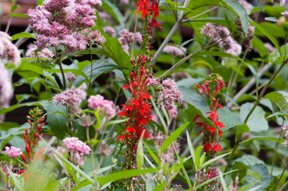
- CA: Lobelia cardinalis, cardinal flower. 2–4’H x 1’W. Bright red flowers from July to September.
- T: Asclepias tuberose, orange butterfly weed. 2–3’H x 2–3’W. Can handle dry areas. Orange blooms from June to September.
- I: Iris versicolor, blue flag iris. 2–4’H x 2–4’W. Blue flowers in spring.
- M: Caltha palustris, marsh marigold. 8”H x 1’W. Glossy heart-shaped leaves with bright yellow flowers in the spring.
- J: Eupatorium maculatum, joe-pye weed. 3–5’H x 1–2’W. Red stems, purple-red flowers from July to September.
- SM: Asclepias incarnate, swamp milkweed. 2–3’H x 2–3’W. Will not tolerate drought. Showy, flat, reddish flowers from July to October.
Plants for the dryer outer edge of the garden:
Woody shrubs:*
- P: Potentilla arguta, tall cinquefoil. 1–3’H x 1–3’W. Thick leaves and many white flowers all summer.
Perennials:**
- G: Geranium maculatum, wild geranium. 1–2’H x 2’W or more. Purple flowers in the late spring and sometimes again in the fall. Pretty foliage.
- A: Anemone canadensis, windflower. 2’H x 10”W. Pure white blossoms in June. Large, attractive leaves.
- LO: Lobelia spicata, spiked lobelia. 3–5’H x 3–5’W. Blue flowers from June to August.
- FA: Symphyotrichum umbellatus, flat-topped aster. 3–7’H x 3–7’W. White to yellowish-centered flowers in the fall.
- AS: Symphyotrichum novae-angliae, New England aster. 3–7’H x 3–7’W. Purple flowers in the fall.
- H: Helenium autumnale, perennial sunflower, 3–5’H x 2–3’W. Lots of yellow flowers in the fall.
*Woody shrubs: Though they may shed their leaves, the woody structure of these plants will provide winter interest in the garden.
**Perennials: These plants die over the winter and sprout new shoots in the spring. Sometimes some of last year’s foliage will survive the winter, but generally, you should trim off the dead foliage in late fall and wait for the green growth of spring.
Example of a Shady Rain Garden Design
(Click on the image to see enlargements.)
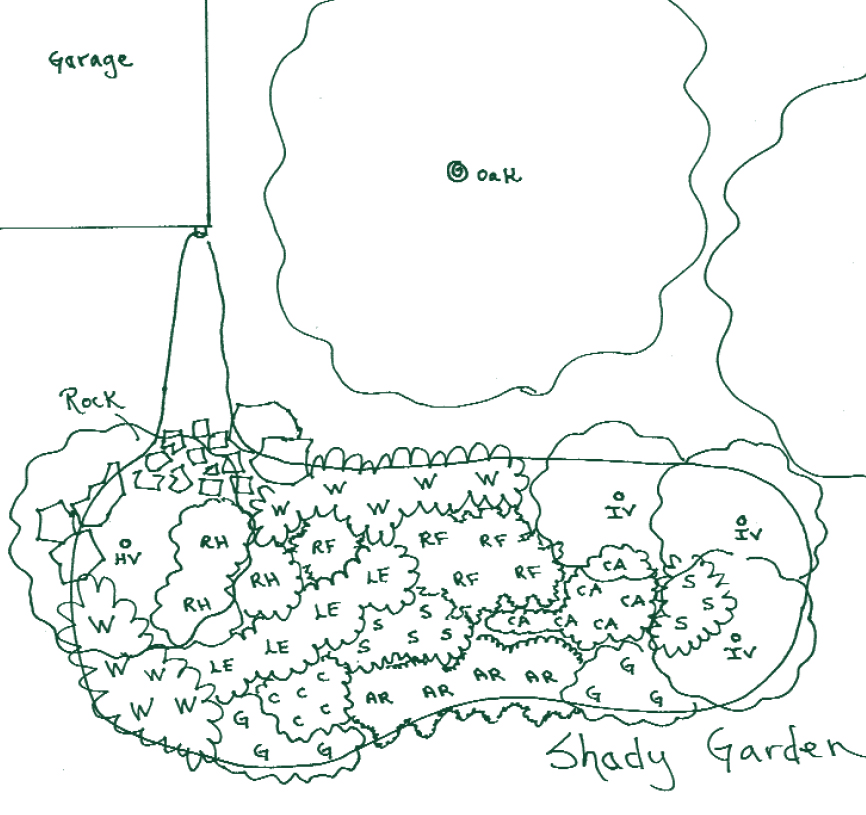
Plant List for a Shady Rain Garden
Plants for the wetter, shadier center of the garden:
Woody shrubs:*
- HV: Hamamelis vernalis, vernal witch hazel. 6–10’H x 6–10’W. Showy golden yellow fall color. Long-lasting, scented yellow flowers in the late winter.
- RH: Rhododendron canadense, rhodora (native rhododendron). 1–3’H x 1–3’W. Showy purple flowers in the spring. Tolerates wet, acidic soil.
- LE: Ledum groenlandicum, Labrador tea. 1–3’H x 1–3’W. Showy white flowers in late spring, tolerates wet feet.
- IV: Ilex verticillata, winterberry. 6–8’H x 6–8’W. Plant a male and female to take advantage of showy orange berries that persist all winter long.
Perennials:**
- RF: Osmunda regalis, royal fern. 2–5’H x 2–5’W. Large, showy fern. Needs moisture! You must keep this plant watered if you are experiencing low rainfall.
- C: Aquilegia canadensis, native colombine. 1–2’H x 1–2’W. Showy red and yellow flowers in spring. Sometimes blooms again in autumn. Beautiful foliage.
- S: Onoclea sensibilis, sensitive fern. 2’H x 18”W. Soft, green fern. Thrives in moist areas.\
- CA: Lobelia cardinalis, cardinal flower. 2–4’H x 1’W. Bright red flowers from July to September.
Plants for the dryer outer edge of the garden:
Woody shrubs:*
- W: Comptonia peregrina, sweetfern. 2–4’H x 2–4’W. Rickrack-shaped leaves are heavily scented when crushed. Comptonia should be purchased in sod form as it is difficult to establish individual plants. Tolerates sandy, dry, rocky soil.
- AR: Arctostaphylos uva-ursi, bearberry. 6–12”H x 1-2W. Shiny evergreen leaves turn bronze in the fall. Small white to pink flowers in the early spring, bright red berries in late summer that persist through winter. Tolerates sandy, dry, rocky soil.
Perennials:**
- G: Geranium maculatum, wild geranium. 1–2’H x 2’W or more. Purple flowers in the late spring and sometimes again in the fall. Pretty foliage.
*Woody shrubs: Though they may shed their leaves, the woody structure of the plant will provide winter interest in the garden.
**Perennials: These plants die over the winter and sprout new shoots in the spring. Sometimes some of last year’s foliage will survive the winter, but generally you should trim off the dead foliage in late fall and wait for the green growth of spring.
Resources
Native plant lists from the Portland Water District and the Maine Department of Environmental Protection: part of the Conservation Practices for Homeowners fact sheet series.
- Native Plant List; Part/Full Shade, Dry Soil, DEPLW0777, May 2006.
- Native Plant List; Part/Full Sun, Dry Soil, DEPLW0778, May 2006.
- Native Plant List; Part/Full Shade, Moist to Wet Soils, DEPLW0776, May 2006.
- Native Plant List; Part/Full Sun, Moist to Wet Soils, DEPLW0779, May 2006.
Landscapes for Maine bulletins from UMaine Cooperative Extension
- Bulletin #2701, Designing Your Landscape for Maine
- Bulletin #2500, Gardening to Conserve Maine’s Native Landscape: Plants to Use and Plants to Avoid
- Bulletin #2502, Native Plants: A Maine Source List
The Buffer Handbook Plant List, Cynthia Kuhns for the Maine Department of Environmental Protection. DEPLW0094-A2001, 1998, Revised 2001.
Need an expert?
In Central or Northern Maine:
Laura Wilson, Extension Assistant Scientist
University of Maine Cooperative Extension
495 College Avenue Orono, ME 04473-1294
207.581.2971 or laura.wilson@maine.edu
In Southern Maine:
Mary Wicklund, Water Resource Specialist
Portland Water District
1 White Rock Road
Standish, ME 04084
207.774.5961 x3336 or mgilbertson@pwd.org
References
Bannerman, R., E. Considine, and J. Horwatich. Rain Gardens: A How-To Manual for Homeowners. UWEX Publications GWQ037. University of Wisconsin-Extension, 2003.
Dietz, M. E. and J. C. Clausen. “A Field Evaluation of Rain Garden Flow and Pollutant Treatment.” Water, Air, and Soil Pollution 167 (October 2005): 123–128.
Wilson, G. “Burnsville Rainwater Gardens.” Land and Water 48, no. 5 (2004): 47–51.

This material is based upon work supported by the Cooperative State Research, Education, and Extension Service, U.S. Department of Agriculture, under agreement nos. 2003-51130-02074 and 2004-51130-03108, through the CSREES New England Regional Water Quality Program.
Full Graph and Plan Descriptions
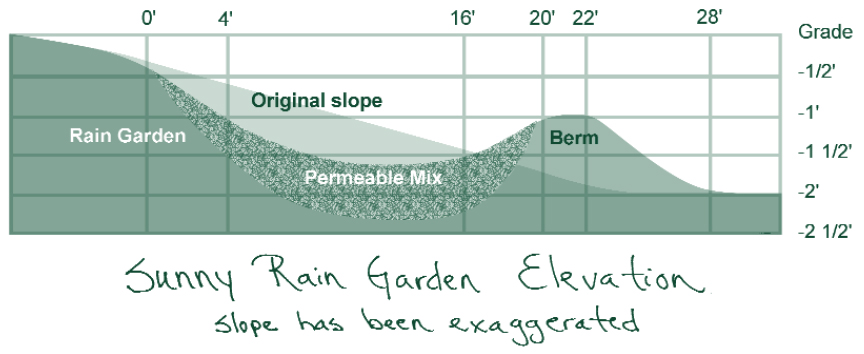
This graph compares the elevation of the land of a sunny rain garden from how the original slope was to how it looks after adding a rain garden, with a semi-transparent overlay of the two. The original land has a fairly constant slope that descends by 1 1/2 feet in a space of 24 feet. With the addition of the rain garden, the land has been modified so that the slope descends by 1 3/4 feet in the space of 12 feet, and then rises up to the berm which peaks 1 1/4 feet above the low point of the valley. At that low point has been laid a one-foot depth of permeable mix that thins out to disappear at the peaks on both sides of the depression. The berm falls to the same height as the original slope at a distance of 28 feet. The slope of this land has been exaggerated.
Sunny rain garden before planting
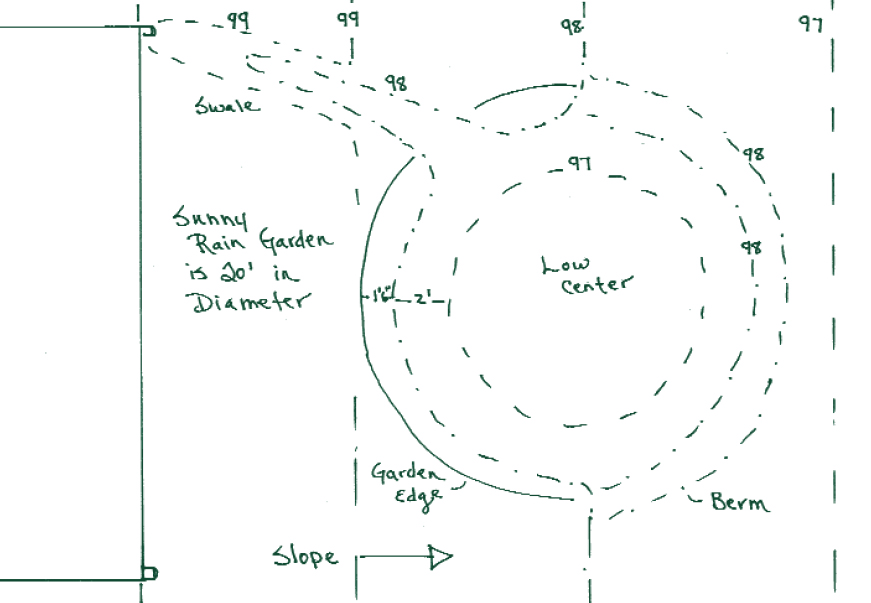
This diagram shows the measurements of a sunny rain garden that has a total diameter of 20 feet. It is arranged as three concentric circles, with a wide low center and two thinner outer rings at diameters of 2 feet and 1 foot 6 inches, respectively. The berm is a half circle and comprises half of the outermost ring, on the side farthest from the building. The slope of the land travels downward away from the building. The swale runs into the garden from a gutter spout on the corner of the building and flows in on the side opposing the berm.
This diagram shows a sample arrangement of plants and fixtures for the circular sunny rain garden above. The swale runs 14 feet from a gutter spout on the corner of the building and flows into the garden on the side opposite the berm, at ten o’ clock on the circle. At eight o’ clock on the circle, an underground water pipe runs into the garden from the other corner of the building. There are two clusters of rocks: one where the swale meets the rain garden, and one on top of the place where the underground pipe drains into the garden. The inside of the garden is arranged as follows. In the very middle is Iris versicolor. It is surrounded by, starting at the top and moving around in a clockwise direction, Clethra alnifolia, Eupatorium maculatum, Clethra alnifolia, Asclepias incarnate, the rocks above the underground pipe, Asclepias tuberose, and Lobelia cardinalis. In a ring around this inner portion, moving in the same clockwise fashion, is Helenium autumnale, Symphyotrichum novae-angliae, Lobelia spicata, Symphyotrichum umbellatus, Lobelia spicata, and Symphyotrichum novae-angliae, and Helenium autumnale. These plants on this half of the outer circle are surroundeed by the berm. Continuing on this outer circle, there is Anemone canadensis, Potentilla arguta, Geranium maculatum, the rocks that the swale drains into, and Caltha palustris.
This drawing shows a sample arrangement of plants and fixtures for an oval-shaped shady rain garden There is a garage in the upper left corner of the diagram with two large oaks next to it, and below these is the garden. The swale drains from the corner of the garage into the left edge of the garden, where there is a pile of rocks. The specific plants in the garden, as described in rows from left to right, are arranged as follows. The top row is Hamamelis vernalis, two clusters of Rhododendron canadense, Osmunda regalis, Comptonia peregrina, and two clusters of Ilex verticillata. The next row is Comptonia peregrina, Ledum groenlandicum, Onoclea sesibilis, Osmunda regalis, Lobelia cardinalis, and Onoclea sensibilis. The bottom row is Comptonia peregrina, Geranium maculatum, Aquilegia canadensis, Arctostaphylos uva-ursi, Geranium maculatum, and Ilex verticillata.
Information in this publication is provided purely for educational purposes. No responsibility is assumed for any problems associated with the use of products or services mentioned. No endorsement of products or companies is intended, nor is criticism of unnamed products or companies implied.
© 2006
Call 800.287.0274 (in Maine), or 207.581.3188, for information on publications and program offerings from University of Maine Cooperative Extension, or visit extension.umaine.edu.
In complying with the letter and spirit of applicable laws and pursuing its own goals of diversity, the University of Maine System does not discriminate on the grounds of race, color, religion, sex, sexual orientation, transgender status, gender, gender identity or expression, ethnicity, national origin, citizenship status, familial status, ancestry, age, disability physical or mental, genetic information, or veterans or military status in employment, education, and all other programs and activities. The University provides reasonable accommodations to qualified individuals with disabilities upon request. The following person has been designated to handle inquiries regarding non-discrimination policies: Director of Equal Opportunity, 5713 Chadbourne Hall, Room 412, University of Maine, Orono, ME 04469-5713, 207.581.1226, TTY 711 (Maine Relay System).