Bulletin #2097, Boom Sprayer Calibration

Bulletin #2097, Boom Sprayer Calibration (PDF for printing)
By Lily Calderwood, PhD., Wild Blueberry Specialist and Associate Professor of Horticulture, University of Maine Cooperative Extension and Jordan Parks, Wild Blueberry Research Technician, University of Maine Cooperative Extension.
For information about UMaine Extension programs and resources, visit extension.umaine.edu.
Find more of our publications and books at extension.umaine.edu/publications/.
Introduction
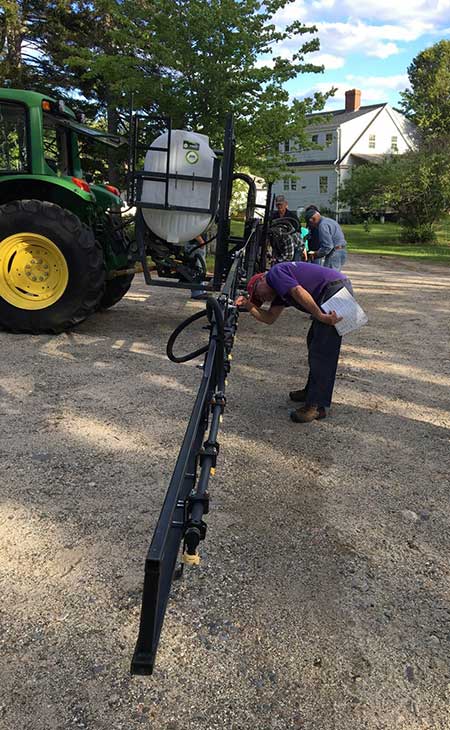
A boom sprayer is a piece of equipment that attaches to a tractor (Image 1) or is a built-in part of a tractor for larger-scale pesticide applications. Boom sprayers have folding arms that vary in size with equally spaced nozzles used to deliver pesticides. Pesticide products are unique and require different application rates, conditions, and timing to control pests. For questions specific to a particular product, refer to the pesticide label. Ensuring that your equipment applies the correct amount of pesticide product to your crop is the law and critical for successful pest control. Learning to calibrate your equipment will make you confident in your applications and ensure you are not over-applying. This will save you money and reduce the amount of material released into the environment. Calibration will help you stay on top of sprayer maintenance, contributing to the longevity of your sprayer equipment. There are many different sprayers, tractors, and nozzles available, which is why you must calibrate according to your equipment and product.
Getting Started
Cleaning
The first task to complete is a thorough cleaning of your equipment. This means performing a triple rinse to your boom sprayer. The list below is from the CORE Pesticide Manual (Barry et al., 2015).
- Hose down the inside of the tank and partially fill the tank with water. Then flush the water through the nozzles by operating the sprayer.
- Repeat step 1.
- Remove nozzle tips and screens. Then clean using a strong detergent and a soft brush. Do not use metal wire, knives, or hard objects that can damage the nozzles or screens.
- Refer to the label for cleaning agents and use as directed.
- Partially fill the tank with water and add the cleaning agent.
- Now your sprayer has been properly cleaned for the next pesticide application or for calibration.
Do not create areas of standing water that are accessible to children, pets, farm animals, or wildlife (Barry et al., 2015). “Ideally, all wash water should be collected and applied to a labeled site or disposed of as hazardous waste” (Barry et al., 2015).
Calibrating Using the 1/128th Method
Supplies Needed
- Proper PPE
- A field tape that can measure up to 250 ft
- Tape measure
- Field flags or markers
- A stopwatch
- Calibration containers
- Nozzle cleaning supplies
- A clipboard with scratch paper and a calibration record sheet to record all settings for next time
Finding Nozzle Spacing
- Fill your boom sprayer with a half tank of water.
- Measure your nozzle distance from the center of one nozzle to the center of the next nozzle and make sure all nozzles are spaced the same distance apart. If they are not, fix the spacing.
Evaluating Nozzles
- Run the sprayer. Look at all the nozzles and see if there are any visual problems with the spray pattern from each nozzle.
- If there is a nozzle clogged, stop the sprayer, take off the nozzle and clean the tip and strainer with a soft brush and/or compressed air (Hamilton, 2023).
- Do not use metal brushes, wires, or knives to clean debris from the nozzle. You will damage the components, which will result in improper application rates and inadequate pest control (Barry et al., 2015; Whitford et al., 2024).
- Do not use your mouth to blow into the nozzle tip. The residue will blow back into your face which exposes you to chemicals. Instead, bring a can of compressed air with you to clean out nozzle components safely (Hamilton, 2023).
Checking Application Pressure
- Make sure to check your master pressure gauge to make sure it is functioning correctly and note the rpm you need to maintain your desired pressure.
- Look at your gauge as you do your speed tests, described in the next section, so you can compensate for any pressure drops while traveling with the tractor.
Timing Tractor Speed
- Use the nozzle spacing you measured earlier to find the distance you need to travel for calibration (Table 1).
Table 1. Calibration distances for different nozzle spacings to spray 1/128 of an acre.
| Nozzle Spacing (in) | Travel Distance (ft) |
| 18 | 227 |
| 20 | 204 |
| 22 | 185 |
| 24 | 170 |
| 26 | 157 |
| 28 | 146 |
| 30 | 136 |
| 32 | 127 |
| 34 | 120 |
| 36 | 113 |
| 38 | 107 |
| 40 | 102 |
Once you find your travel distance, use the field tape and flags to mark out your needed distance.
- The best place to set the markers for timing speed is in similar field conditions to those you will be spraying.
- A safe travel speed should be chosen for timing between flags.
- If your field has a lot of terrain such as hills, bumps, and rocks, then pick a speed that can be safely and comfortably used by the operator.
- Start with a minimum of one tractor length from the start marker. This will allow the tractor to accelerate to the set speed before using the stopwatch. Set the speed and rpm you will be using for spraying.
- Have someone outside with a stopwatch start timing as the boom crosses the starting marker, then stop it as the tractor boom crosses the end marker.
- If you are alone, put part of the boom down and use a stopwatch when the boom crosses over the flag at the start and finish. If you have tall, malleable markers, you can start the stopwatch as the front of the tractor hits the marker and stop the timer when it hits the end marker.
- Turn around and repeat the timing process until you have three timed measurements to average.
- Add your three times together and divide them by three to record your average.
Collecting Nozzle Output
- Next, collect the output of all your nozzles.
- Take the calibration container and catch all the water coming from one nozzle while using the stopwatch. Stop collecting water once you have reached your average tractor time found earlier.
- Record, in ounces, what you collected from the nozzle by bringing up the container to eye level to get an accurate measurement.
- Repeat this process for every nozzle on the boom.
- Now, add your measurements together and divide by the number of nozzles on the boom to get an average application rate.
- Check to make sure each nozzle is applying within the allowed range. Each nozzle is allowed a 10% difference above or below the average application rate that you found earlier (Bell et al., 2015; Hamilton, 2024).
- Multiply the average application rate by 0.10, then add and subtract that value from your average rate.
- If a nozzle falls out of this range, it will need to be replaced with a new nozzle.
-
- Replace the nozzle and collect the water while using the stopwatch.
- Keep in mind that when you replace a nozzle with a new one, the rest of the nozzles may fall out of range.
- This usually means that the nozzles wore evenly over time, which is hard to notice with just a visual inspection.
- You may need to replace all of your nozzles, so be sure to have extras on hand to avoid missing an application waiting for new nozzles.
- Once replacements have been made, repeat the timed collection process for all new nozzles and calculate your average application rate in oz again.
Finding the Application Rate
- Now that your nozzles are applying properly and measurements have been collected, it is time to find the application rate.
- Because we used the 1/128th Method, the amount of oz collected directly translates into gallons per acre. This is because there are 128 oz in 1 gal, and we traveled in our tractor 1/128th of an acre.
- Meaning, if you collected an average of 20 oz, the application rate at that speed, nozzle type, and pressure is 20 gal per acre.
- Refer to the pesticide label and determine if you need to adjust speed, pressure, or the type of nozzle so that you can accurately make applications.
- Changing speed and pressure are good for making small changes in your application rate, but if you need to make a big change, then switch your nozzles to a different type.
- An example of how to read your nozzle is shown in Image 2. This information is useful for finding the nozzle type, spray angle, nozzle capacity, and what material the nozzle is made of.
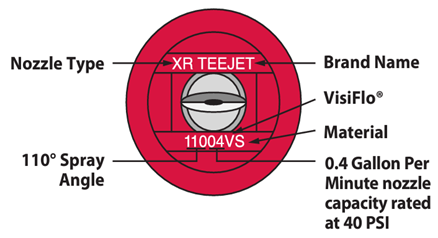
When looking at the nozzle (image 2) where the product comes out, the first letters describe the nozzle type, followed by the nozzle brand name. Below the brand name is a set of numbers. The first numbers are the spray angle. The diagram reads 110, which means it is a 110° fan spray angle. The next set of numbers in the diagram (04) means the nozzle should output 0.40 gallons at a pressure of 40 psi in one minute. The letters “VS” after the gallons per minute define the type of material the nozzle tip is made of. In this case, “VS” stands for stainless steel. “SS” can also stand for stainless steel.
How Often Should You Calibrate?
It is important to know the application rate of your sprayer and to check your equipment. Calibration should be done at the beginning of the season before you start your first application, as well as mid-way through the season, and after any equipment changes like nozzles, tractor speed, pumps, using a different tractor, or using different tires. Calibration should occur after tire changes because larger tires or new tire treads will change what your speedometer reads (if you have one) (Hamilton, 2023). Nozzles will wear out, resulting in over-applying, leading to leaching, crop damage, environmental damage, and increased pest resistance. If your setup is not applying enough product, you will waste time, money, and product, along with not controlling the pest. It is important to know what your machine is applying to make accurate applications. If you need to change nozzles, pressure, or speed, you will need to recalibrate to ensure you are accurately applying pesticides. Reach out to your local UMaine Extension Office for sprayer calibration events and further resources. Remember, calibrating your equipment is the law.
References
Barry, D., Fish, G., & Bills, A. (2015). Pesticide Education Manual A guide to proper use and handling. University of Maine Cooperative Extension. secure.touchnet.com/C22921_ustores/web/product_detail.jsp?PRODUCTID=2720&SINGLESTORE=true
Bell, C., Wilen, C., & McGiffen Jr., M. (2015). Calibrating Liquid Application Equipment [Fact Sheet]. University of California Cooperative Extension, Invasive Plants in Southern California. Retrieved March 18, 2025 from ipm.ucanr.edu/legacy_assets/PDF/TRAINING/liquid-calibration.pdf
Hamilton, G. (2023). Boom Sprayers 1/128th Method of Calibration: A Quick and Easy Method [Fact Sheet]. University of New Hampshire Cooperative Extension. Retrieved March 17, 2025 from extension.unh.edu/resource/boom-sprayers-1128th-method-calibration-quick-easy-method-fact-sheet
Hamilton, G. (2024). Pesticide Sprayer Calibration, Use and Care. University of New Hampshire Cooperative Extension. Retrieved March 18, 2025 from extension.unh.edu/blog/2024/01/pesticide-sprayer-calibration-use-care
TeeJet® Technologies. (n.d.). Technical Information. TeeJet Technologies. Retrieved February 23, 2024 from teejet.com/resources/catalogs-and-bulletins
Whitford, F., Sinha, R., Oliveira Latorre, D., Young, B., Ozkan, E., Peason, S., Obermeyer, J., & Leigh Smith, K. (2024). Agricultural Spray Nozzles a Comprehensive Review. Purdue University College of Agriculture. Retrieved March 17, 2025 from ag.purdue.edu/department/extension/ppp/resources/ppp-publications/mobile/ppp-153/agricultural-spray-nozzles-a-comprehensive-review.html
Information in this publication is provided purely for educational purposes. No responsibility is assumed for any problems associated with the use of products or services mentioned. No endorsement of products or companies is intended, nor is criticism of unnamed products or companies implied.
© 2025
Call 800.287.0274 (in Maine), or 207.581.3188, for information on publications and program offerings from University of Maine Cooperative Extension, or visit extension.umaine.edu.
University of Maine Cooperative Extension is an equal opportunity institution and provider committed to nondiscrimination. For more information, visit extension.umaine.edu/nondiscrimination.