Bulletin #7012, Making Balsam Fir Wreaths
Originally developed by Mark Cercone, Special Project Assistant, and William D. Lilley, Forestry Specialist, University of Maine Cooperative Extension.
For information about UMaine Extension programs and resources, visit extension.umaine.edu.
Find more of our publications and books at extension.umaine.edu/publications/.
Table of Contents
- Material Needed
- VIDEO: Maine Balsam Fir Tips: A Sustainable Harvest (YouTube)
- Making a Tip Bunch
- Attaching Tip Bunches to the Ring
- Steps for Making a Wreath
- Storing Wreaths
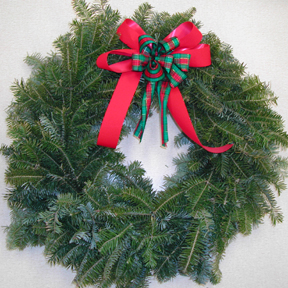
Balsam fir wreaths consist of tips, a metal ring, and wire. A wreath is assembled by attaching bunches of tips to a ring. These bunches are held to the ring with the wire. The following instructions are for making double-faced wreaths (wreaths with tip bunches attached to both sides). Single-faced wreaths are made the same way as double-faced wreaths, except tip bunches are attached only on one side. Wreath making methods may vary slightly, depending on the wreath producer. Make sure you use fresh tips.
Material Needed
Wreath making material can be purchased from florists, garden centers and some wreath producers. To make wreaths, you will need:
Rings—Common wreath rings have 8, 10, 12, 14 or 16-inch diameters. The ring’s size determines the size of the wreath’s outside diameter. Crimped single rings are recommended for double-faced wreaths and double-rail rings are recommended for single-faced wreaths to prevent tip bunches from flipping over.
| Ring Diameter (inches) | Wreath’s Approximate Outer Diameter (inches) |
|---|---|
| 8 | 12–14 |
| 10 | 17–19 |
| 12 | 20–24 |
| 14 | 25–27 |
| 16 | 31–33 |
Wire—Wire should be 22 to 24 gauge. Green wire is more easily hidden by the wreath.
Clippers—Clippers are needed to cut the wire. They also may be used to cut the tips.
Gloves—Gloves may be worn to protect the hands.
Balsam Fir Tips—A tip is the part of a fir branch that is used in wreaths. The amount of tips required for a wreath depends on the size of the wreath. The approximate amount of tips required for each wreath is given below.
| Ring Diameter (inches) | Average Amount of Tips Needed (in pounds) |
|---|---|
| 8 | 1.5–2.0 |
| 10 | 2.5–3.0 |
| 12 | 3.5–4.0 |
| 14 | 4.5–5.0 |
| 16 | 5.5–6.0 |
For more information on tips and tip gathering, refer to Bulletin #7011, Balsam Fir Tip Gathering.
Making a Tip Bunch
The wreath maker begins assembling a wreath by making a tip bunch. The tip bunch is then wired onto the ring.
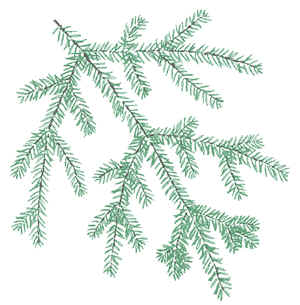
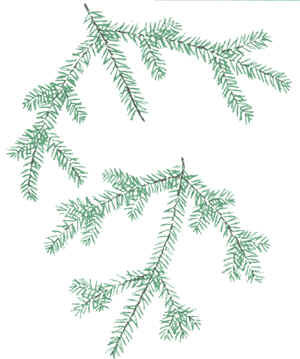
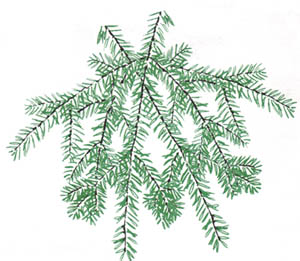
A wreath maker usually works with a fir branch that’s 12 to 20 inches long. This branch may be broken into two to three places, if required. These tips are placed together to form a tip bunch. A tip’s average length depends on the size of the wreath to be made. The length also varies with the particular wreath maker. It’s important for the tips to be the same length for each wreath. This will improve the wreath’s appearance since the tip bunches will flow evenly around the wreath. (Figures 1, 2 and 3.)
| Wreath Ring Size (inches) | Tip Length (inches) |
|---|---|
| 8 | 5–6 |
| 10 | 6–9 |
| 12 | 9–12 |
| 14 | 12–14 |
| 16 | 14–16 |
Attaching Tip Bunches to the Ring
Wire is used to secure a tip bunch to the ring. The wire is tightly wound two or three times around the bunch and the ring (beginning about 1/3 to 1/2 the distance from stem end).
Steps for Making a Wreath
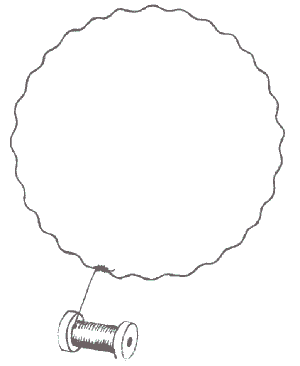
- Wind wire several times around the ring’s weld. This helps prevent the ring from coming apart when the wire is pulled (Figure 4.)
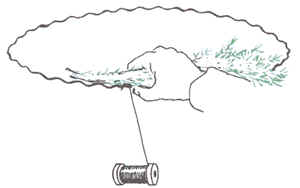
- Place the first tip bunch on the ring. This bunch should be slightly longer that the other bunches. The extra length helps cover from view the wire that’s used to attach the last bunch. The tip bunch’s needles should face upward (the darker side up). (Figure 5.)
- Wind wire two to three times around the ring and tip bunch. (Figure 6.) The wire is wound tightly around the bunch, 1/3 to 1/2 the bunch’s distance from the stem end.
- Turn the wreath over. The wreath maker must be careful not to unwind the wire when turning over the wreath.
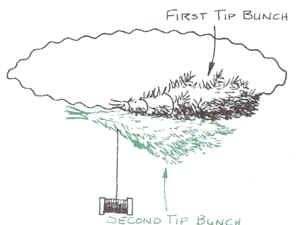
- Place a tip bunch on the first bunch. The second bunch is set a couple of inches down from the first bunch. The spacing between each tip bunch varies among wreath makers. Generally, the longer the tip branches, the wider the spacing will be. Needles of the second bunch should face upward (face the opposite direction of the first bunch). The second bunch’s stems should point in the same direction as the first bunch. (Figure 7.)
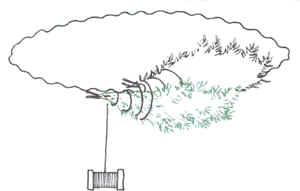
- Attach the second bunch and turn the wreath over. The wire should be wound close to the second bunch’s center (the same location for all tip bunches), and around the first tip bunch (near its stems). All the tip bunches will be wired at these two places. This secures the tip bunches to the ring. (Figure 8.)
- Attach the third bunch. The third bunch is attached a couple of inches down from where the second bunch was attached on the opposite side. The third bunch completely covers the second bunch. (Figure 9.)
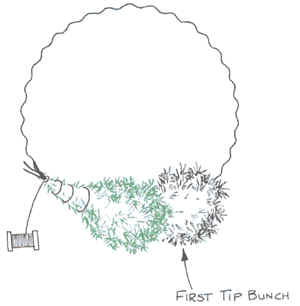
- Repeat the procedure until the first bunch is nearly reached, as in Figure 10. Continue to attach each bunch a couple of inches down from where the previous tip bunch was attached on the opposite side.
- Lift up the first bunch and tuck in a bunch. Once tucked in, wire the bunch to the ring. Turn the wreath over and attach a bunch to the other side. There should be no room for another tip bunch on either side. Cut the remaining wire and wrap it around a nearby branch. The wire should not be seen.
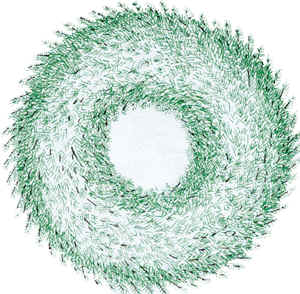
The wreath is now finished. (Figure 11.) If it is a good quality wreath, it will
- be compact and sturdy (can be shaken without falling apart);
- have a distinct, round hole in the center;
- have no ring, wire, or broken stems showing;
- be an acceptable weight (described in previous section).


Storing Wreaths
Wreaths should be stored under the following conditions:
- In a cool, damp location
- Sheltered from the wind, rain and sun
- Well ventilated
Wreaths may be stacked together on pallets, which keep them off the ground and provide better ventilation. Storing them in a building will protect them from bad weather; however, doors and windows should be left open for ventilation. Large quantities of wreaths have been ruined when left in a closed building. Wreaths, like all organic matter, can decompose when left damp in a poorly ventilated area.
Technical assistance provided by Walter Thompson and Dugald Kell.
Illustrations by Mark A. McCollough.
Reviewed by Brett Johnson, Assistant Extension Professor,Sustainable Agriculture and Farm Business Management Educator, University of Maine Cooperative Extension, 2024
Reviewed and with new information by David Fuller, Agriculture/Non-Timber Forest Products Professional, University of Maine Cooperative Extension, 2015
Information in this publication is provided purely for educational purposes. No responsibility is assumed for any problems associated with the use of products or services mentioned. No endorsement of products or companies is intended, nor is criticism of unnamed products or companies implied.
© 1991, 2008, 2015, 2024
Call 800.287.0274 (in Maine), or 207.581.3188, for information on publications and program offerings from University of Maine Cooperative Extension, or visit extension.umaine.edu.
In complying with the letter and spirit of applicable laws and pursuing its own goals of diversity, the University of Maine System does not discriminate on the grounds of race, color, religion, sex, sexual orientation, transgender status, gender, gender identity or expression, ethnicity, national origin, citizenship status, familial status, ancestry, age, disability physical or mental, genetic information, or veterans or military status in employment, education, and all other programs and activities. The University provides reasonable accommodations to qualified individuals with disabilities upon request. The following person has been designated to handle inquiries regarding non-discrimination policies: Director of Equal Opportunity and Title IX Services, 5713 Chadbourne Hall, Room 412, University of Maine, Orono, ME 04469-5713, 207.581.1226, TTY 711 (Maine Relay System).

