Bulletin #7036, How to Tap Maple Trees and Make Maple Syrup

Bulletin #7036, How to Tap Maple Trees (PDF for printing)
Originally developed by Marvin (Bud) Blumenstock, Extension forestry specialist, University of Maine Cooperative Extension. Revised by Kathy Hopkins, Extension educator, University of Maine Cooperative Extension.
Updated by Jason Lilley, Assistant Extension Professor, Sustainable Agriculture and Maple Industry Educator, University of Maine Cooperative Extension (2025)
For information about UMaine Extension programs and resources, visit extension.umaine.edu.
Find more of our publications and books at extension.umaine.edu/publications/.
Table of Contents
- How Much Syrup Can I Get?
- What Happens in the Tree?
- How To Collect Maple Sap and Make Syrup
- Where To Go for Help
- Additional Resources
- References
People have made syrup and sugar from the sap of the maple tree since long before recorded history. This sweet activity spreads across the native habitat of sugar and red maple trees in the Upper Midwestern and Northeastern U.S. and Eastern Canada. Many Native American communities relied on maple sap-based products as an essential part of their culture long before European colonists arrived on the continent.
In 1663, English chemist Robert Boyle told associates in Europe, “There is in some parts of New England a kind of tree whose juice that weeps out its incision, if it is permitted slowly to exhale away the superfluous moisture, doth congeal into a sweet and saccharin substance and the like was confirmed to me by the agent of the great and populace colony of Massachusetts.”
Tapping maple trees today is based largely on the same process used long ago. 1) Create a hole in the tree in late winter, 2) collect the sap, and then 3) remove the water to concentrate it to a sweet and delicious end product. Of course, there have been significant advancements in our understanding of tree health, increasing sap yields, food safety, and more efficient evaporation. This bulletin will highlight current evidence-based approaches to sustainable small-scale maple syrup production.
How Much Syrup Can I Get?
The yield of sap varies greatly with the method of tapping, the size of the tree, and year-to-year seasonal differences. Sap yield is usually discussed in terms of the number of tapholes, rather than the number of trees. The average full season yield for a taphole is from five to 15 gallons of sap. However, under favorable conditions, a single taphole can produce as much as 40 to 60 gallons of sap in a single year.
The sugar content of sap produced by different trees in a grove can vary a great deal. The average maple tree produces sap with a sugar content of 1.5% or 3%. Sugar maple trees (Acer saccharum), also known as rock or hard maple, usually have the highest sugar content. Red maples (Acer rubrum) also provide sweet sap.
Depending on sap sugar content it takes 10-15 gallons of sap to produce one quart of syrup. To put it another way, when using good practices, each tap will yield roughly 0.25 gallons of syrup.
What Happens in the Tree?
Understanding how maple sap is formed requires some knowledge about tree physiology. In the later summer and fall, maple trees virtually stop growing and begin storing excess starches throughout the sapwood, especially in cells called ray cells. This excess starch remains in storage as long as the wood remains colder than about 40℉. Whenever wood temperatures reach around 40℉, enzymes in the ray cells change the starches to sugars, largely sucrose. This sugar then passes into the tree sap.
Rising temperature creates pressure inside trees, causing sap to flow. When a hole is bored into a tree, wood fibers that are water (sap) carrying vessels are severed, so sap drips out of the tree. The freeze and thaw cycle is the primary driver for sap movement in the tree and, therefore, sap collection during the season. These cycles of about 40℉ or warmer during the day and freezing at night typically occur from mid-February to early April in Southern Maine and mid-March to late April in Northern Maine.
How To Collect Maple Sap and Make Syrup
Identify your trees
The first step in tapping a maple tree is to identify your trees. There’s nothing worse than tapping a tree and later realizing that it’s not running because it’s not a maple.
Forest Trees of Maine is a resource by the Maine Forest Service that is very useful for the tree identification process. It is available as a PDF or for purchase from the Maine Forest Service.
Identifying trees in the fall is ideal as the foliage of maple trees is among the brightest and most noticeable at that time of year. The leaves are also the most distinctive characteristic of the trees. Going out and marking trees with flagging tape in the fall is easier than relying on winter tree ID.
If you identify trees in the wintertime, focus on the shoots (tips of the branches). Maple trees have an “Opposite” arrangement of leaves and buds. This means that as you look at the shoots, you will see 2 buds or leaves directly across from each other. You will likely also see several (but not all) of the new branches in the canopy for a ψ pattern. Shoot tips are narrow and taper down to a point (see photos below). The only other native tree species in Maine with opposite branching patterns at Ash trees. Horse Chestnut trees will also have opposite branching. The shoot tips on both of those species are blocky and wide at the end, vs the narrow and pointed maple shoots.


Hover over an image to display description. Click on image to enlarge.
Tree Diameter
Before tapping, a tree should be at least 10 inches in diameter, measured at 4 1/2 feet above the ground. Trees between 10 and 18 inches in diameter should have no more than one tap per tree. A second tap may be added to trees between 18 and 25 inches in diameter. Only very healthy trees over 25 inches in diameter can sustain three taps. No tree should ever have more than three taps. The shape and size of the crown are also important. Trees with large crowns extending down towards the ground are usually the best sap producers.
| Diameter in inches | Circumference in inches | Number of taps |
|---|---|---|
| 10—18″ | 31.4—56.5” | 1 |
| 18″ + | 56.5” + | 2 |
Now that you have identified your tappable trees, follow the following steps.
Step 1. Drill the Holes: When the forecast predicts sap flow conditions, drill the hole using a clean and sharp drill bit with a diameter of 5/16 inch, at a convenient height, and 1.5 to 2 inches deep. Maple-specific drill bits are designed to drill into living wood and remove shavings more effectively. However, any clean and sharp bit will work. Look for unblemished bark. Do not bore closer than two feet directly over or under a former tap hole or closer than six inches from the side of an old taphole. Drill the taphole level and horizontal with no angle so the sap flows out readily. Use a sharp drill bit to minimize rough wood in the taphole, which can reduce sap yield and cause sap quality problems. Use one quick in-and-out motion with the drill bit in constant rotation. Do not redrill and risk creating an oblong hole.
Step 2. Install the Spout: Tap the spout into the freshly drilled hole lightly so that it is tight and cannot be pulled out by hand. Be sure to select a spout type that aligns with your sap collection system (maple bucket, sap bag, or tubing). DO NOT drive the spout so hard that you split the tree. Tap on warm days when the temperature is above freezing to minimize the risk of splitting the tree. If sap is leaking around the spout after tapping, check to see if it is loose. If loose, tap it in to be solid. If it is not, leave it be.
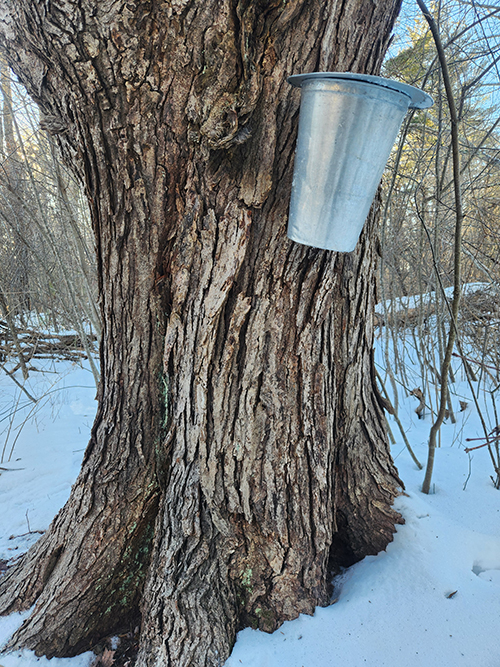
Step 3. Attach the Sap Collection Vessels: Hang your bucket or container on the hook of the spout. Alternatively, a tubing spout can be used, and enough food-grade maple tubing can be attached to reach a food-grade 5-gallon bucket at the base of the tree. Be sure to cover any bucket used to keep out rain, snow, and foreign material.
Step 4. Handle Sap Carefully: Do not leave an accumulation of sap in the collection buckets, especially in warm weather. Sap is like milk. It will sour if left in the sun. Keep the sap in cold storage. Boil it as soon as you can.
Step 5. Prepare the Evaporator: To boil sap, use a hobby-sized evaporator, an outdoor gas range, or an outdoor fireplace. Prepare to boil the sap by making sure your selected fuel is ready in ample supply and by having a large pan or series of pans ready for the sap. Evaporator systems with more surface area are most efficient (think multiple catering pans over a cinder block fireplace). NOTE: Do not plan to cook the syrup indoors on the stove without a stove vent fan or a dehumidifier. Boiling sap creates a lot of steam.
Step 6. Boil Down the Sap: Once the sap has started to run and you have collected enough to fill your pan(s) for boiling, you are ready for the fire. Do not fill your pan to the top, as this reduces efficiency and risks boiling over. As the sap boils down, keep adding more sap. Keep the sap at least 1 1/2 inches deep in the pan, or it may burn. You can pour cold sap right into boiling sap; however, preheating it will increase efficiency. It will take a lot of boiling to make syrup. Never leave boiling sap over a wood fire unattended. Sap can quickly boil away and burn the pan. Keep a bit of butter or vegetable oil readily available. If (and when) the pan starts to boil over, a small addition (drops) of these fatty materials will reduce the foam.
Step 7. Identify When the Syrup is Finished: Sap becomes finished maple syrup when it reaches 66-69 percent sugar content. When that sugar concentration is reached, the syrup will be 7.1℉ above the temperature of boiling water. You can learn the boiling point of water, which varies depending on your elevation and barometric pressure, by measuring the temperature of the raw sap when it begins a rolling boil. A syrup or candy thermometer is very useful. If you have a large operation, you might consider using a syrup hydrometer and testing cup to tell you when the syrup is done. Concentrations below 66 percent sugar content can ferment or grow mold over time. If the syrup is boiled above the 68.9 percent sugar, sugar crystals can form in the bottom of storage containers. Using a hydrometer is an accurate method of determining sugar concentration.
Step 8. Filter Finished Syrup: When the syrup has reached the correct density and temperature, filter it to remove “sugar sand” before you hot-pack it in containers. Filter the syrup while it is still hot through clean filter material such as wool or Orlon™, available from maple equipment dealers. If you don’t have filter material, you may put the syrup in a container and let it cool for 12 hours or more. The sediment will settle to the bottom, and the clear syrup can be carefully poured off. This should be reheated to 180℉ (almost boiling) (no higher than 195℉) before it is poured into containers for final storage. If brought back to a boil, more sediment could form.
Step 9. Can the Syrup: Syrup must be canned hot (180-190℉) to prevent spoilage. Pour the hot syrup into sterilized canning jars and seal. Fill them full so that very little air will be in the jar. There is no need to hot-water-bath-process hot packed, appropriate density syrup.
Step 10. Store Syrup: Store your syrup in a cool, dry place. After a container has been opened for use, it must be refrigerated. Should mold form on syrup that has been stored for several months, discard the syrup. There is the potential for contamination by a micro-organism that can cause foodborne illness.
Step 11. Clean Up: After the season ends, clean your equipment with plenty of hot water. Use a brush or cloth to scrub any buildup or scum and triple-rinse with hot water. Never use soaps or detergents on any equipment, as these can leave a residue that will contaminate the syrup with off flavors. Wash filters with hot water only, as residues cannot be rinsed out of most filters. Store the equipment in a dry area.
Step 12. Enjoy Your Homemade Maple Syrup!!
Tools for Determining When Your Syrup is Finished (Density Tools)
Where To Go for Help
- Jason Lilley, Assistant Extension Professor of Sustainable Agriculture and Maple Industry Educator. University of Maine Cooperative Extension (207) 581-8368 or Jason.Lilley@Maine.edu
- Maine Maple Producers Association
- Southern Maine Maple Sugarmakers Association
- Maine Forest Service, State House Station 22, Augusta, ME 04333-0022, 1.800.367.0223
Additional Resources
Maple Syrup Quality Control Manual, University of Maine Cooperative Extension Bulletin #7038
Forest Trees of Maine, Maine Forest Service
Handbook for Maple Grading and Judging Training, University of Maine Cooperative Extension
Mann, Rink. Backyard Sugarin’. Woodstock, VT: The Countryman Press, 1976. An excellent “how to” book for the hobby and small-scale producer.
University of Vermont Extension Maple Resources (Publications and Media)
Cornell Maple Program Resources
References
North American Maple Syrup Producers Manual (3rd ed.), 2022. North American Maple Syrup Council. mapleresearch.org/pub/manual/
Mapleresearch.org (Searchable database of maple syrup focused research reports and resources).
Information in this publication is provided purely for educational purposes. No responsibility is assumed for any problems associated with the use of products or services mentioned. No endorsement of products or companies is intended, nor is criticism of unnamed products or companies implied.
© 1991, 2007, 2020, 2025
Call 800.287.0274 (in Maine), or 207.581.3188, for information on publications and program offerings from University of Maine Cooperative Extension, or visit extension.umaine.edu.
University of Maine Cooperative Extension is an equal opportunity institution and provider committed to nondiscrimination. For more information, visit extension.umaine.edu/nondiscrimination.