Signs of the Seasons Field Guide: Step-by-Step Guide for How to Observe
Safety First!
- Use good judgment before going out into the field — be prepared.
- When in doubt, do not ever risk personal safety for making observations, and please only observe in locations where you have been granted permission.
- Working in pairs is recommended for safety, efficiency and quality of data — this is particularly true for coastal species (Rockweed) in the rocky intertidal zone, where it could be slippery. Please take your cell phone and let someone know where you are.
- Make sure you are protected against sun exposure, insect stings, and poison ivy, and wear proper footwear with good tread.
1. Select a Site
The first step in getting started on observing phenology is to select at least one site to make observations, though you may choose to observe at several sites.
A site is the area within which you will look for your selected animal species and/or includes any plants you will observe.
When selecting sites, such as your yard or a nearby natural area, consider these guidelines:
A. Convenience: This is number one! You will be visiting your site(s) regularly and often to collect phenology data, so it should be convenient and easily accessible.
Example: You may want to choose sites that you already visit frequently such as your yard, a neighbor’s woods or field, or a nearby natural area where you regularly hike on the weekend. The best data are data that actually get collected — make it easy!
B. Representative location: As much as is practical, the selected site(s) should be representative of the environmental conditions for your area.
What is a representative location?
We welcome all observations, even if your site is unusual for your area, but we encourage people to select sites that are representative of the local environment, when possible.
- Select a site in a relatively flat or gently sloping area.
- Avoid areas subject to drifting snow or funneled or channeled winds.
- Ideally, the site should be neither excessively dry nor wet for your area.
- In forested areas, the site should be generally similar to the surrounding forest, reflecting the overall canopy composition and forest stature.
- If you are observing wild plants, avoid locations where plants are watered or fertilized.
- If your site is unusual for your area, record the unusual characteristics in the comments section on your datasheet, and later enter this information in Nature’s Notebook online.
C. Uniform habitat: The conditions of your selected site(s) should be relatively uniform across the site.
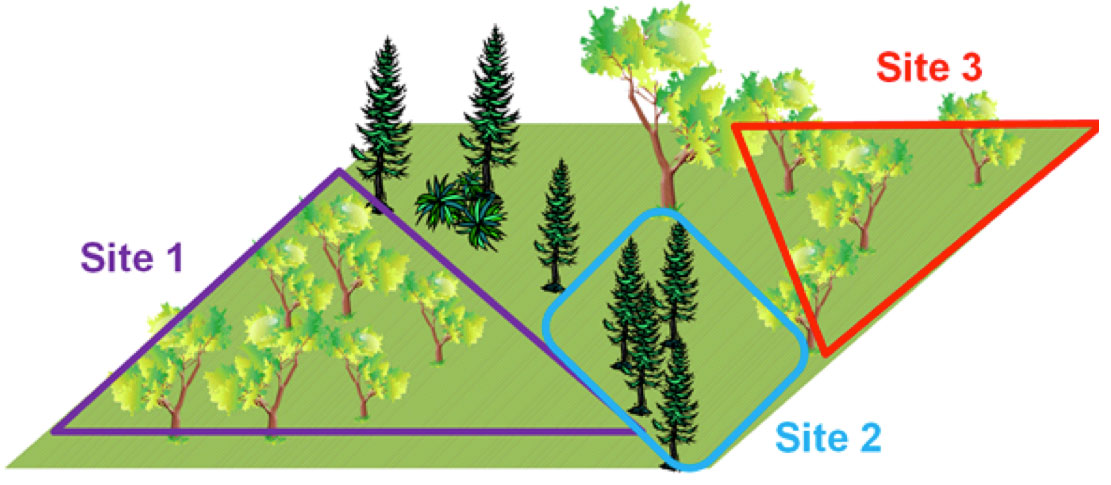
- If you choose to observe in two adjacent but distinct habitats, please document them as separate sites.
- For example, a wetland adjacent to or surrounded by a drier grassland or forest should be documented as a separate site from the grassland or forest. (Fig. 1)
D. Appropriate size: A site should be no larger than 15 acres (200 x 240 yards), or a square with sides the length of 2 ½ football fields. A site can certainly be smaller than this, and larger areas can be divided into multiple sites. (Fig. 2)
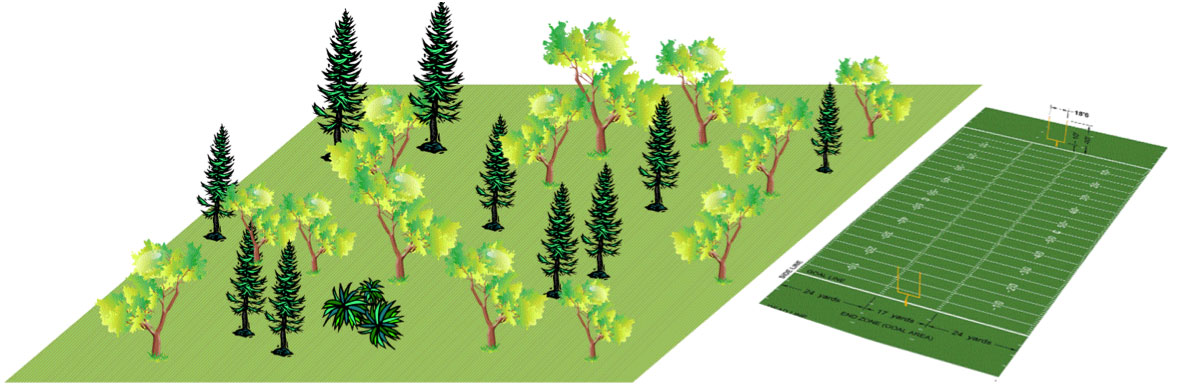
How do I choose an appropriate size for my site?
The best size for your site depends on the scale of your landscape and the distance over which you can easily see or walk.
A Note if you are observing ![]() animals at your site: Because you will be reporting observations of animals you see or hear in your site, your site can include the total area within which you can see and hear well while walking a three minute transect through your site (more on this in Section 5: How to Observe).
animals at your site: Because you will be reporting observations of animals you see or hear in your site, your site can include the total area within which you can see and hear well while walking a three minute transect through your site (more on this in Section 5: How to Observe).
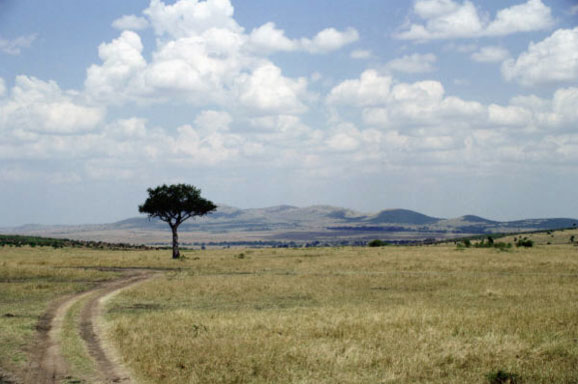
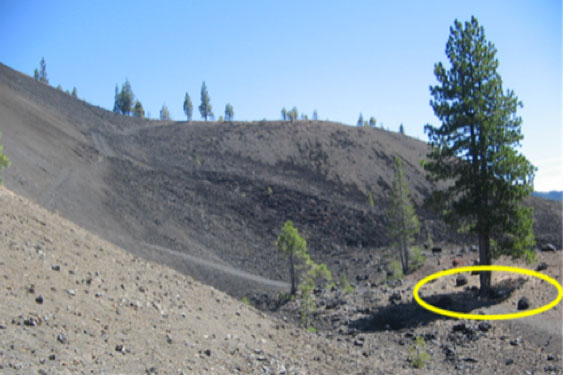
- If you are observing in an open grassland or near a body of water, your site might be the maximum recommended size (15 acres), because you may be able to identify animals that are far away. (Fig. 3)
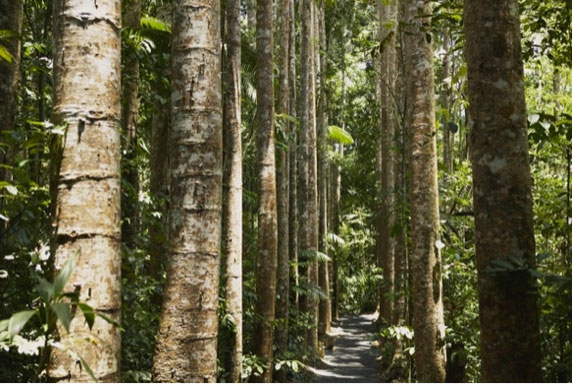
- In contrast, if your site is in a dense forest, it might be relatively small, as you may not be able to identify species at great distances because of reduced visibility. (Fig. 4).
-

- Fig. 3. Open grassland
-

- Fig. 4. Dense forest
![]() Note: Even though you can identify animals over a large area, an area should be divided into different sites if it includes habitats that are obviously different.
Note: Even though you can identify animals over a large area, an area should be divided into different sites if it includes habitats that are obviously different.
Example: If you are making observations at a pond in a meadow, the pond and the meadow should be registered as separate sites. Report your animal observations for the site at which you saw or heard them, either the pond or the meadow.
![]() If you are observing only plants: For plants, the size of your site does not matter much as long as the conditions are pretty similar throughout your site.
If you are observing only plants: For plants, the size of your site does not matter much as long as the conditions are pretty similar throughout your site.
- If you are observing just one plant, your site may simply be the small area immediately around that plant, say within 3 feet of the plant. (Fig. 5)
- If you are observing several plants near one another, you can consider them all to be at one site, as long as the site conditions are pretty similar and the site is no larger than 15 acres.
E. Proper permission is essential!
It is essential that you get permission to use a location as your site while participating in the Signs of the Seasons Program. Before marking the site, marking plants, reporting the site location, or making regular visits to the site:
- If you do not own the property where the site is located, and it is on private property, you must get permission from the landowner.
- If the site is on public land: You must get permission from the appropriate federal or state agency, municipality or land trust that is responsible for the property.
2. Select Plant and Animal Species to Observe
A. Choose one or more species from the Signs of the Seasons list of indicator plant and animal species. These species have been selected because they are familiar species (easy to identify), common in Maine and elsewhere, and/or because they are important for people and many natural processes.
Note: Several species on the SOS list are USA-NPN calibration species that have been selected to help scientists “calibrate” — or get the big picture — of phenology across the United States.
Signs of the Season Indicator Species (calibration species marked with ♦)
- Beach rose, Rosa rugosa
- Common dandelion, Taraxacum officinale ♦
- Common lilac, Syringa vulgaris ♦
- Common milkweed, Asclepias syriac
- Common reed, Phragmites australis
- Forsythia, Forsythia spp ♦
- Mountain Ash, Sorbus americana
- Red maple, Acer rubrum ♦
- Sugar maple, Acer saccharum
- White Pine, Pinus strobus
- Wild strawberry, Fragaria virginiana ♦
- American robin, Turdus migratorius
- American toad, Bufo americanus
- Common loon, Gavia immer
- Monarch butterfly, Danaus plexippus
- Ruby-throated hummingbird, Archilochus colubris
- Spring peeper, Pseudacris crucifer
- Wood frog, Rana sylvatica
- Rockweed, Ascophyllum nodosum (Includes a separate protocol, guide, equipment, and training)
B. How do I identify my plants and animals? Correct plant and animal identification is important when reporting your observations. Make sure that you have correctly identified the plant and animal species at your site before reporting your observations online. (See Appendix B, FAQs 7)
- We know it can be tricky to identify a plant early in the season, or an animal that may be immature or that you can only hear.
- There are field guides and online resources that can assist (see below).
- You may be able to get help from a local gardening, birding, native plant or naturalist group, cooperative extension office, or nature center.
- You can always contact SOS! Please email a photo of the unknown species to esp@maine.edu in Maine and Eberhardt@unh.edu in New Hampshire to assist in identification.
Field Guide Books:
![]() Wildflowers
Wildflowers
- Newcomb’s Wildflower Guide
- Wildflowers, Northeastern and North Central North America (Peterson Field Guide)
- Audubon Field Guide to North American Wildflowers: Eastern Region
- Plants of Acadia National Park (UMainePress)
![]() Trees
Trees
- Trees: A Guide to Familiar American Trees (Golden Guide)
- Audubon Field Guide to North American Trees: Eastern Region
- Field Guide to Eastern Trees (Peterson Field Guide)
- Winter Keys to Woody Plants of Maine (UMaine Press)
- Bark: A Field Guide to Trees of the Northeast (University Press of New England)
![]() Birds
Birds
- Audubon Field Guide to North American Birds: Eastern Region
- Peterson Field Guide to birds of Eastern and Central North America
![]() Butterflies
Butterflies
- Peterson First Guide to Butterflies and Moths
- Butterflies and Moths (Golden Guide)
- Butterflies through Binoculars: The East
- Caterpillars inn the Field and Garden: Field Guide to Butterfly Caterpillars of North America
Online field guides
![]() Other online resources for plants
Other online resources for plants
- USDA PLANTS
- Lady Bird Johnson Wildflower Center
- Native Plant Trust: New England Wildflower Society
- Arbor Day Foundation (for trees)
![]() Other online resources for birds
Other online resources for birds
- All About Birds
- Links for SOS bird species below, including songs and calls:
3. Select Individual Plants
*If you are observing only animals at your site, you will not need to refer to this section.
![]() A. At your site(s):
A. At your site(s):
- Select one or more individuals of each of your selected plant species to observe.
- Choose plants that appear to be healthy, undamaged, and free of pests and disease.
- If you decide to observe several individuals of the same species, select individual plants that are growing in a similar environment, but are not direct neighbors.
![]() B. How many individual plants of the same species should I observe?
B. How many individual plants of the same species should I observe?
We recommend observing between one and three individuals of the same plant species at a site.
- Observing multiple individuals helps to give scientists an idea of the variation in phenology among individuals at your site.
- If you decide to observe multiple individuals of the same species, select plants growing in a similar environment (e.g., similar amounts of sun or shade), but which are not direct neighbors. Selected plants should not be closer than two or three times the width of one of the plants. For example, if lilacs are growing as a hedge, this would mean every third lilac plant could be selected.
Example: You might select three red maples growing in your back yard, each growing in full sun, and not direct neighbors (Fig. 6).
- Consider the time it will take to make the observations. If you are observing the same species at multiple sites and have limited time, you may want to observe multiple individuals of each species at one site, and only observe one of each species at the other sites.

![]() C. Are there other things I should consider when selecting my plant(s)?
C. Are there other things I should consider when selecting my plant(s)?
Yes. Although we welcome all observations, we encourage observers to:
- When possible, avoid selecting plants that are closer than 20 feet to a road or building.
- Please refer to the phenophase definitions in Appendix D of this handbook or read the “Special Considerations for Observing” section of the species profile on Nature’s Notebook to find out if there are other considerations for your plant species.
Example: Red maple has separate male and female flowers. If you know which flowers you are observing, make a note in the comments section of that individual plant’s field datasheet. Later, you will add this information to your Nature’s Notebook online Add or Edit Plants form.
4. Mark Your Site and Individual Plants
Regardless of whether you are observing only plants, only animals, or both, you will make your observations repeatedly at the same site(s) over time. You will want to mark your site(s) so that you can find it each time you make observations.
A. How can I best mark my site?
There are many options, but the most important thing is that you mark your site so that you can find it again in the future.
- For large sites, it is probably easiest to mark the four corners with a stake or rebar tied with colorful flagging, scrap cloth, or something similar (Fig. 7).
Note: On public lands, or other places where it is not possible to mark your site, you may use natural or man-made landmarks, like the edge of a yard, big rocks, a bend in a trail, a road, or something similar to define the boundaries.
- You will need to replace your markers periodically as they weather and become unreadable.
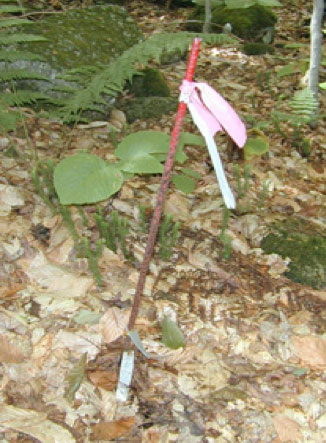
![]() B. How can I best mark the plant(s) that I am observing?
B. How can I best mark the plant(s) that I am observing?
There are many options, but the most important thing is to come up with a reliable way to find your individual plants each time you visit your site.
- Trees and shrubs — Attach labeled flagging tape or small aluminum tags (which you can buy at a hardware store or forestry supply company) to the trunk or a branch on each plant.
- Herbaceous perennials (forbs) — Place labeled aluminum plant markers, tent stakes, popsicle sticks, or skewers in the ground next to each plant, or loosely tie labeled flagging tape around the base of the plant (Fig. 8).
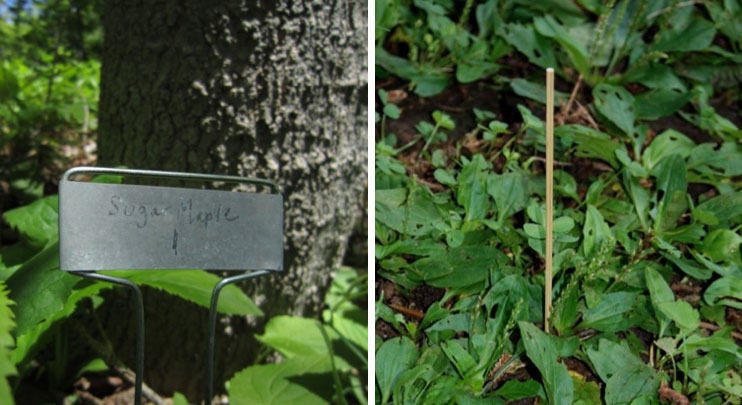
- Use a black indelible marker to write your labels
- However you mark your individual plants, make sure you do not change the growing conditions of the plant.
Example: Avoid placing a broad stake next to a small plant that would shade it or cause root damage.
- Replace your markers periodically as they weather and become unreadable.
5. How to Observe
A. Materials Needed to Make Observations
To make your plant and/or animal phenology observations, you will need the following:
- Phenophase definitions and instructions on how to recognize them:
- Phenophase definitions and species fact sheets
- They are also printed on each plant/animal phenophase datasheet in brief
Note: Be sure to check Tips for Observing for each species.
- Datasheets, clipboard, pencil, ruler
- Download and print single datasheets from individual species profile pages, or
- Create a personalized datasheet packet from your Observation Deck.
- Binoculars (optional, but very helpful for observing animals as well as phenophases in tall canopy of trees)
- Marking equipment for first trip: Flagging, black indelible markers, stakes, plastic tags, aluminum tags or markers, popsicle sticks
- Safety/Comfort Items: sun protection, insect repellent, Benadryl, proper footwear, etc
B. Observation Methods
Because animals move around and plants do not, there is a difference in the methods we ask you to use.
![]() For plants: Observe each marked, individual plant every time you visit your site.
For plants: Observe each marked, individual plant every time you visit your site.
Example: Observe the same marked red maple in your back yard all through the year.
![]() For animals: Look or listen for all your species by making a single pass (walking) through your site along the same line (transect) each time you visit. Remember you will be looking and listening for both adult and juvenile animals, and also that some animals are active at different times of the day.
For animals: Look or listen for all your species by making a single pass (walking) through your site along the same line (transect) each time you visit. Remember you will be looking and listening for both adult and juvenile animals, and also that some animals are active at different times of the day.
- Define a transect line at your site: A transect is a fixed path at your site that you will walk along to listen and look for animal species on your list. It may be an already existing path or trail, or you may use a compass to locate a transect line along a given bearing.
Note: Whether you use an existing path or define a new one, make sure that you can locate the beginning and end of your transect so that you can walk the same path on each visit.
- Walk slowly along your transect while looking and listening for animals.
- If needed, move towards an animal that you see or hear to identify it.
Note: If you are observing Monarch butterflies, your transect should pass by common milkweed, the typical food plant of monarch caterpillars. As you walk along, turn over leaves on common milkweed to look for caterpillar activity.
- Plan to spend the same amount of time looking and listening for animals, three minutes on each visit to your site, which is the standard observation time used for SOS.
How often should I make my observations?
- As often as is convenient for you!
- Once a week or, if possible, even as often as every two or three days is ideal, particularly during the spring and fall when plant and animal phenology is changing quickly. However, if you are only able to make observations twice per month or monthly—that is also good data!
- Most importantly, record and submit all the observations you make. Your observations, no matter how often you make them, provide valuable data!
At what time of day should I make my observations?
- Make observations at a time of day that is convenient for you.
- Try to make your observations consistently around the same time each day. This practice keeps your data consistent and easier for researchers to use.
Example: If one of your sites is your backyard, you may decide to observe on Tuesday and Thursday after work and again on Saturday afternoon. If another site is a nearby natural area that you visit on weekends, you may make observations there on your regular Sunday morning hike.
6. Record Your Observations in the Field
Now that you have all your supplies and understand the observation methods, you are ready to fill in your datasheets. In this section we will take a look at all the datasheets. In Appendix A you will find a complete example of making plant and animal observations and completing the field datasheets.
A. Types of Datasheets
Each time you make your plant and animal phenology observations, there are 2 types of datasheets you are asked to complete:
- Plant or Animal Phenophase Datasheet for each species on your list
- Cover Sheet
B. Filling in Plant and Animal Phenophase Datasheets
The individual plant and animal Phenophase Datasheets are for tracking your phenophase observations for each animal species or each individual plant species.
For each day that you make observations and for each species on your list you will:
- Fill in the block in the upper right hand corner with Species, Plant/Animal Nickname, Site, Year and Observer (Fig. 9, Note 1)
- Record the date that you made the observations (Fig. 9, Note 2)
- For each phenophase (Do you see/hear?), record one of the following choices:
- Yes (y) — if you saw that the phenophase is occurring
- No (n) — if you saw that the phenophase is not occurring
- Uncertain (?) — if you were not certain whether the phenophase was occurring
- Do not circle anything if you did not check for the phenophase!
![]() For plants: It is very important to record this information, even if nothing has changed on your plant since your last visit! Knowing when a plant is not in a given phenophase is just as important as knowing when it is in that phenophase.
For plants: It is very important to record this information, even if nothing has changed on your plant since your last visit! Knowing when a plant is not in a given phenophase is just as important as knowing when it is in that phenophase.
![]() For animals: It is very important to record this information, even if you did not see a particular animal species! Knowing when an animal is not present, or when an animal is not in a given phenophase is just as important as knowing when it is.
For animals: It is very important to record this information, even if you did not see a particular animal species! Knowing when an animal is not present, or when an animal is not in a given phenophase is just as important as knowing when it is.
- Record comments such as time of day, weather conditions or any special circumstances (e.g., “field was mowed; milkweed gone”) (Fig. 9, Note 3).
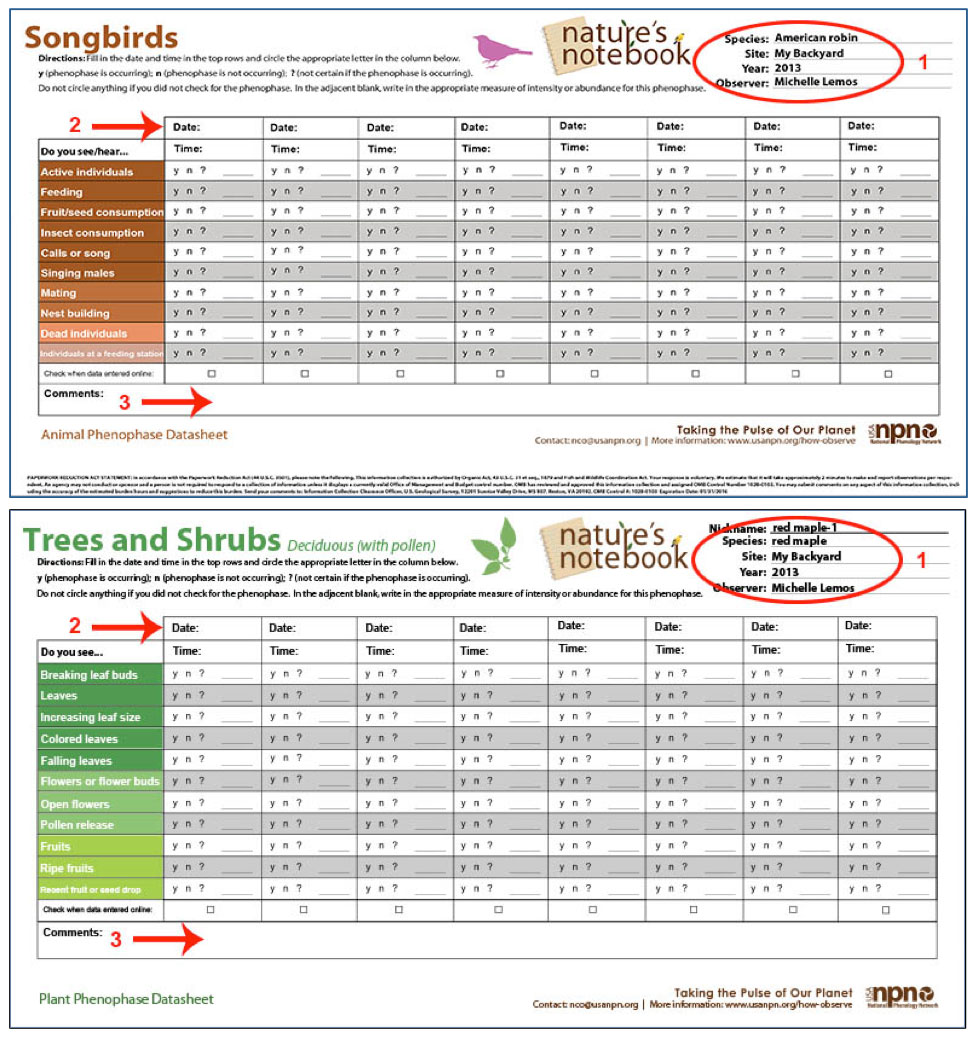
Note: Phenophase descriptions and datasheets are different for every single species! Be sure to review your phenophase definitions, found for each species on the SOS website. Also check to make sure you are using the correct datasheet when observing!
The purpose of the Cover Sheet is to report information to describe each day you visit the site.
For each day that you make observations you will fill in a Cover Sheet (Fig. 10.)
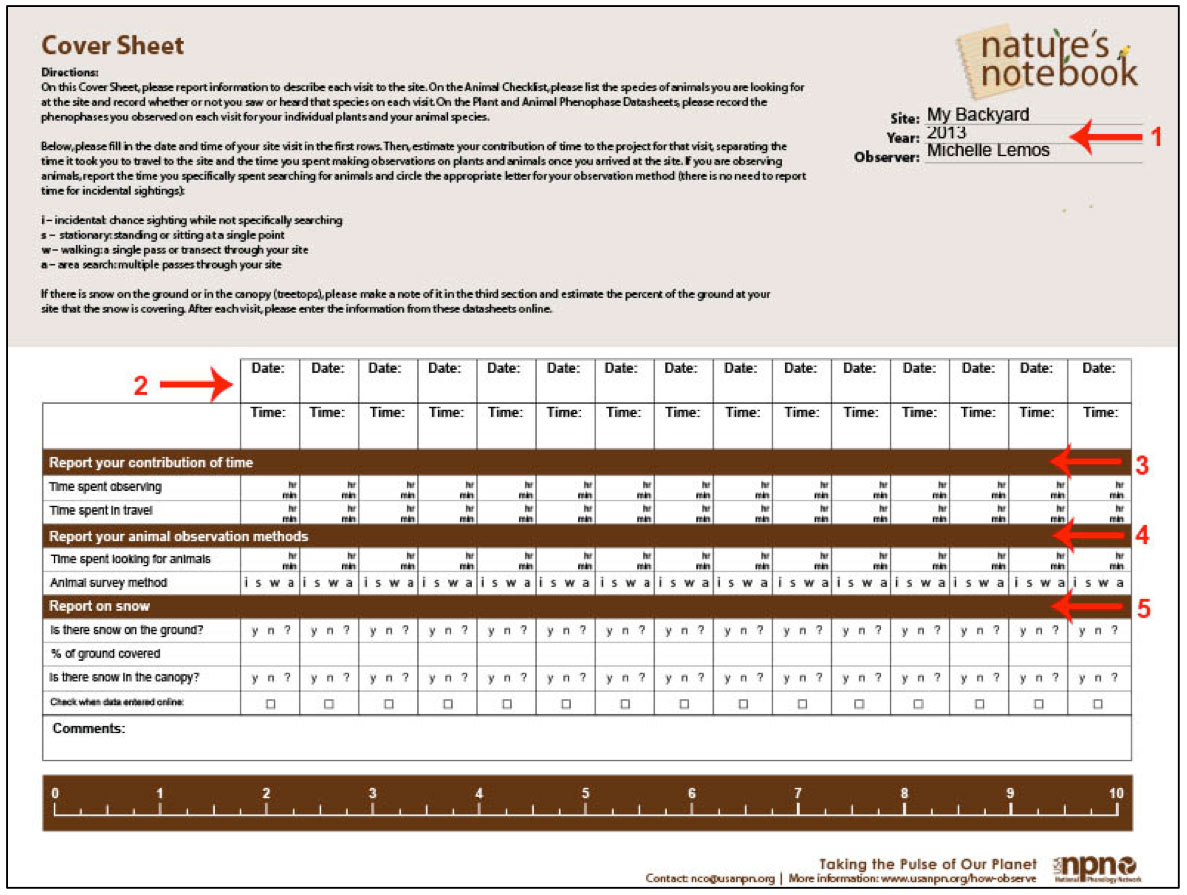
- If you created a complete set of datasheets from Nature’s Notebook, your Cover Sheet is pre-printed with your site name, year, and your name at the top of the page (Fig. 10, Note 1).
- Record the date (Fig. 10, Note 2).
- Report your contribution of time (enter number and circle unit: minutes or hours) (Fig. 10, Note 3) for:
- Time spent observing, including getting organized
- Time spent traveling
- Report your animal observation methods (Fig. 10, Note 4)
- Time spent looking for animals (enter the number 3 and circle unit: minutes Animal survey method (enter “w” for walking along your transect)
- Report on snow on ground and canopy (Fig. 10, Note 5)
Note: Capturing volunteer time assists the Signs of the Seasons Program in seeking funds.
7. Register with Nature’s Notebook Online
Once you have selected your site and plants and/or animals, you are ready to log on to Nature’s Notebook where you will go through the following steps:
- Create an account
- Register your site or sites
- Register your plants
- Register your animals
- Create datasheets
- Enter and submit observations
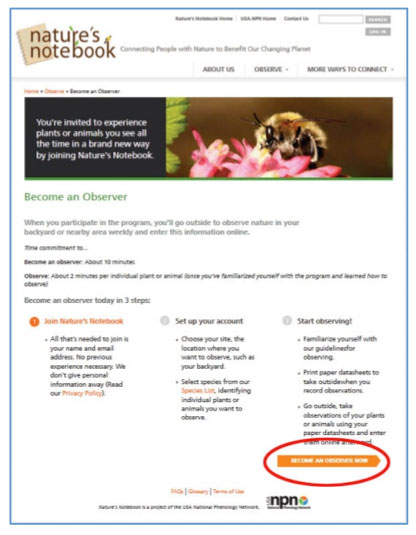
A. Create Your Account on Nature’s Notebook
- Go to USA-NPN and click on “Become an Observer Now” (Fig. 11).
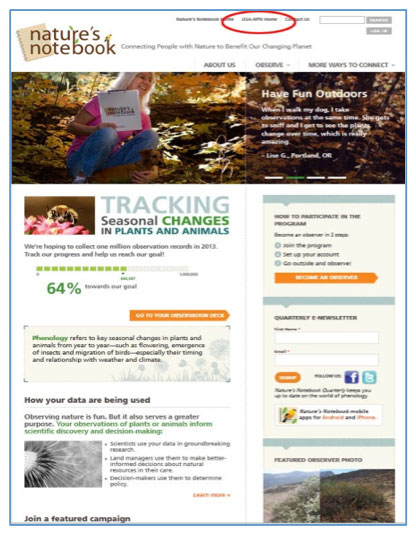
- Or, click on the Nature’s Notebook link on the top of any page on the USA-NPN website (Fig. 12).
-

- Fig. 11. USA-NPN at https://www.usanpn.org/nn/become-observer
-

- Fig. 12. USA-NPN home page at www.usanpn.org
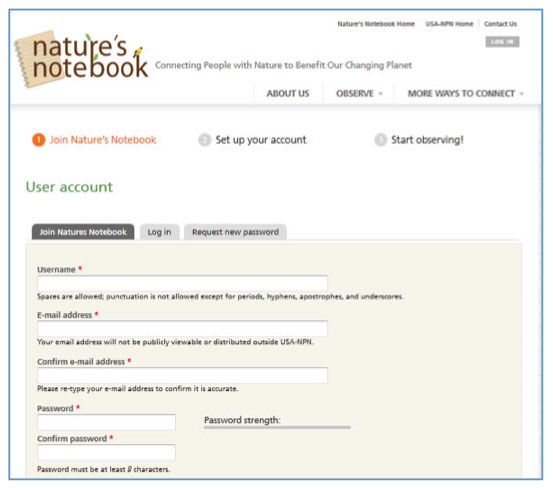
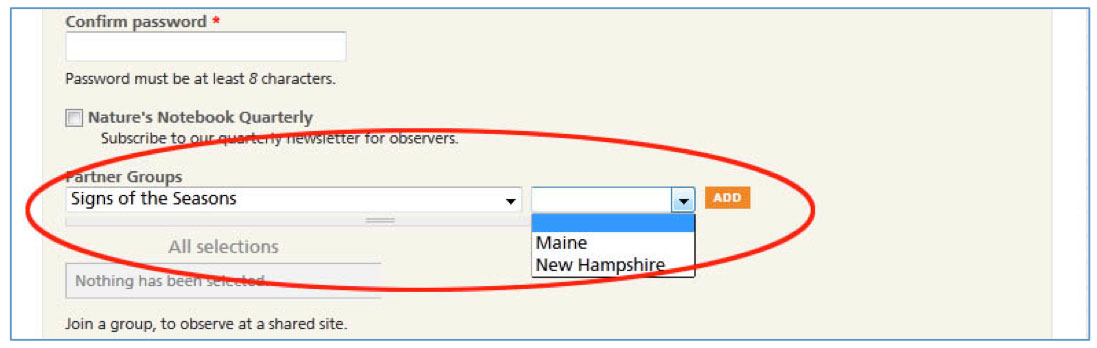
- Fill out the “Join Natures Notebook” form — all you need is a valid email address (Fig. 13)
- Be sure to choose Signs of the Seasons as your partner organization and the state where you are making observations, and click “Add” (Fig. 14)
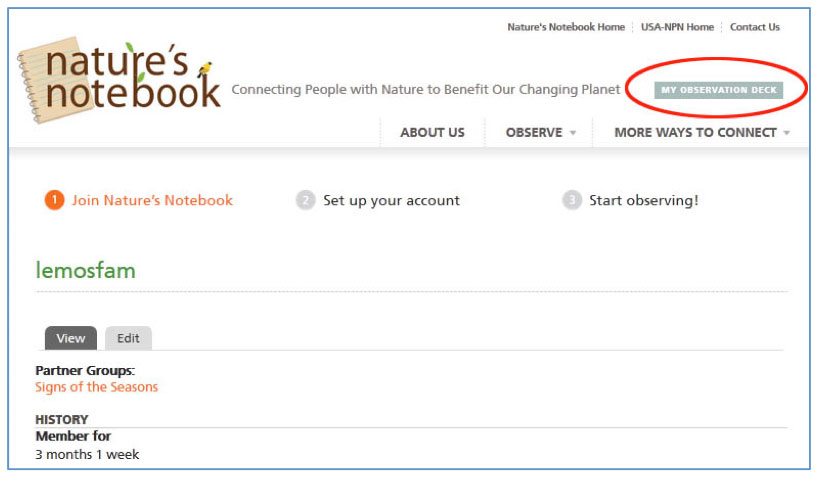
- Once you complete and submit the online form, you can go directly to your own Observation Deck from your user account page (Fig. 15) or follow the instructions that will automatically be sent to your email address.
B. Register a Site on Your Home Page
From your Nature’s Notebook Observation Deck (Fig. 16), you can add a site, add or edit plants and animals, create datasheets, and enter your observations online.
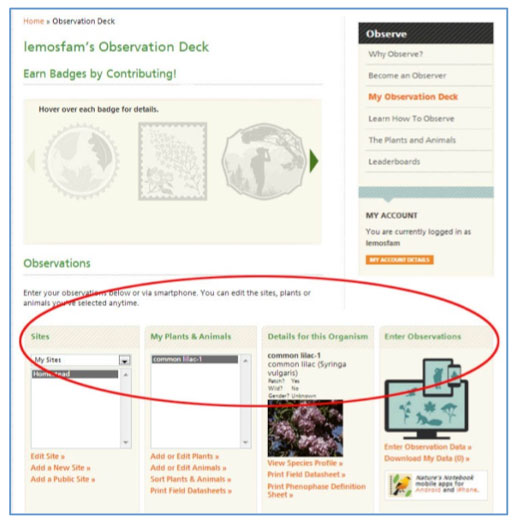
- Click “Add a New Site” on the menu at the bottom left of your home page (Fig. 16) to open the Add a New Site form (Fig. 17).
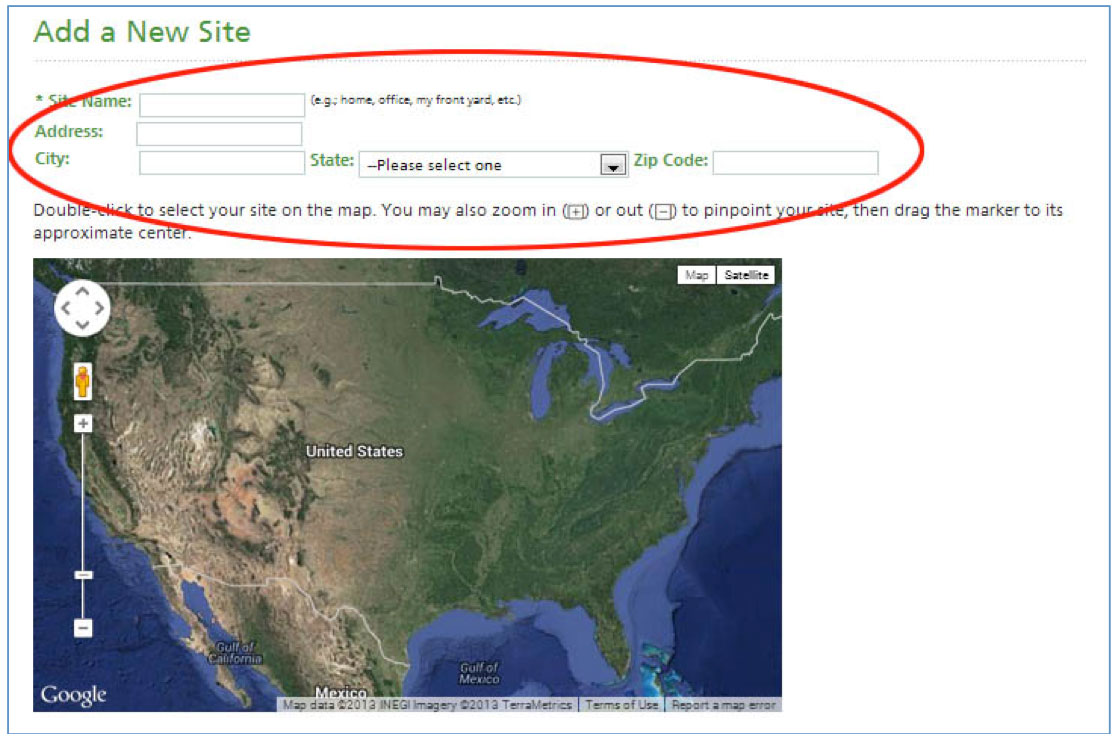
- Here, you can locate your site by
- Entering an address, which will be automatically geo-located on the map (Fig. 17),
- Finding and selecting your site on the interactive map, or
- Typing the latitude and longitude into the boxes below the map interface.
- Once you’ve found the general location of your site, you can refine your site location by moving the red teardrop on the map.
- Please fill in the Optional Additional Information questions to further describe your site. While these are labeled “optional” this information is critical to gathering good data, so please don’t skip this step!
- If you have any trouble working with this Google Earth form, email or call your ME or NH SOS contact. (esp@maine.edu in ME and Eberhardt@unh.edu in NH)
- Once you have successfully registered a site, you can add plants and animals to that site.
- Click “Add or Edit Plants” from the menu at the bottom of your Nature’s Notebook Home page (Fig. 16) to open the form (Fig. 18).
- Make sure that the site to which you would like to register the plants is selected in the “Site Drop Down Box” at the top of the Add or Edit Plants form (Fig. 18, Note 1).
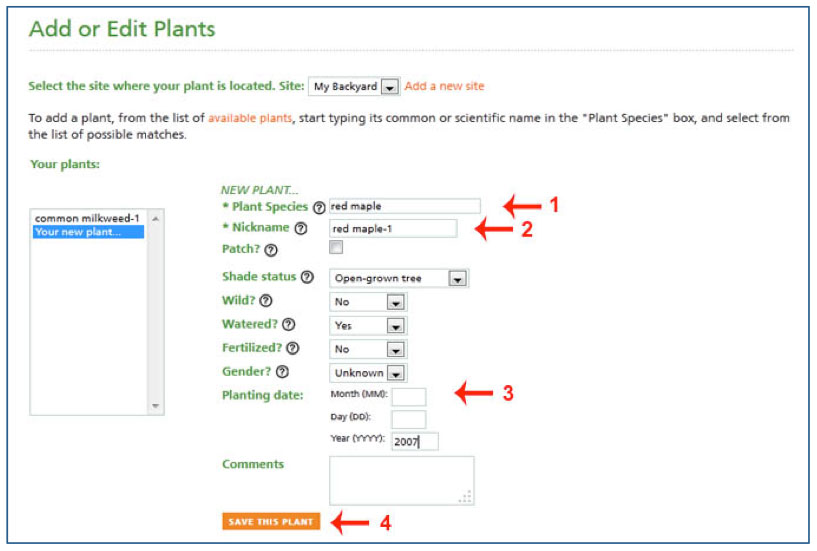
- Begin typing a plant species name from the Signs of the Season Indicator Species List in the “Plant species” box (Fig. 18, Note 2). A pop-up window will appear with suggested plant species; click on the correct species.
- A nickname for that plant will automatically generate. If you’re observing more than one plant of a particular species, you can label each one differently. (For example, the first maple tree you select can be labeled Maple-1, the second maple tree you select to observe can be labeled Maple-2, etc.).
- Fill in answers to the remaining questions and add comments, e.g., about site conditions for this plant (Fig. 18, Note 3).
- Click on the “Save this plant” button before adding other plants (Fig. 18, Note 4).
- Once you have successfully registered a plant to your site, it should appear in Your Plants list. (Fig. 19)
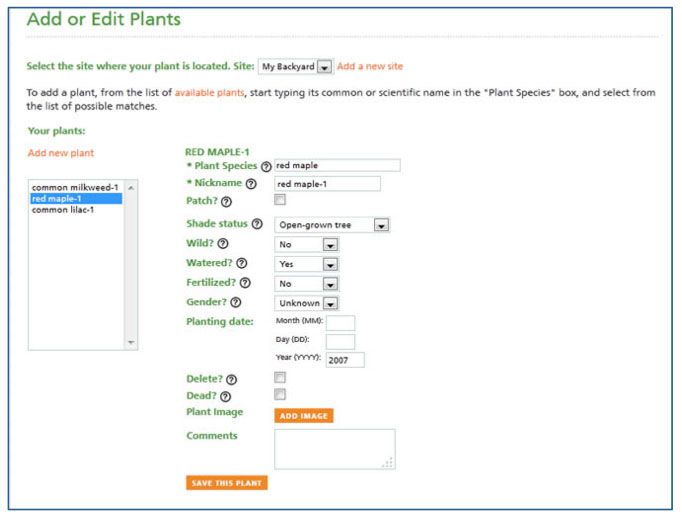
- To add more plants, click on “Add New Plant” and repeat the previous steps.
![]() D. Add Animals to Your Site(s)
D. Add Animals to Your Site(s)
To add animals to your site, you must create an “Animal Checklist”
Click “Add or Edit Animal” on the bottom of your Observation Deck (Fig. 16) to open the Animal Checklist page (Fig. 20).
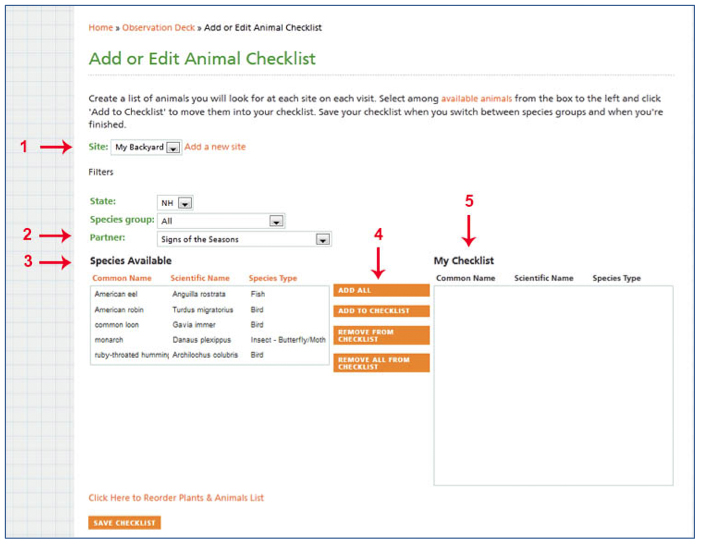
- Make sure your site is selected in box at the top of the new window (Fig. 20, Note 1).
- Select Signs of the Seasons in the “Partner” drop down menu (Fig. 20, Note 2) to show SOS animal species in “Species Available” window (Fig. 20, Note 3).
- Click “Add All” (Fig. 20, Note 4) to move species into “My Checklist” (Fig. 20, Note 5) on the right.
- Note that this animal list may not be up to date — if you need to, search for and add other SOS indicator animals you wish to observe and click “Add to Checklist” button.
Note: We recommend adding all of the animals on the SOS list, even if you do not typically see the all of the animals at your site. Negative data (not seeing animals) is just as important to us as animal sightings (See Appendix B, FAQs 5). To add additional species, you can filter the animals in this list using the “Species group” drop-down menu. Be sure to save your checklist before you switch between species groups.
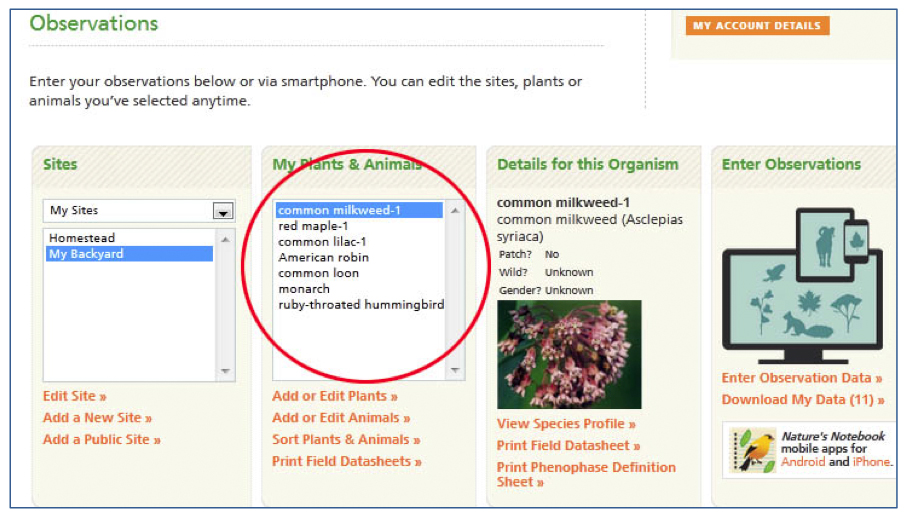
- Once you are finished adding animals, click the “Save checklist” button. Your checklist should now appear on your Nature’s Notebook Observation Deck. In the example below (Fig. 21), the Signs of Seasons animals have been added to the checklist for the site called “My Backyard.” They will appear in the My Plants and Animals box with red maple-1 and common lilac-1, which you previously added.
E. View Species Profiles/Create and Print Datasheets
Once you have registered your site and added plants and animals, click on “My Observation Deck” link. You will now be able to:
- Go to the plant or animal profile for any species on your list.
- Enter observations for a selected plant or animal.
- Enter observations for all your plants and animals.
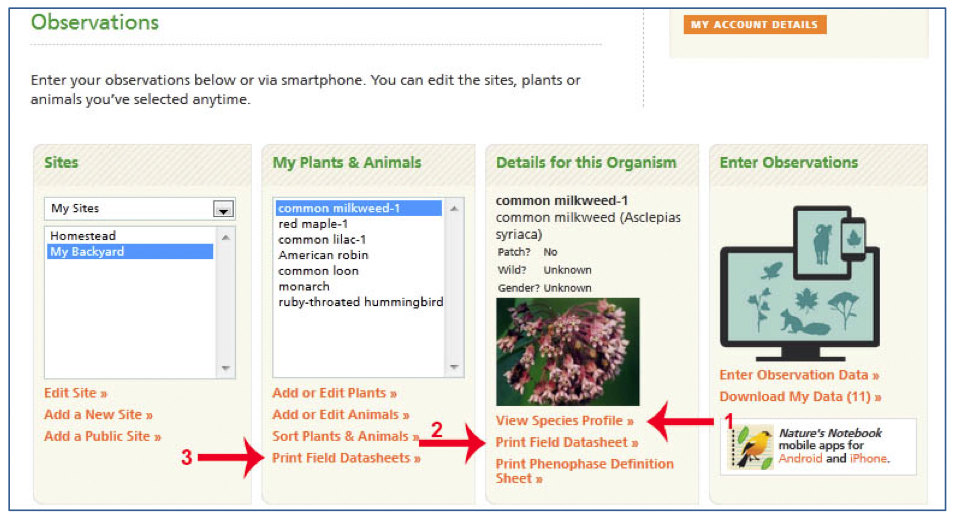
To create and print a single datasheet for one species:
- Select a site and a plant or animal on your Observation Deck (Fig. 22).
- You can view the species profile (more detailed species information is available on the SOS website (Fig. 22, Note 1).
- Click on “Print Field Datasheet” (Fig. 22, Note 2) under the “Details for this Organism” window.
- You can open and print one or more copies of the data sheet for that plant or animal or save a copy to a folder on your computer.
To create and print datasheets:
On your Observation Deck, click on “Print Field Datasheets” button under “My Plants & Animals” (Fig. 22, Note 3), a pop-up window will appear (Fig. 23).
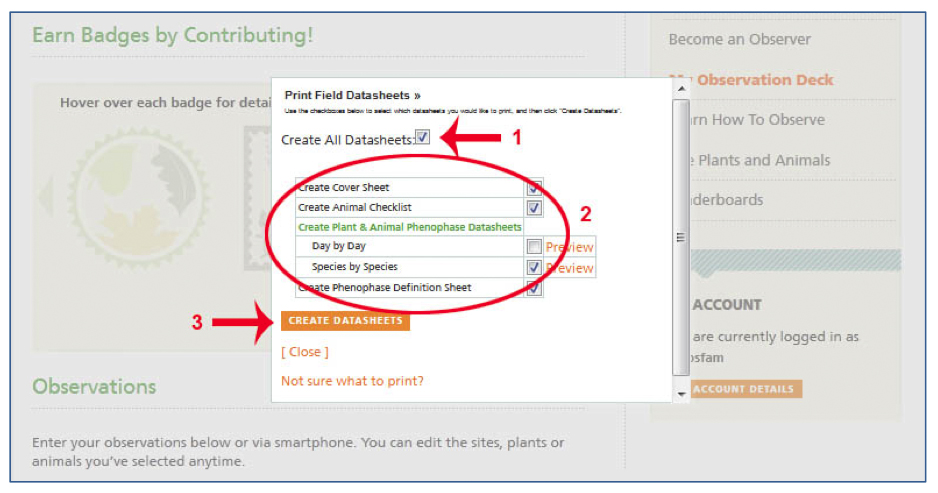
- Use the checkboxes to select the datasheets you would like to print:
- Create All Datasheets (a cover sheet, an animal checklist and a phenophase datasheet for every plant and animal you registered) (Fig. 23, Note 1).
We recommend you get started by selecting “Create All Datasheets” - Create a Coversheet only (Fig. 23, Note 2).
- Create all Plant and Animal Phenophase Datasheets only. (Fig. 23, Note 2)
- Create All Datasheets (a cover sheet, an animal checklist and a phenophase datasheet for every plant and animal you registered) (Fig. 23, Note 1).
- Click “Create Datasheets” button (Fig. 23, Note 3) to
- Open and print datasheets now or
- Save datasheets to a folder on your computer to print when you need them.
Note: In addition to a form for recording your observations, datasheets provide very brief phenophase definitions for your species. These definitions, which are more complete with photos of each phase, are available on the SOS website, http://staging.umaine.edu/signs-of-the-seasons/indicator-species/
F. Enter your Observations Online/Log in
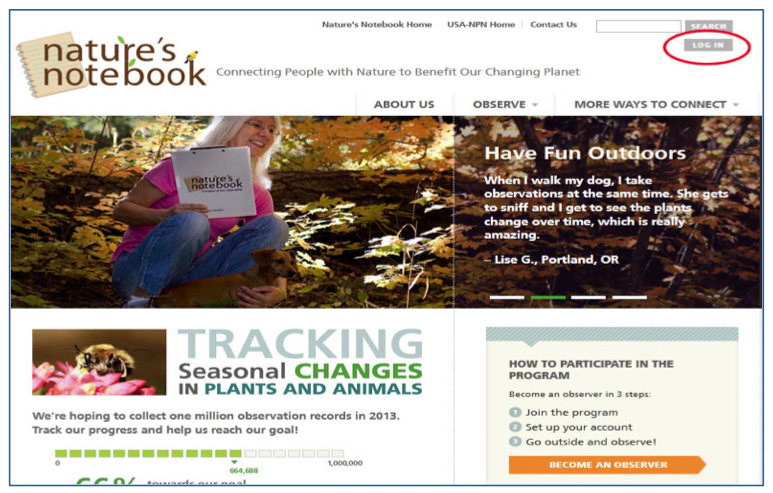
- Go to usanpn.org/natures_notebook and click on “Log In” at the top of the page (Fig. 24)
Note: You may find it handy to save the Nature’s Notebook home page in your Favorites or Bookmarks on your computer.
2. On your home page, click on “My Observation Deck” and scroll down to “Enter Observations” at the bottom of the page. Click “Enter Observation Data.”
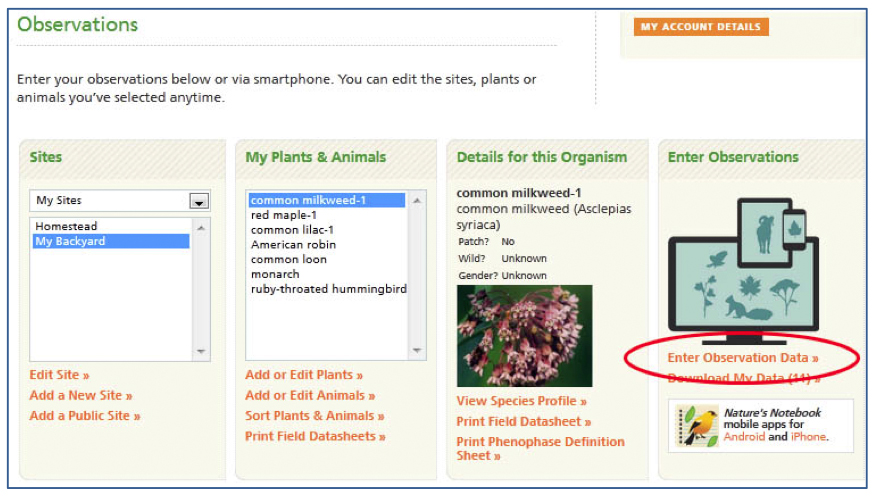
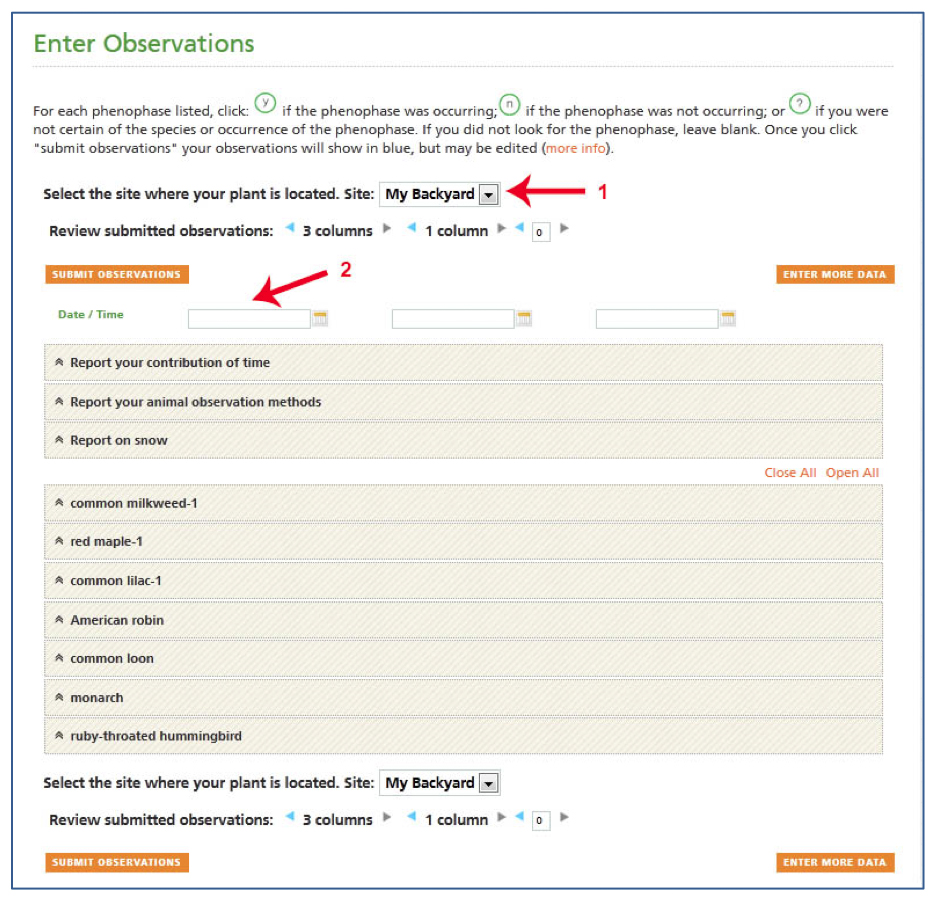
- You should now see the Enter Observations Form (Fig. 26).
Before you enter observations:
- Select the correct site from the drop-down menu at the top of the form (Fig. 26, Note 1)
- Using the calendar function, select the date for which you want to enter observations then click on “Apply”(Fig 26, Note 2).
- Each of the categories of information that you need to enter (contribution of time, animal observation methods and snow conditions at your site) can be accessed by clicking on the black arrows at the left of the title to expand the menu.
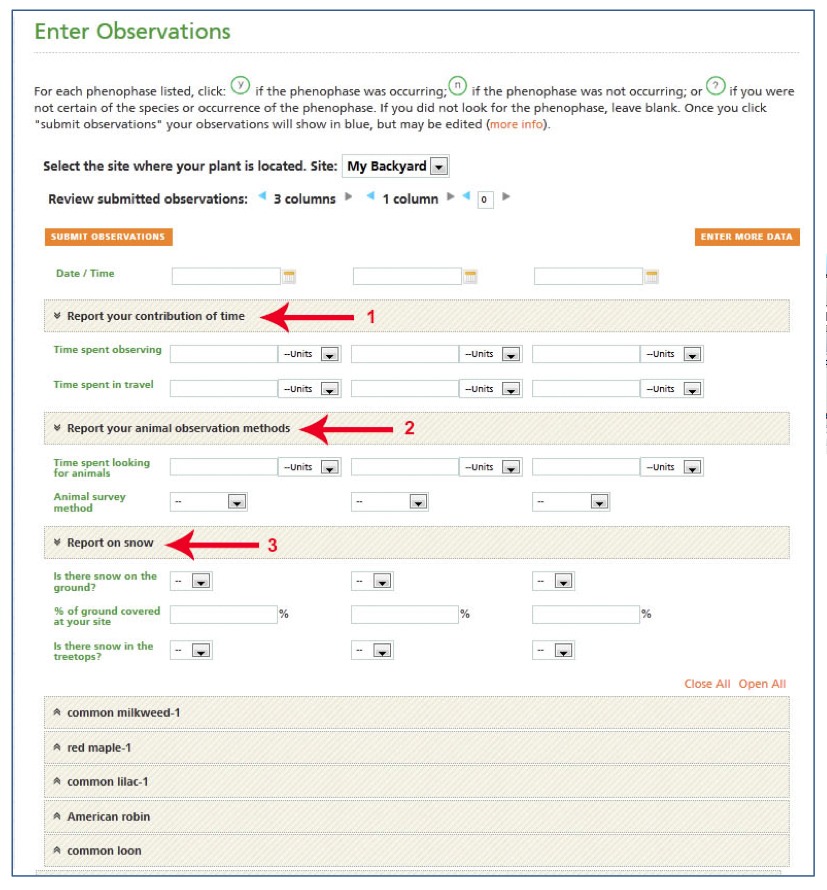
- To enter your time, click on Report Your Contribution of Time to open the menu for “time spent observing” and “time spent in travel” (Fig. 27, Note 1)
- Enter a number in box next to Time Spent Observing and then select the appropriate unit of measure from the drop-down menu to the right.
Example: If you spent a total of 15 minutes observing (for both plants and animals), enter “15” and select “minutes” from the drop-down menu.
- Repeat the above step for Time Spent in Travel (Fig. 27, Note 2).
- Next click on “Report Your Animal Observation Methods.”
- For time “spent looking for animals”, enter 3 and select minutes for your unit of measure from the drop-down menu, as you did above for time reports.
- Now, enter your “animal survey method” by clicking on “Walking” in the drop-down menu.
- Finally, click on Report on Snow and enter the information regarding snow cover. (Fig. 27, Note 3).
G. Enter Plant and Animal Observations
You have already chosen the site and entered the date and reported cover sheet information, so you are now ready to enter your plant and animal observations (Fig. 28).
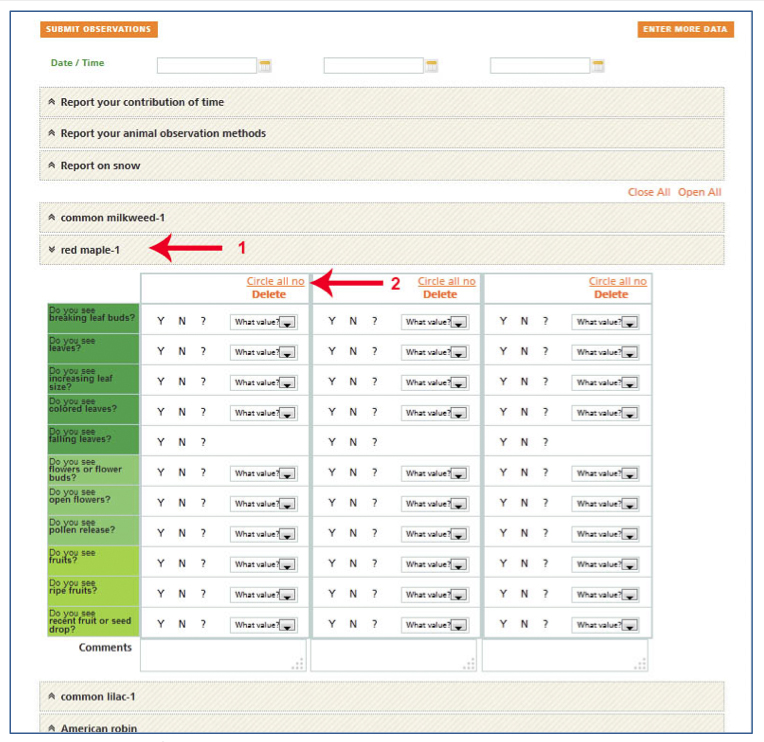
The plant and animal species that you have registered to this site will appear in expandable menus on the left side of the form (Fig. 28, Note 1).
- Click on one of the species names to access the data entry interface for that species
- Each column represents one day’s worth of observations.
- Using the phenophase datasheets that you filled out in the field, enter your observations
- Click “y” for any phenophase that you observed
- Click “n” for any phenophase that you did not observe
![]() Note: If you are reporting animal observations and you did not see or hear a particular animal species, click “Circle all no” at the top of the column to automatically enter “n” for all phenophases for this animal on this date (Fig. 28, 2).
Note: If you are reporting animal observations and you did not see or hear a particular animal species, click “Circle all no” at the top of the column to automatically enter “n” for all phenophases for this animal on this date (Fig. 28, 2).
- Click “?” if you are not sure whether you observed a particular phenophase.
Note: Do not click anything if you did not look for a particular phenophase.
- Repeat these steps for all the plants and animals on your species list.

Now that you have entered all your observations, be sure that you save them!
- To save your observations, click the orange “Submit observations” button in the lower left corner of the screen (Fig. 29). You will see a message that your observations were successfully saved.
- From here, you can enter further observations, or use the menu bar at the top of the page to navigate to other functions within Nature’s Notebook.
How do I change observation data once I have entered it?
If you wish to correct your observation data for a particular date, navigate to that day’s column using the arrows at the bottom of your Nature’s Notebook Enter Observations form.
- Phenophases: Change the “Yes”, “No” and “?” to the correct ones for that day.
- Date: it is not possible to change the date once you have mistakenly put in a wrong date when you have recorded observations.
To solve this problem: If you have correct data entered for the wrong date, please change all the responses in the column with the wrong date to “?”, and add a new column with the correct date and responses. You can add a comment describing the correction to help us keep track of your change.
I. Using a Smartphone to Enter and Submit Observations
Nature’s Notebook is now available as a free smartphone application for both Iphone and Android platforms.
- Go to the following Nature’s Notebook website to get instructions on how to download and use the mobile data entry app: https://www.usanpn.org/nn/mobile-apps
- We highly recommend that you use the app only for data entry. Use a regular computer to create and set up your Nature’s Notebook account and site.
- Using the mobile app allows you to skip the datasheet step of observing — you can directly enter data you are observing in the field into the mobile app.
- The mobile app has all of the functionality of the regular computer data entry forms, but may appear differently. For example, you can submit cover sheet information through the mobile app, but you may do so in a different way than you do online. For full instructions, please visit the above website.
- You do not need wifi or cell service in order to use the app when you are in the field, but you must remember to sync your app once you do have wifi or cell service, (the app will prompt you to sync data regularly).
Congratulations, you are finished!
Much of the value of phenology data is in making observations from the same sites and plants over many years, so please come back next year!