Activity 4: Solar S’mores
Learning Targets:
- Understand how solar ovens capture the sun’s heat.
- Design and construct a working solar oven.
- Use the engineering design process to determine the best design and potential modifications.
Length: 60 – 80 minutes
Essential Questions:
- How can you capture the sun’s heat?
- How do properties of different materials impact heat capture?
Enduring Understandings:
- Solar energy is not just light/electrical, but also heat/radiant.
- Some materials capture heat better than others.
NGSS Standards:
- 3-5-ETS1-1, 1-2, 1-3
- 4-PS3-2, 4-PS3-3
- MS-PS3-3, ETS 1-2, 1-2, 1-3, 1-4
Background for Facilitator:
In this activity, participants will build their own solar ovens and use them to cook s’mores. Using the engagement and appeal of food, in particular s’mores, youth will become engineers to build and test their designs. It will be important to check with your group to make sure there are no food allergies before proceeding. This activity uses everyday materials, such as cardboard, aluminum foil, and the sun. Constructing the ovens themselves will require youth to be open to the challenge, positive emotionality, and teamwork in order to be successful. As the facilitator, be sure to tell youth this upfront. Let them know that while they will be working in small groups, everyone is a team and it’s ok to ask for help. For example, if you get frustrated using the packing tape, ask someone else to take a turn or lend an extra hand.
Several scientific phenomena are involved in making your oven the best heater it can be. Heat is the form of energy (sometimes called thermal energy) that is transferred by a difference in temperature. You want to transfer the sun’s heat to your solar oven. Reflection is the throwing back of light, heat, or sound by a body or surface, like a mirror. The shiny foil you’ll use in your oven will reflect the sun’s light and heat inside your oven. During absorption, energy is taken into material rather than reflected. You will line the inside of your oven with black paper so it can absorb the light and heat being reflected into it. Another energy process you should be familiar with for this project is convection, which is the transfer of heat by the movement of a gas or liquid. You’ll use plastic wrap to make your oven airtight so the air warmed by the sun doesn’t leave your oven through convection. One final energy term important to this project is insulation. Insulating materials prevent heat from leaving your oven through radiation. That’s why you are going to line the inside of your oven with a cheap and effective insulator — newspaper!
- Science Project: How to Make a Solar Oven (Education.com website)
Safety tip: Youth should be told not to look directly at the sun or any area where the rays are concentrated.
Vocabulary List:
- Thermal Energy: heat energy
- Radiant Energy: light energy
- Reflection: bouncing energy back without absorbing it
- Absorption: take in heat energy
- Convection: move heat through the air
- Engineering Design: a series of steps to create a product, including ask, imagine, plan, create, improve
Materials:
- Cardboard
- Aluminum foil
- Plastic food wrap
- Packing tape
- Glue
- Scissors
- Newspaper
- Black paper or markers
- Ruler
- Paper
- Pencils
- S’Mores fixings
Goal: Help students visualize how solar energy can be captured and transferred.
Methods:
Engage:
Begin by accessing the youth’s prior knowledge:
- Have you ever gotten into a car after it sat in a sunny spot? What did you notice about the interior of the car? Why do you think this happened?
- What does the Sun provide for the Earth system?
- How can we capture the Sun’s energy?
- What is a solar oven and how does it work?
- What are 2 objects that reflect light? (ex. mirror, aluminum foil, white walls or paper)
- What are 2 colors that absorb heat well? (ex. dark colors such as black and purple)
Explore:
- Explain that today they will be constructing an oven that is heated using energy from the sun. Let participants know what materials will be made available to them in building their oven, but do not give them the materials yet. Explain that their oven can be any shape, but must have a door that can open and a “window” space on the top.
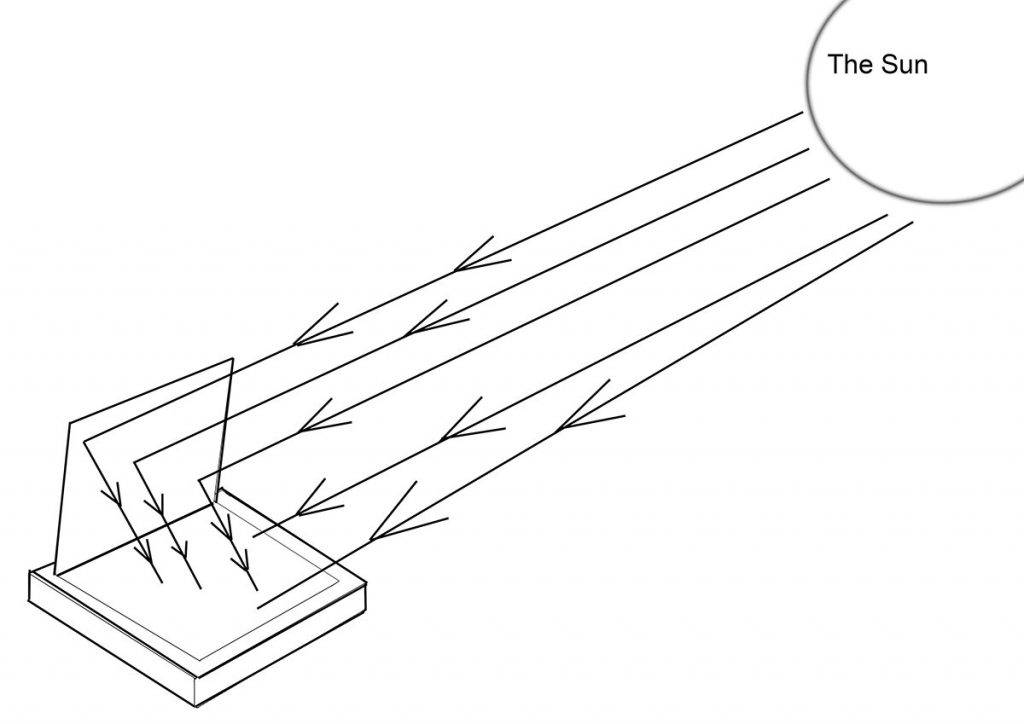
Figure 4.1: Sun shining down on a solar oven (UMaine Extension 4-H Graphic, Jessy Brainerd) - First, they will be asked to discuss and sketch their design in small groups. Before breaking into groups, ask if anyone has ideas about how this might work? Has anyone seen a solar oven before? If yes, have them explain what they remember. The facilitator may want to show youth image 4.1 or replicate it on a whiteboard to help the imagination process get started. Explain that this image is one example of how the sun’s energy might reach inside their oven, but there have been many other successful designs.
- Divide youth into cooperative learning groups. Groups should begin by discussing how they might use the materials. Give participants access to paper and pencils to sketch their ideas. Remind them that everyone in their group needs to have a voice in how the oven is designed. Challenge them to include at least one idea from each person.
- Explain they can be as creative as they want, but they need to be able to explain how the sun’s energy will be captured into the oven. Have them draw a creative, one-of-a-kind solar oven.
Explain
Have groups present their design to either the facilitator or the whole group if time allows. Have groups explain why they chose certain materials and what they anticipate the function of those materials to be.
As a group, discuss the purpose of the foil, window, and reflector. Why might these features be important? Review some of the key concepts in the elaborate phase as well, such as rolled-up newspapers as an insulator. After sharing oven designs and some of the important pieces of the oven design, give groups a few minutes to discuss what they might want to change or modify from their original design. The facilitator should be ready to prompt discussion or ideas that promote some key factors that generally lead to success. These include:
- Covering the entire inside of the oven with aluminum foil
- Adding insulation to the sides of the box (rolling up newspaper into tubes works well)
- Having a covered window at the top of the oven (2 layers of packing tape or plastic wrap works)
- Create a sun reflector to direct the sun into the oven’s window (example: using cardboard, glue, and foil)
- Consider the outside of the oven. Dark colors absorb the sun’s energy, so covering it with black construction paper is one approach.
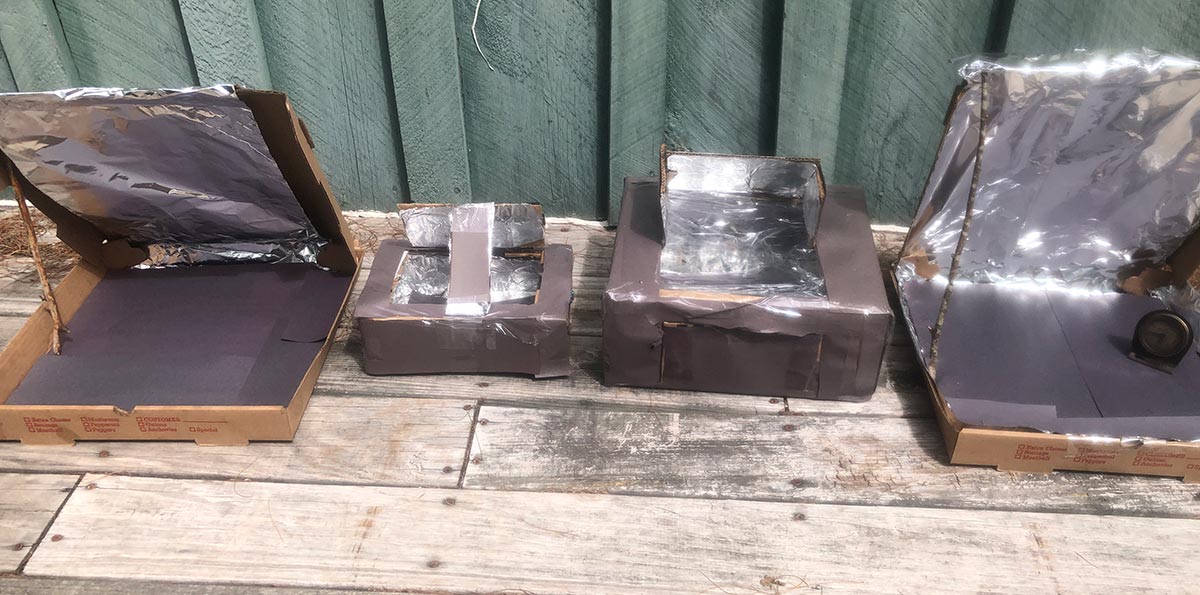
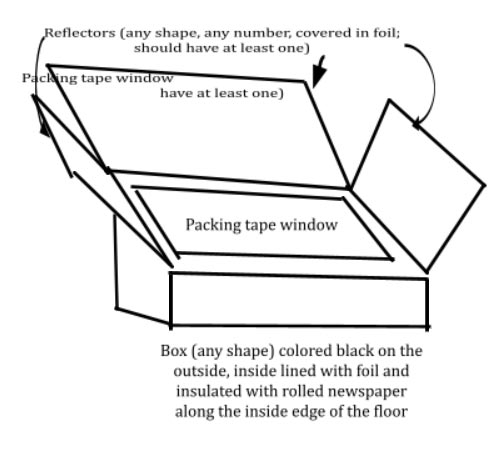
Example images of assembled ovens:
-
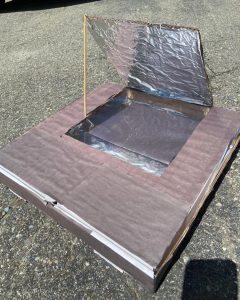
- Figure 4.2: A sample of a solar oven set-up (UMaine Extension 4-H Photo, Jessy Brainerd)

-
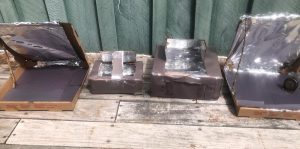
- Figure 4.3: Solar Oven Examples (UMaine Extension 4-H Photo, Sarah Sparks)
Elaborate
Allow groups to select their materials and build their ovens. Remind them to work together as the materials can be difficult to manipulate. When groups have their ovens constructed, it’s time to test them out! Follow these steps to get your s’mores recipe baking.
- Preheat the solar oven by placing it in a sunny spot for up to 10 minutes.
- Place a square of graham cracker in the oven and top with a marshmallow.
- Close the oven door and place the reflector on the top.
- Heat until the marshmallow is squishy.
- Gently place a piece of chocolate and another square of graham cracker on top.
- Heat it up for a few minutes more, just to melt the chocolate a bit.
Facilitator Tip: While s’mores are baking, this might be a good time to move into discussion for the evaluate section.
Evaluate
Based on their experience and observations, engage is a group discussion. Here are some suggested topics to get started.
- How did you feel when you were drawing and designing your oven?
- How did you actually build your oven?
- How did you decide who would do what?
- How did you actually build your solar oven?
- What challenges did you encounter?
- What are the key components of the most effective design of a solar oven? Why are those designs effective?
- How do you know if your solar oven is working? What evidence do you have to support that claim?
- Discuss the importance of the engineering design process.
- How else might you use a solar oven?
Facilitators may want to have youth sketch their solar oven design to label or aid in the discussion of how the energy was captured.
Extension Ideas:
- Use a full-sized solar oven and prepare something more complicated.
- Use a thermometer and measure how hot different colored objects get in the sun.
- Use a thermometer to measure how the temperature differs for a solid, liquid, and gas.
- Use a thermometer in each oven to determine the design that gets the hottest.
- Try each oven to see if they can melt a solid piece of candy.
Additional information: This experiment should be done in pairs or small groups, in order to maximize 21st Century skill building-communication, teamwork, and problem-solving skills.
Additional Resources:
- Science Project: How to Make a Solar Oven (Education.com website)
- Make S’Mores With a Solar Oven! (NASA Climate Kids website)