Activity 1: What is a Circuit?
Learning Targets:
- Understand how electricity flows through a circuit.
- Demonstrate how to light a bulb with wire and a battery.
- Utilize the circuit to determine if materials conduct electricity or insulate.
Length: 60 – 75 minutes
Essential Questions:
- How do the parts of an electrical circuit work together?
- What makes a good circuit design?
Enduring Understandings:
- All electrical circuits must include a power source, a load, and a path for electricity to flow. Electricity only flows through a complete circuit.
- Conductors and insulators help in designing circuits.
NGSS Standards:
- 4-PS3-2, 4-PS3-4
- 5-ESS3-1
- MS-PS3-3
Background for Facilitator:
Electricity is a type of energy (EXPLAINTHATSTUFF! website) that can build up in one place or flow from one place to another. When electricity gathers in one place it is known as static electricity (does not move); electricity that moves from one place to another is called current electricity. For an electric current to happen, there must be a circuit. A circuit is a closed path or loop around which an electric current flows. Linking electrical components together with pieces of wire cable usually makes a circuit. Thus, in a flashlight, there is a simple circuit with a switch, a lamp, and a battery linked together by a few short pieces of copper (EXPLAINTHATSTUFF! website) wire. When you turn the switch on, electricity flows around the circuit. If there is a break anywhere in the circuit, electricity cannot flow. If one of the wires is broken, for example, the lamp will not light. Reference the EXPLAINTHATSTUFF! website for more background information as needed.
This activity has youth explore what objects may conduct electricity (conductors) and which objects do not conduct electricity (insulators). Metals are generally good conductors of electricity, for example, the washer provided in this activity. Insulators do not conduct electricity, for example, glass marbles, wood, plastic, and most rocks.
Many youth may not have had any formal exposure to electricity or circuits. Be sure to let them know it is ok if they have not had any experience with this before, and if they have, this will hopefully be a new approach for them. Building a circuit with these materials, while seemingly simple, requires everyone to be open to a new challenge and discovery. It may also require some grit to keep trying if the light bulb does not light easily.
Vocabulary List:
- Circuit: A device that provides a path for electric current to flow.
- Voltage: The force or “pressure” pushing the electricity through the circuit; measured in volts.
- Conductor: Material that allows the flow of electricity.
- Insulator: Material which does not allow the flow of electricity.
- Power: The rate of doing work, measured in watts.
- Resistance: A material’s opposition to the flow of electric current; measured in ohms.
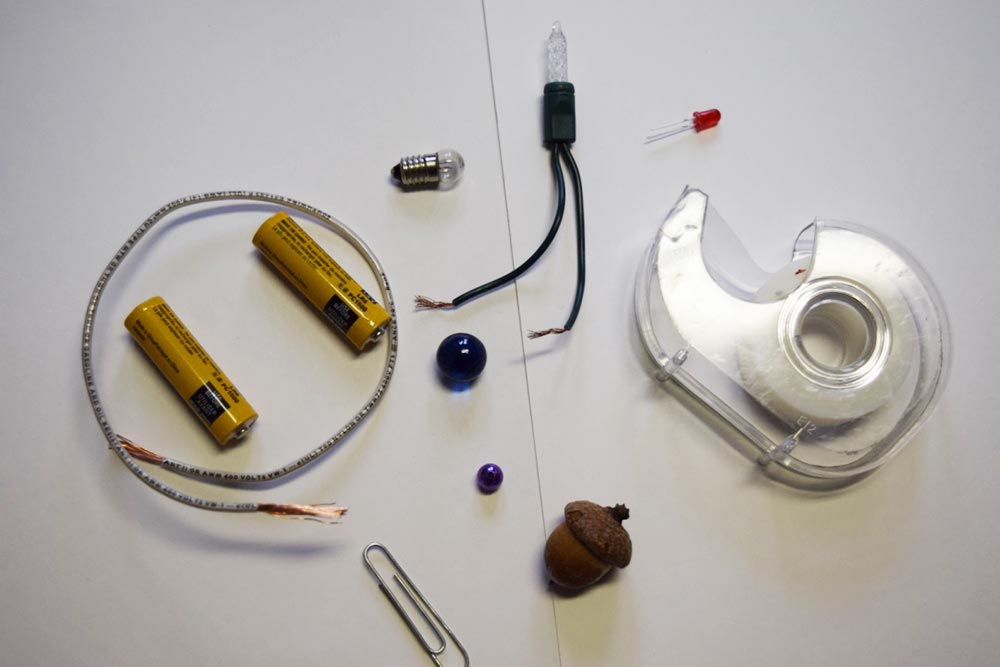
Materials:
- 2-AA batteries
- 1.5V bulbs
- Wires
- LED lights
- Tape
- 5 objects (marble, washer, wood, plastic, rock)
- Pencils
- What is a Circuit Data Sheet (PDF) (to download and print)
What is a Circuit? Data Sheet
Insulate or Conduct
Draw the complete circuit:
–
–
| Variables | Predict I or C |
Actual I or C |
|---|---|---|
| Acorn | ||
| Paperclip | ||
| Glass Marble | ||
| Bead | ||
| Aluminum Foil | ||
| Paper |
Methods:
Engage:
Begin by playing a few rounds of the game Have You Ever? Facilitators should designate one side of the room as “yes” and one side of the room as “no.” Tell youth that you will be reading statements out loud and they should go stand on the side of the room that best describes their answer to that question. Read these out loud, one at a time, and allow youth to move appropriately. Where youth stand can help serve as an indication of what their own experience is with renewable energy and energy consumption.
- Have you ever left the room and not turned out the light?
- Have you ever seen a wind turbine?
- Have you ever used energy captured from a wind turbine?
- Have you ever seen a solar panel?
- Have you ever used energy captured from a solar panel?
- Have you ever left the sink on while you brush your teeth?
- Have you ever walked or ridden a bike to avoid driving somewhere?
- Have you ever used data on your cell phone instead of using wi-fi (when it was available)?
- Have you ever used a device powered by a battery (stored energy)?
- Have you ever unplugged something when you were done using it?
- Have you ever recycled something?
- Have you ever used a clothesline (or hung clothes outside to dry)?
- Have you ever used an air conditioner in the summer or heated your home in the winter?
After youth have played Have You Ever, ask them what they know about how energy is directed to things like lights, cell phone chargers, etc? Help them connect what they brought up in Have You Ever to what they might already know.
Explore:
- Begin by letting youth know that today they are going to build a circuit. Provide each team of students with a set of materials. Before starting, make sure they know that the wire is insulated in the middle, but the open ends can get hot and are sharp.
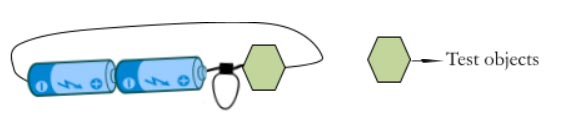
- Explain that each team should construct a working circuit with 2 wires, the 1.5V bulb, and the battery. Challenge them – how many different ways can you put the circuit together to get the light to shine? Reference additional information and diagram below.
- Have each participant draw a sketch of the completed circuit in the results table.
- After they have completed steps 1-3, let groups know their next step is to construct a working circuit using the LED lights, battery and wires (lights will illuminate).
- As groups work on their working circuits, introduce the concept of polarity testing. Polarity testing the LED bulbs can be a way to reinforce concepts of the circuit. Youth can test the polarity by matching the positive and negative terminals of the bulb to the appropriate positive/negative terminals of the batteries. (Tip: in typical LEDs, the longer wire terminal is generally positive).
Safety Consideration: Do not leave the wires attached to the battery (completed circuit) any longer than to see the light illuminate, as the wire could become warm.
Explain
- As a large group, have a sharing discussion about what each group did that successfully completed a circuit.
- What did they discover that did not work to make a complete circuit? Tip for facilitator: taking time to reflect together can help all groups have some foundational knowledge for the second half of this activity.
- Discuss how energy flows through a circuit.
- Now it’s time to introduce some key vocabulary for circuitry. Explain that today we learned about circuits, insulators, and conductors. These can be questions brainstormed as a whole group, or in small groups and then reported out.
- Tell what you know about circuits.
- Tell me what you think an insulator is. What are examples of insulators in the circuits you built?
- Tell me what you think a conductor is. What are examples of conductors in the circuits you built?
Elaborate
- Now groups will be given five sample objects to test. Each participant should predict which of the test objects they think can conduct electricity and which cannot. Examples of sample objects could include metal coins, washers or tinfoil, wooden items (acorn/toothpick), and rocks or marbles.
- Now using your completed circuit, test your hypotheses. Place one of the other objects between the battery and the bulb. Write in the data table if the object conducts (bulb lights up) or insulates (bulb does not light up).
- Look around the classroom and try to find 3 insulators and 3 conductors. Discuss what makes you believe they are insulators and what makes them conductors.
Evaluate
As a group, take time to reflect on the experience you just had. Here are some questions to get you started.
- How did you feel when you were building your circuits?
- What did you think was going to happen when you put the wire, battery and light together the first time? How about when you tried the LED lights and test objects?
- What process or method did you use to design your circuit?
- How did you decide what to do to build your circuit? Who did what?
- Did everyone design their circuit the same way? Did your background knowledge impact how you designed your circuit? What did you already know before this activity that you used in designing your circuit?
- How did you make your circuit light up the bulb?
- Can you think of objects in a house that conduct and those that insulate?
- What would happen if the wires in your house were not insulated?
- Why might it be important for us to know about how energy flows in circuits?
- How might you explain circuits to someone else?
Extension Ideas:
- Try a bigger or multiple batteries and see what happens.
- Try adding a longer length of lights and see what happens.
- Test other objects.
- Try a lemon battery.
- Try adding a switch.
Additional Information: