Bulletin #7039, Getting Geared Up for Maple Sugaring: Supplies and Equipment Needed for 1 to 50 Taps

By Jason Lilley, Assistant Extension Professor, Sustainable Agriculture and Maple Industry Educator, University of Maine Cooperative Extension
For information about UMaine Extension programs and resources, visit extension.umaine.edu.
Find more of our publications and books at extension.umaine.edu/publications/.
Table of Contents
- Tree Identification
- Tapping
- Sap Collection Options
- Sap Storage
- Boiling Options
- Fuel Source
- Defoamer
- Determining When Done
- Filtering
- Canning
- Labeling
- License
- Additional Resources
Producing maple syrup is a fun and rewarding activity and a sure sign of the onset of spring in Maine. To be successful with sugaring there are some key tools and equipment that are needed. This factsheet will list the supplies needed for an operation between 1 and 50 taps, and will make distinctions between bare minimum supplies, and supplies that will increase your efficiency of production and the quality of your finished product. The majority of the listed materials can be found at a local maple equipment supplier, or at most local hardware and feed stores throughout Maine and the rest of the Northeast.
Tree Identification
If you are just getting started with maple production and are unfamiliar with which trees to tap, a good tree identification book will be helpful. While any type of maple tree can be tapped, sugar maples produce sap with the highest sugar content, followed by red and Norway maples.
- Forest Trees of Maine, published by the Maine Forest Service, is an excellent resource available both in print and on-line.
- Surveyors’ tape or other marking materials can be used to identify trees for tapping while the foliage is on, which is the easiest time to identify species.
Tapping
- Spouts: Current guidelines recommend taphole sizes of 5/16”. While you may find 7/16” spouts for sale they cause more damage to the trees than the newer 5/16” spouts. You may also find 3/16″ spouts and systems for sale. Research has demonstrated that these systems can result in reduced yields after a few years of use, so we recommend the 5/16″ spouts for most producers. Choose spouts made of food-grade plastic or stainless steel. Old tin spouts may contain significant amounts of lead and should be avoided. Spouts are specific to bucket systems, or tubing systems so be sure to identify how many of each you plan to use.
- Drill bit: Once you choose the size spout that you will use, choose a drill bit that matches that size. Drill bits produced specifically for maple production are designed to pull out more shavings from the tap hole. Consider buying a maple specific 5/16” drill bit.
- Drill: Battery-powered drill and extra batteries.
- Mallet for setting taps: Rubber mallets work well for setting taps. The rubber helps get the tap set without overdriving. Overdriving taps can split the tree, increasing damage to the tree and causing sap loss. Hammers can also be used for setting taps if used carefully.

Sap Collection Options
2-Gallon Sap Bucket Systems:
- Spouts with hanger hooks: If you choose to use the traditional 2-gallon sap buckets, be sure to buy spouts that include a hook on them to hang the bucket from.
- Buckets: Buckets should be made of food-grade plastic or aluminum. Galvanized buckets may contain lead, which will leach into the sap. Avoid non-food grade containers such as box store buckets, kitty litter containers, etc. Also avoid containers that had other types of food in them, which will impart an off-flavor to your syrup.
- If you have galvanized buckets, you may be able to find sap bucket liners, a food-grade plastic bag that is inserted into the bucket to prevent the sap from contacting the galvanized metal.
- Lids: Install lids that are made for the buckets you’re using. This keeps rainfall, insects, and debris out of the sap. Find a system that is easily removed and re-installed to enable efficient sap collection.
Bag Systems:
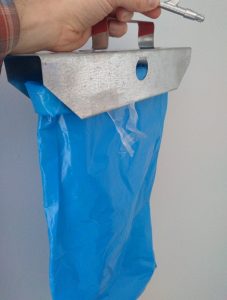
- Bag sap collection systems are relatively new. They consist of a metal bracket that hangs on a specialized spout. A food grade plastic bag is hung from the bracket and can be easily slid in and out of the bracket for sap collection. If using this system be sure that your spouts work with the bracket.
5-Gallon Food Grade Bucket and Tubing System:
A system that works well for trees with more than 1 (but never more than 3) taps is to place a 5-gallon food-grade bucket at the base of a large tree. Be sure to securely support the bucket. Snow melts on sap run days and can result in buckets tipping over if not supported.
- Use spouts that are designed for tubing systems.
- Maple, food-grade 5/16” inside diameter tubing.
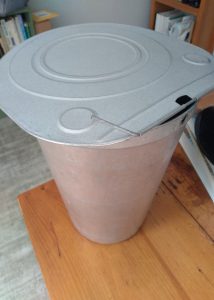
- 5-gallon food-grade bucket with holes drilled toward the top, on the sides of the buckets. Drilling holes in the lid would allow rainwater and snow melt in with the sap.
Tubing Systems:
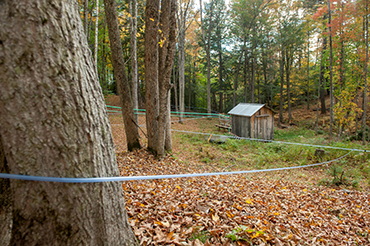
When there are 4 to 15 trees in relatively close proximity to each other collecting sap in a tubing system saves time and effort.
- Tubing: For up to 15 taps a 5/16” inside diameter maple tubing (food grade) is used.
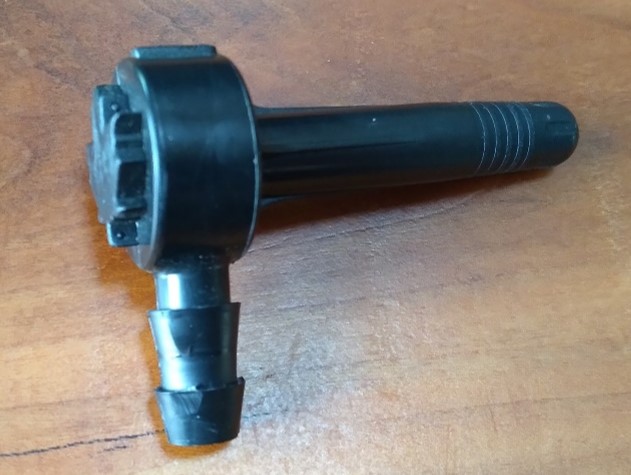
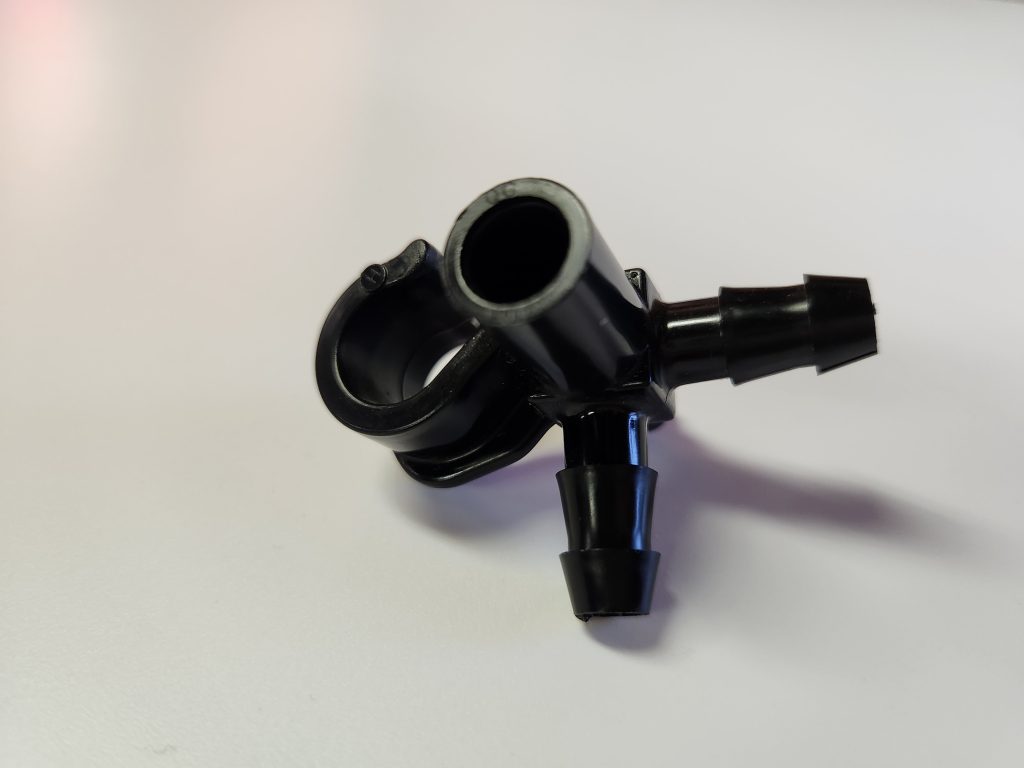
- Spouts: Spouts for tubing systems have barbed outlets on them for connecting the tubing.
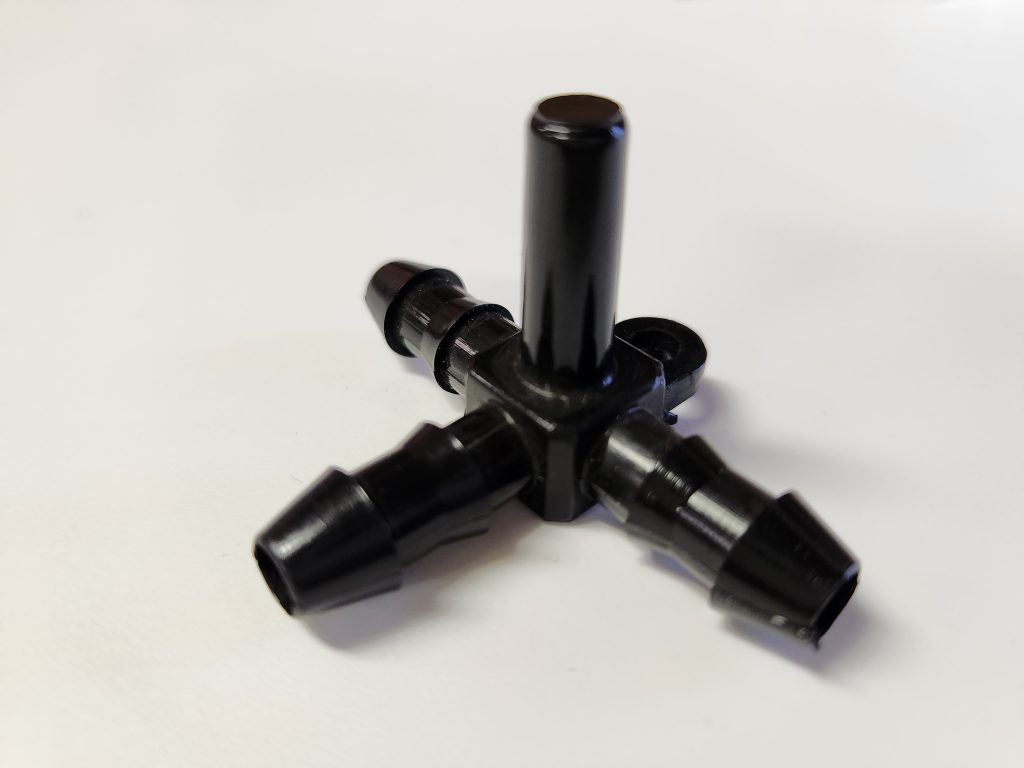
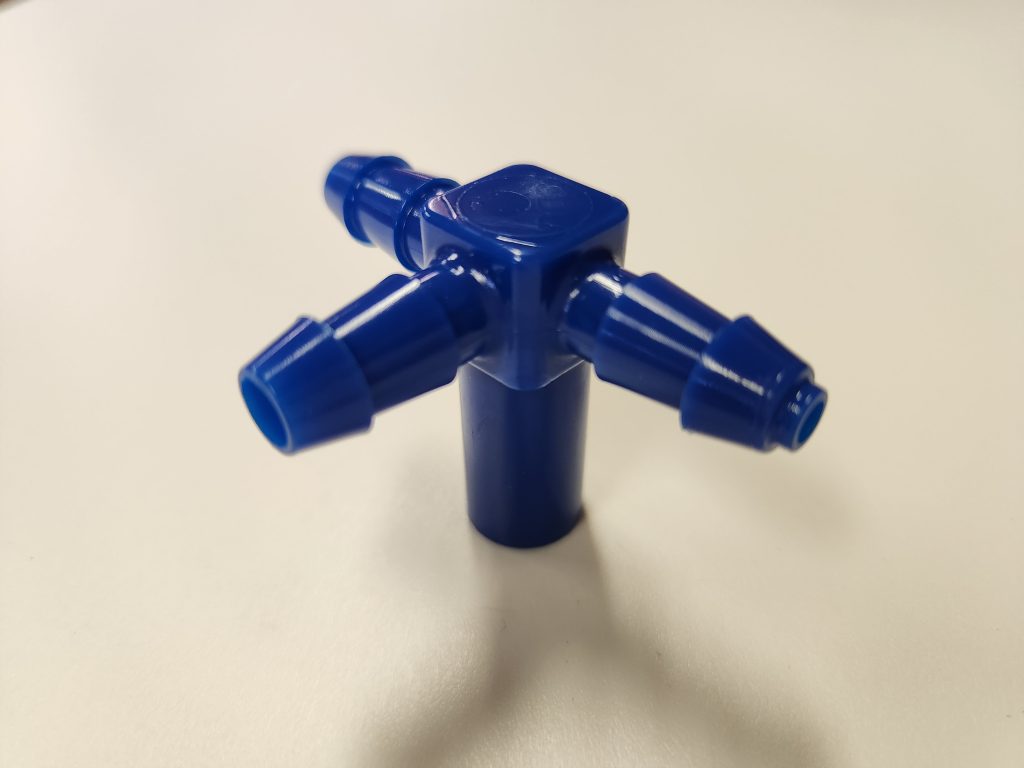
- T-Fittings: 5/16” t-fittings are installed at each tappable tree to connect the drop line and spout to the lateral collection line.
- Top of line: Hook Fittings are installed at the top of the line to hook the line to itself around a tree at the top of the tubing run. An end-line T-fitting is used next to the hook fitting to only allow sap to run down the line (not behind the tree) on this first tree of the line.
- Bottom of line: Y-fittings work to keep tension on the line, holding it in place at the top and bottom of the lateral line. They also allow the sap to exit the bottom of the system into your collection vessel.
- Tubing tool 5/16” maple tubing assembly tool: will enable you to put adequate tension on the line while installing fittings, and aid in the installation of fittings. Installation can be done without this tool; however, the process will be significantly easier and result in a tighter system with the tool. Alternatively, hot water can be used to soften the end of the tubing to allow for connection to fittings without the tool. Again, this will not achieve the desired tension on the lines.
- Collection vessel at the trees: To avoid sap overflow and loss, account for 1 to 2 gallons of sap per tap per day. A covered 55-gallon food-safe barrel works for most systems. Ensure that the barrel was not used for food products that could impart an off flavor in the sap.

Sap Storage
No matter the sap collection method, you will need to plan for storage between the time when the sap is collected from the trees, and when you are able to boil it. Ideally, the sap would be boiled the day it runs to prevent spoilage, however, that is not always practical.
- Use a storage vessel that is big enough to hold two gallons of sap per tap, per day of sap run.
- Example: If you plan to boil once per week, gamble on no more than three sap runs per week.
- 3 days of sap x 1.5 gallons per tap, x 30 taps = 135 gallons of storage capacity needed.
- Example: If you plan to boil once per week, gamble on no more than three sap runs per week.
- Storage vessels must be food grade and not have been used to store other products that could impart an off-flavor to the sap.
- Consider investing in insulating wrap for the vessel to keep the sap cool, and also minimize freezing. Keeping this vessel on the north side of a building, banked in the snow is also helpful.
Boiling Options
Catering Pans:
- While any pan will work for boiling sap, wide, high-sided (6”), flat-bottomed vessels that create a large surface area work well for small-scale operations. Catering pans also work well. Having three catering pans allows for fresh sap to be added into one and to move concentrated sap down the line, as opposed to constantly diluting sap in one pan. This results in a lighter, better quality product and increased efficiency.
- Catering pans boiled efficiently will boil about 1-2 gallons of sap per hour each.
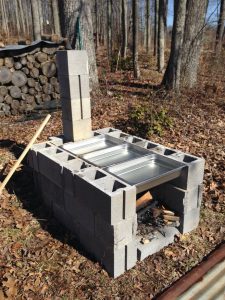
- Catering pans are most efficiently used when placed over a cinderblock fire pit. For a three-catering pan system, build walls to rest the pans on and to hold the heat in. You will also want to construct a chimney for good draft production and to divert the smoke and ash away from your pans.
- It will take about 25 to 30 cinder blocks to construct the fire pit that supports the catering pans, depending on the size and design.
Oil Tank Evaporator:
- A common first step to a designated evaporator is to convert a 50-gallon metal drum or 275-oil tank into an evaporator. The barrel or tank acts as the firebox, and is cut to allow for installing catering pans, or a sap pan for boiling. The sap should never come into contact with the barrel or tank.
“½ pint” Evaporator:
- These 24”x36” designated maple evaporators are built for the efficiency of boiling maple sap.
- Boils 4 to 6 gallons of sap per hour.
Fuel Source
- Wood-fired is an effective way to boil sap, particularly if you have access to cheap firewood.
- Propane burners do work but can get costly quickly.
- Ultimately you want a heat source that provides even high heat throughout the process.
Defoamer
Defoamer is an important part of the boiling process. When boiling efficiently, the sap will frequently foam up and threaten to boil over. Having a designated defoamer on hand will break the surface tension and bring down the foam. Allowing the pan to boil over creates a big mess and loss of product and should be avoided.
- Popular defoamers include vegetable oil or designated synthetic defoamers from a maple supplier. Use as little defoamer as possible to be effective, in order to avoid creating off flavor and texture.
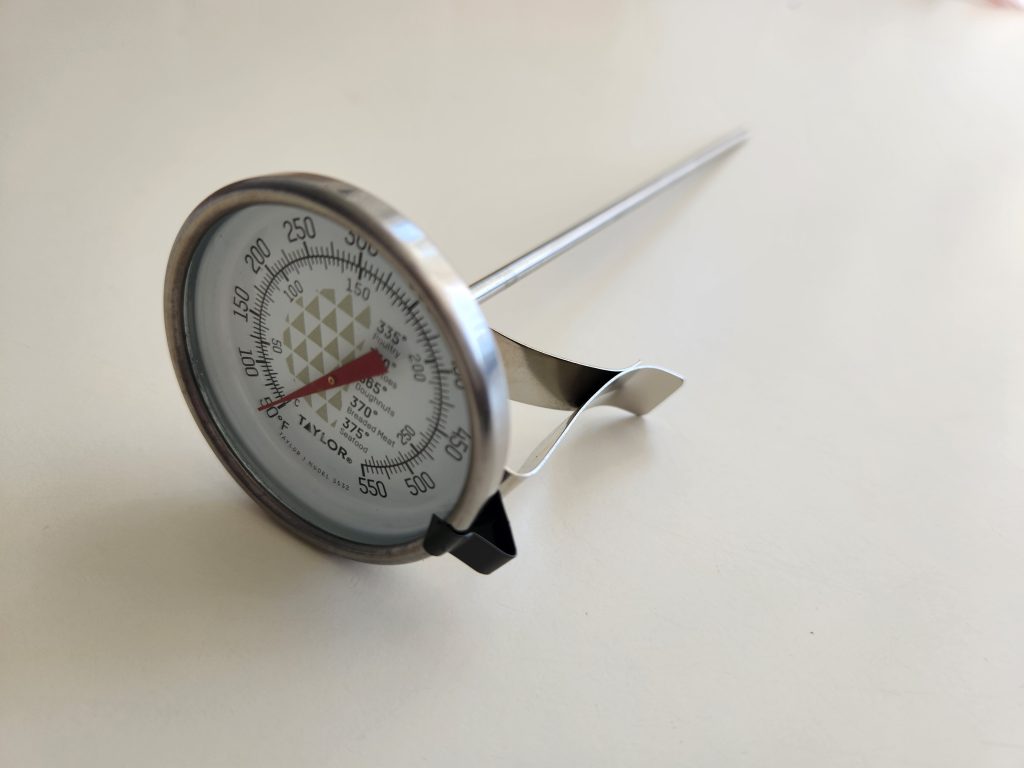
Determining When Done
Knowing when you’re done boiling is an important part of creating a shelf-stable product without over-concentrating, resulting in the crystallization of sugars.
- A long-stemmed candy thermometer is the most essential tool for determining the correct syrup density (sugar concentration). The finished syrup should be between 66- and 68.9-degrees Brix. A thermometer will read 7 degrees above the boiling point of water on that day when syrup hits this density. For example, if the boiling point of water on a certain day is 212 degrees F, your syrup would be finished when you hit 219 degrees F.
- A more accurate method of measuring syrup density is with a hydrometer and hydrometer cup. The hydrometer allows you to get a precise reading of the sugar concentration in your syrup. Be sure to get a hydrometer that is specific to maple syrup.

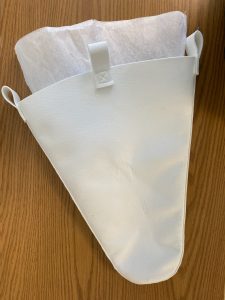
Filtering
The syrup should be filtered to remove mineral deposits (sugar sand) and other sediments from the syrup.
- Cheesecloth can remove much of the sediment from finished hot syrup.
- A cone filter and paper or synthetic pre-filter made for filtering syrup are designed for filtering sediment from the hot syrup. The pre-filter is easy to switch out, which increases the speed of filtering as the filters get dirty. The design is easier and safer for handling hot syrup compared to cheesecloth.
Canning
- New mason jars or maple-specific plastic jugs (food grade and heat tolerant) work well for canning syrup.
- Recycled jars and jugs can introduce contaminants, cause off-flavors, or increase the chance of mold growth.
Syrup should be canned hot (between 180 to 195 degrees F) to sterilize the containers
Labeling
If you plan on selling your syrup, you will need to label your syrup.
- Labels must include:
- The name of the product
- Contents by volume
- Name and address (including zip code) of manufacturer or distributor
- The grade of the product
- To determine the grade, you will likely need a Vermont Temporary Maple Color Grading Kit. This will allow you to accurately determine the color, and therefore grade of your syrup.
License
- If you plan to sell syrup, Maine-based producers will need to apply for a Maple Syrup Processing License from the state of Maine. Application forms for that license are also available from the Quality Assurance and Regulation branch of the Maine Department of Agriculture, Conservation, and Forestry. (207) 287-3841.
Summary
The basics you will need to produce syrup at an entry-level are:
- 5/16” Spouts
- 5/16” Drill bit
- Battery powered drill
- Rubber mallet
- Food-grade buckets with lids
- Food-grade storage vessel for storing sap between runs, and boiling
- Boiling pan with a wide surface area
- Outdoors boiling method
- Fuel source (wood, oil, propane)
- Long-stemmed candy thermometer
- Cone filter or cheesecloth
- New mason jars or maple jugs and lids
Maple sugaring can be done with limited expense, and with time and patience. As you invest more in equipment, do so with a mind towards improving quality and efficiency.
Additional Resources
Bulletin #7036, How to Tap Maple Trees and Make Maple Syrup
Bulletin #7038, Maple Syrup Quality Control Manual
Bulletin #7040, Getting Geared Up for Maple Sugaring: Supplies and Equipment Needed for 50 to 500 Taps
Bulletin #7041, Licensing and Regulations for Maple Syrup Processing in Maine
University of Maine Cooperative Extension Backyard Sugaring Resources
How-to videos on How and When to Tap Maple Trees.
Information in this publication is provided purely for educational purposes. No responsibility is assumed for any problems associated with the use of products or services mentioned. No endorsement of products or companies is intended, nor is criticism of unnamed products or companies implied.
© 2023
Call 800.287.0274 (in Maine), or 207.581.3188, for information on publications and program offerings from University of Maine Cooperative Extension, or visit extension.umaine.edu.
In complying with the letter and spirit of applicable laws and pursuing its own goals of diversity, the University of Maine System does not discriminate on the grounds of race, color, religion, sex, sexual orientation, transgender status, gender, gender identity or expression, ethnicity, national origin, citizenship status, familial status, ancestry, age, disability physical or mental, genetic information, or veterans or military status in employment, education, and all other programs and activities. The University provides reasonable accommodations to qualified individuals with disabilities upon request. The following person has been designated to handle inquiries regarding non-discrimination policies: Director of Equal Opportunity, 101 Boudreau Hall, University of Maine, Orono, ME 04469-5754, 207.581.1226, TTY 711 (Maine Relay System).