Fruit Science
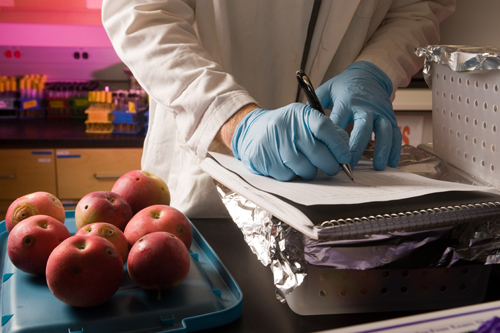 Go ahead, and play with your food! The Fruit Science toolkit provides youth with a different way of looking at their food as something to explore. From hand washing (did you get all the germs off?) to a scientific experiment (what makes an apple turn brown, and how can you speed up or slow down that process?), this kit includes eight activities that revolve around one of Maine’s traditional crops- the apple!
Are you interested in learning more about what the University of Maine and UMaine system campuses offer?
The University of Maine offers over 100 academic majors! To learn more either:
Visit UMaine’s Find a Major.
Explore our other campuses here.
If you need help connecting to UMaine or one of the other UMaine System campuses, contact us by email or call 207.581.3877 and ask for Laura, Greg, or Sarah.
- Curriculum Activities
- Learn More:
- The Life Cycle of an Apple
- I Can Get a Job Doing That? Careers Involving Food!
- School of Food and Agriculture, Food Science and Human Nutrition at UMaine
Video: 4-H Brown Apple Project (YouTube)
Curriculum Activities
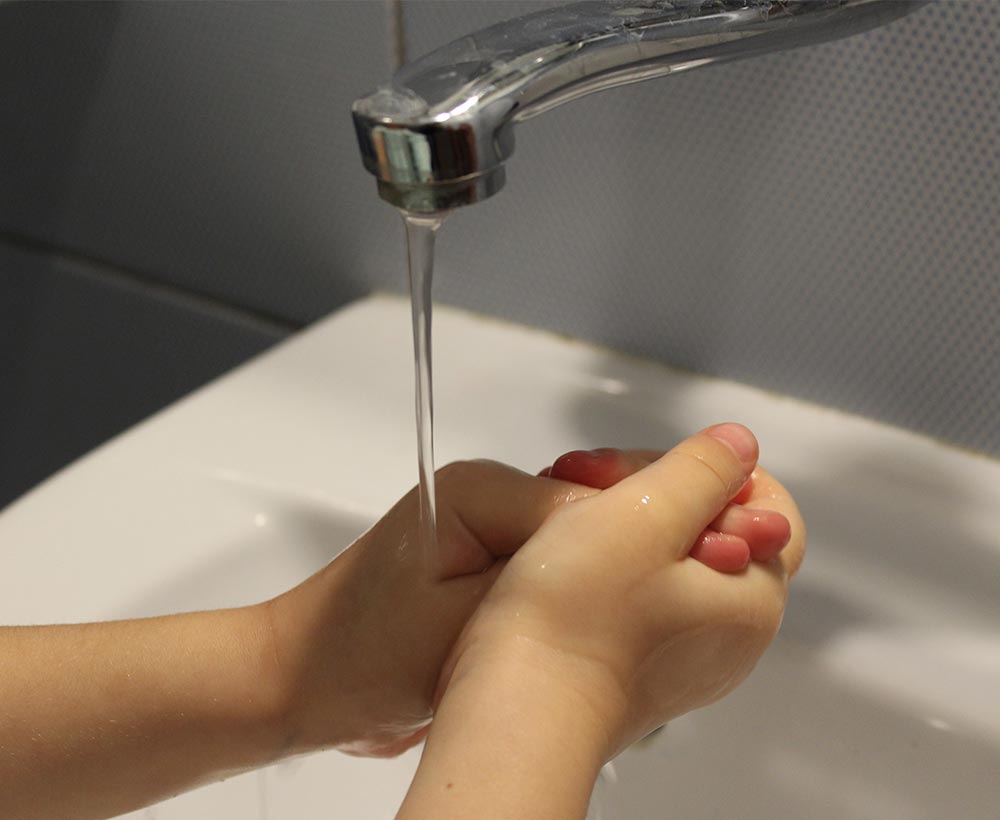
Activity 1: Hand Washing
Objectives:
Before beginning working with food, it is important to always wash your hands. In this activity, youth will examine the importance of taking the time (at least 20 seconds) to thoroughly wash hands.
Time to complete activity: 25 minutes
Background:
 Soap is an excellent cleanser because of its ability to act as an emulsifier. An emulsion is a mixture of liquids that do not dissolve in each other — they have droplets of one liquid throughout the other liquid. An emulsifier is capable of dispersing one liquid into another liquid. This means that while oil (which attracts dirt) doesn’t naturally mix with water, soap can suspend oil/dirt in water so that it can be removed.
Materials:
- soap
- paper towels
- UV light
- fluorescent hand cream
- baby oil
- cinnamon
Have youth name all the times they can think of when they should wash their hands. Record these answers, then review the following with the youth:
Hands should be washed:
- Before handling food
- After handling raw foods
- After eating or drinking
- After handling garbage or dirty plates
- After handling dirty utensils, objects, or equipment
- After using the restroom
- After touching your nose, mouth, hair, and skin
Methods
Choose one of the following (or split into two groups):
- Fluorescent Hand Cream: Mix 10-15 oz. of inexpensive hand cream with two ounces of water-soluble fluorescent paint. Have participants apply the hand cream and rub it in well.
- Oil and Cinnamon: Have participants coat their hands with baby oil and then have someone sprinkle their hands with cinnamon.
Set up a hand washing station with liquid soap and paper towels.
Explain to the group how important it is to wash your hands to reduce the transmission of germs and foodborne illnesses.
- Once youth have applied the fluorescent hand cream mixture or the oil and cinnamon mixture have the participants wash their hands for different periods of time.
- Tell some to wash their hands for 3 seconds, 5 seconds, 10 seconds, 15 seconds, and 20 seconds. Have them count aloud “One one thousand, two one thousand, three one thousand…”
- After they are done washing their hands have them hold out their hands for inspection. Use the UV light for youths who used the fluorescent hand cream.
- Group the hands in order from cleanest to dirtiest.
- Review correct amount of time to wash hands — 20 seconds. Also, you should review the importance of drying hands with a clean towel or paper towel.
Questions to Discuss
- How is the cream/oil different from germs or bacteria?
- Which person has the least amount of “germs” on their hands?
- Are there areas that everyone seemed to miss? What are they? [It is important to pay special attention to your cuticles, area in between your fingers, and the edge of your palm]
- What conclusions can you make, based on this activity?
- Why do you think it is important to wash your hands before handling food?
For more information and resources, visit FIGHT BAC! Partnership for Food Safety Education website..
Lesson adapted with permission from WSU Extension, M. L. Wallace. “Getting Started in Food Preservation, Leaders Manual & Member Kit”, WSU Extension Publication, 2005.
Activity 2: Spoilers or Helpers?
Objective:
Youth will learn what happens when food comes in contact with microorganisms (yeasts).
Time to complete activity: 15 minutes (plus follow up in one week)
Background:
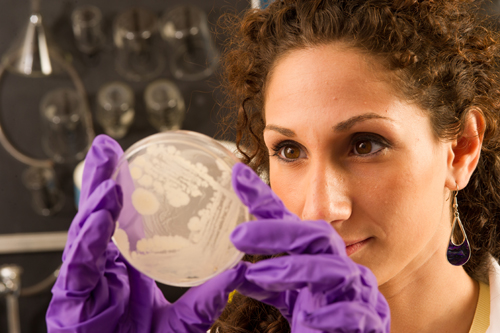 Microbes are tiny organisms. They include molds, bacteria, and yeast. All of these can grow on food and usually cause the food to spoil. However, cheese and yogurt are two foods that are produced by the action of bacteria. Not all microorganisms are bad!
Yeasts are single-cell microorganisms that need food and warm temperatures to grow and multiply. They are actually distant cousins of mushrooms. You can buy “dry” yeast that is inactive and can stay that way for a long time. Yeast needs to be “activated” when you use it to make bread. It becomes activated when mixed with other ingredients and warm water. When making bread, the yeast is a “helper” because it causes the bread to rise.
Have you ever seen the “spoiler” side of yeast? It decomposes food or breaks it down.
Materials:
- banana
- a packet of dry yeast
- three re-sealable plastic bags
- set of measuring teaspoons
- marker
Methods
- Peel the banana, and cut three slices off.
- Place a banana slice in each re-sealable plastic bag.
- Seal one bag, and label it with an “NY” for no yeast.
- Measure 1/2 teaspoon of yeast and place it on top of the second banana slice. Seal the bag. Label it with a “Y” for yeast. Put both bags in a warm* place where they can sit undisturbed for a week.
- Prepare a third banana/yeast slice. Label this bag “YR” for yeast refrigerator. Place this bag in the refrigerator.
- Check the bags periodically. After one week, take the “YR” bag out of the refrigerator and compare the contents of the three bags.
* A warm place = room temperature.
Questions to Discuss
- Which banana slice showed the fastest and most decomposition?
- How do the yeast and no-yeast slices differ from each other?
- If yeast is not activated in bread making, how will the final product be affected?
- What did you learn about yeast that you could share the next time you make bread with someone?
Explanation/What we expect to happen:
- The room temperature banana with yeast will decompose more rapidly than the room temperature banana with no yeast.
- The refrigerated banana with yeast will decompose more slowly than the room temperature banana with yeast.
Adapted from “You’re the Chef” with permission of National 4-H Council.
Activity 3: Guess Who With Clues
 Objective:
Youth will develop observation and note-taking skills and will use those skills in differentiating characteristics of apples.
Time to complete activity: 20-25 minutes
Materials:
- five or six different apple varieties
- paper plates
- permanent marker for labeling
- pen and paper for note taking
Methods
In this activity, the kids will conduct a simple investigation of apples. Depending on how many students you have, give each student (or group of students) one apple to scientifically investigate. They will examine and write down the unique characteristics of their apple. Students should make notes in journals or on a paper describing the distinctive characteristics: shape, color, textures, and physical variations from the other apples. This should take about 15 minutes.
After the students have written down their descriptions and observations, take the different apples and put them in a pile. Ask the students to find their apple based on their observations they wrote down. Have them share with everyone why this is their apple based on proof from their notes.
Explanation/What we expect to happen:
Youth should come up with a listing of characteristics of their apple. This could include size, shape, color, notes on shading/patterns observed, etc. A data sheet is not necessary for this activity but could be used. An example data sheet is attached.
Reprinted/adapted with permission from the University of Illinois Extension. For more information visit the University of Illinois Extension “Apples and More” website.
Activity 4: All Apples Are Not Created Equal
Objective:
Youth will explore and document the characteristics of apples.
Time to complete activity: 10 minutes
Background:
Explain there are many different varieties of apples and their taste can be affected by latitude, terrain, weather, and the care they received when they were growing.
Methods
Using the same apples from Activity 3: Guess Who With Clues, take the apples and have an adult cut them up. Have everyone taste each one. As they are taste testing, they should be writing down the flavor profile they detect.
For instance, is it sweet or tart? What about firm or soft? Is the flavor distinct or mild? etc. At the very end have the participant say which apple they liked the best and which apple they liked the least.
Questions to discuss
The top ten apples in the United States are as follows (how many have each of the youth had?):
- Red Delicious
- Golden Delicious
- McIntosh
- Rome Beauty
- Granny Smith
- Jonathan
- York Imperial
- Stayman
- Newtown Pippin
- Winesap
Apples grown commercially in Maine. How many Maine apple varieties can the youth name? How many have each of the youth tried? What is their favorite?
- McIntosh
- Cortland
- Macoun
- Honeycrisp
- Empire
- Gala
- Golden Delicious
- Red Delicious
- Jonagold
- Paulared
- Jerseymac
- Vistabelle
- Idared
- Spencer
- Liberty
- Mutsu
- Northern Spy
- Gingergold
To learn about other apple varieties, visit:
- Maine Apple Varieties
- Our Fruit page on the McDougal Farms website (apple varieties can be lower on the page)
- The Maine State Pomological Society (maineapples.org website)
Adapted with permission from the University of Illinois Extension. For more information visit the University of Illinois Extension “Apples and More” website.
Activity 5: The Brown Apple Project
Video: 4-H Brown Apple Project
The Brown Apple Project (Grades 3-6)
Objectives:
Participants will explore the chemical reaction behind apple browning.
Time to complete activity: 1 hour and 15 minutes
Background:
Fruit turns brown when exposed to air because a reaction is happening when a cut piece of fruit is exposed to oxygen. This is called enzymatic browning. The name enzymatic browning comes from the fact that an enzyme located in the fruit reacts with oxygen from the air to turn the fruit brown.
The chemical reaction can be simplified to:
Polyphenol Oxidase + O2 → Melanin (Brown Color)
Oxygen activates the compound polyphenol oxidase in the fruit to turn the fruit brown. Polyphenol oxidase is the enzyme.
- Definition of an enzyme: A substance produced by all living organisms that speed up a chemical reaction (i.e. speeding up the browning of fruit).
- FUN FACT: Enzymes usually end with the suffix -ase.
Materials:
- fresh apple slices
- lemon juice
- water
- Fruit Fresh® (a product used to prevent browning)
- apple juice
- white vinegar
- tongs
- paper towels
- paper plates
- paper bowls
- clock or timer
Set Up:
There should be different areas set up for each group to perform the upcoming experiment.
Prior to starting the activity, talk about it!
- What happens when you cut into a piece of fruit and leave it on the counter?
- Fruit is an important part of our diets to keep us healthy, but who wants to eat a brown, soft piece of fruit? Most people prefer a fresh, crisp apple for instance over a mealy, mushy, and brown apple. What about you guys? Would you like to eat a brown fruit?
- Can anyone think of a way to prevent this from happening?
- Allow the kids to openly brainstorm and consider
- Various ideas (would you stick it in the refrigerator…wait to cut the fruit until you want to eat it etc.)
Introduce the experiment:
This experiment involves dipping slices of apple in a variety of substances. These include water, lemon juice, a special substance designed to preserve fruit, and apple juice. The fruit will be observed over time.
Before beginning, ask participants what they think will happen? Which mixture will prevent browning the most? Have the participants write down their predictions.
Methods
- Take out three bowls and put water, lemon juice, and vinegar in the bowls respectively.
- Label a paper plate “water.”
- Using the tongs dip apple slice(s) into the water for 30 seconds.
- Take out the apple slice(s) and place the paper plate labeled “water.”
- Label a paper plate “lemon juice.”
- Using tongs, place apple slice(s) into the lemon juice for 30 seconds.
- Take out the apple slice(s) and place on the paper plate labeled “lemon juice.”(make sure to rinse the tongs after each use to avoid cross-contamination!)
- Label a paper plate “control.”
- Place apple slice(s) on this plate without dipping them into anything.
- Place on a paper plate labeled “Fruit Fresh®.”
- Sprinkle apple slice(s) with Fruit Fresh®.
- Using tongs dip an apple slice(s) into apple juice for 30 seconds.
- Place on a paper plate labeled “Apple Juice.” (remember to rinse the tongs!)
- Using tongs, dip apple slice(s) in vinegar for 30 seconds.
- Place on a paper plate labeled “Vinegar.”
- Record your observations every ten minutes for three intervals.
Questions to discuss
- Tell me what you noticed happening in this experiment?
- Why do you think this happened?
- How did the apple slices change in their appearance?
- Which group had the least amount of browning?
- Which had the most?
Have the youth openly discuss what they think happened. You could even go up to specific groups and hold up their apples for comparison to see if everyone had the same treatment with the least and most amount of browning.
- Ask youth to identify the ingredient that prevented the apples from turning brown the most.
- Why do they think that ingredient worked the best?
What should happen?
The treatment group of apple slices that were dipped in the water should have some browning, but not as much as the control. This is due to the water restricting the amount of oxygen coming in contact with the fruit tissues. If there isn’t as much oxygen available, then less reacts with PPO to convert the phenolic to melanin (brown coloring on the surface of fruits).
The control was not treated with any solution and therefore the reaction was able to proceed and the fruit turned brown.
The treatment group of apple slices dipped in the lemon juice solution should inactivate the browning enzyme. Polyphenol oxidase (the enzyme) is pH dependent. The pH of lemon juice is between 2.0-2.5. A lower pH means the substance is more acidic. The acid in lemon juice inactivates polyphenol oxidase to prevent browning.
The treatment group of apple slices sprinkled with Fruit Fresh® should prevent browning. Fruit Fresh® is a commercial product that contains vitamin C (also known as ascorbic acid). Ascorbic acid is naturally found in lemons. The vitamin C should prevent the browning reaction from occurring.
The treatment group of apple slices dipped in apple juice should prevent browning. Apple juice has a pH between 3.5-4.0. Because apple juice is less acidic than lemon juice, expect to find the apple juice didn’t prevent browning as well as the lemon juice.
The treatment group of apple slices dipped in the white vinegar should prevent browning as well. The vinegar has a pH between 2.4-3.0. Vinegar should be similar to the lemon juice apples, however, they could be slightly more brown.
- Can anyone remember what we said earlier happens when a fruit is cut open? (Answer: the oxygen reacts with the fruit to turn it brown)
- What type of reaction is this? (Answer: Enzymatic)
Again, the definition of enzymatic browning is:
Enzymatic browning a chemical reaction that occurs when the enzyme polyphenol oxidase inside of the fruit/vegetable comes in contact with oxygen.
Real-Life Examples
- Apple slices at McDonald’s vs. regular apples: The prepackaged apple slices are treated with sulfites that act as an antioxidant to keep the fruit crispy and from turning brown.
- When you swallow food, digestive enzymes break up the food into smaller pieces.
- Marinades for meat often contain an enzyme called papain. Papain breaks down the fiber of meat creating a more tender product.
Can anyone think of any other products where browning has been stopped?
Did you know that plants use enzymatic browning as a defense mechanism?
- Can anyone think of a reason why this is?
- Answer: When a plant is damaged, the browning of the affected area is thought to discourage animals and insects from eating the plants any further.
Why do we care about enzymatic browning?
- This is an opportunity for youth to think and discuss.
Ultimately…
- Effect is undesirable
- Can decrease the quality of the food/storage
- Can lead to spoiling
Ask: Can you think of any way scientists and the food industry can prevent this reaction from occurring?
Allow for the participants to discuss their ideas openly.
To get them to think a little deeper you could say:
- Tell me about what we just said about the solutions we placed the apples in?
- What were there effects and why did __________ work the best?
- What did it inhibit?
Methods of Prevention:
- Inactivate the enzyme. This can be done through heat, acid (enzyme activity is pH dependent)
- Remove the essential compound, oxygen, from the product
*You can mention that with the heat method, it is important to recognize that you will cook the fruit so this method is not always best.
How this concept is applied in the food industry
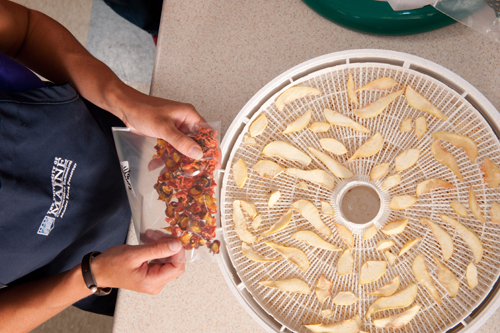
In the food industry, a common way to apply the techniques of enzymatic browning is drying fruit. Drying fruit is the oldest known method for preserving food. Drying fruit is safe because you are removing moisture and this prevents microorganisms from growing in it. Dried fruit is also more compact and needs less storage space; keeps/travels well.
Light colored fruits (apples, apricots, peaches, pears) tend to darken during drying and storage. This process is called oxidation. Oxidation robs the fruit of flavor, color, and vitamins. To prevent this from happening, it is common to pretreat the fruit in a solution before beginning the process of drying.
Pretreatment methods:
- An effective method is Sulfuring. Sulfuring commercially is done on fruits using sulfur dioxide gas
- A sulfite dip can also be used. Either sodium bisulfite, sodium sulfite, or sodium metabisulfite can be used; use ¾ to 1½ teaspoons of sodium bisulfite per quart of water. Place sliced fruit in the mixture and soak for five minutes. If a fruit is in halves, place in the mixture for 15 minutes. Rinse lightly under cold water and place on drying trays. This can be done indoors or outdoors. Note: some people have asthmatic reactions to sulfur.
- A fruit juice dip can also be used. Any fruit juice that is high in vitamin C is an effective pretreatment though it does not work as well as ascorbic acid (remember, ascorbic acid is pure vitamin C). Examples are orange, lemon, pineapple, and grape juice.
- Honey dip: Many store bought dried fruits have been dipped in a honey solution. Honey dipped fruit is much higher in calories.
The Brown Apple Project (Middle and High School)
Objectives:
As a result of participating in this activity, youth will
- Learn how enzymatic browning occurs through designing their own experiment
- Be able to explain at least two methods that can be used to stop or slow the process of enzymatic browning.
Time to complete activity: 1 hour and 15 minutes
Introduction to the topic:
How many people are familiar with this scenario?
You bite into an apple or cut into one and do not eat the whole thing right away. Later, when you come back the outside of your remaining apple is brown.
- Why do you think that happens?
- Did you know scientists have ways to prevent this reaction from happening?
- The reaction taking place is called enzymatic browning. The reason it is called enzymatic browning is because enzymes are responsible for the chemical reaction of turning fruit brown in color.
- Enzymes are proteins that accelerate metabolic reactions. They are what activate processes in occur.
If a whiteboard/chalkboard is available, the educator can write the reaction below on the board and explain that the enzyme in the fruit called polyphenol oxidase is reacting with the oxygen from the air to create a brown compound called melanin.
Polyphenol Oxidase + O2 → Melanin (Brown Color)
Oxygen reacts with the enzyme, polyphenol oxidase to produce a brown appearance on the apple. An enzyme is a protein that initiates a chemical reaction. In this case, the enzyme is activated by oxygen to produce browning. Hence, this is the reason the reaction is known as enzymatic browning.
FUN FACT: Enzymes usually end with the suffix, -ase
Assignment:
“Today, I am going to present a group of materials to you and your job is to design an experiment that would block oxygen in the air from coming in contact with the apple slices.”
- Introduce each of the materials you will be providing for the experiment
- Let them know there is no right or wrong design.
- They may use all of the materials or only some of them. However, let them know that they can leave one group of apple slices out in the air to use as a control. A control is a standard of comparison used to check and verify the results of an experiment.
Materials:
- fresh apple slices
- lemon juice
- water
- Fruit Fresh®
- white vinegar
- apple juice
- fan
- plastic bag
- tongs
- paper towels
- paper plates
- paper bowls
Allow participants to brainstorm, create an experiment, and carry it out. This should take about 30 minutes because you want to allow the fruit to have a chance to brown (or not brown).
Steps?
Discussion:
- Have each group describe their experimental design. Did they remember to include a control group?
- Ask each group to explain what they observed.
- What were their predictions? Were they right?
- What ingredient worked the best at preventing browning? Why do they think that?
Explanation:
Ideally, the participants will have six groups: the plain apple slices (the control), apples with lemon juice, apples with water, apples with Fruit Fresh®, apples with white vinegar, and apples with apple juice. Again, the point is to get them thinking so there is no right or wrong way to use the materials. Below is an explanation of three possible groups.
If WATER is used:
The group of apple slices that were dipped in the water should have some browning, but not as much as the control. This is due to the water restricting the amount of oxygen coming in contact with the fruit tissues. If there isn’t as much oxygen available, then less reacts with PPO to convert the phenolic to melanin (brown coloring on the surface of fruits).
If only exposed to AIR (Control):
The control was not treated with any solution and therefore the reaction was able to proceed.
If LEMON juice were used:
The group of apple slices that were dipped in the lemon juice solution should inactivate the enzyme. Polyphenol oxidase (PPO) is pH dependent. The pH of lemon juice is between 2.0-2.5. A lower pH means the substance is more acidic. The acid in lemon juice inactivates PPO to prevent browning.
If a PREVENTATIVE BROWNING AGENT were used:
The group of apple slices sprinkled with a preventative browning agent should prevent browning. These products contain vitamin C (also known as ascorbic acid). Ascorbic acid is naturally found in lemons. The vitamin C should prevent the browning reaction from occurring.
If APPLE juice were used:
The group of apple slices dipped in apple juice should prevent browning. Apple juice has a pH between 3.5-4.0. Because apple juice is less acidic than lemon juice, expect to find the apple juice didn’t prevent browning as well as the lemon juice.
If WHITE VINEGAR were used:
The group of apple slices dipped in the white vinegar should prevent browning as well. The vinegar has a pH between 2.4-3.0. Vinegar should be similar to the lemon juice apples, however, they could be slightly more brown.
If a FAN were used:
This will speed up the reaction and turn the apples brown quickly because you are introducing a greater amount of air to the apples.
If a PLASTIC bag were used:
This will reduce the amount of browning assuming all the oxygen was removed from the plastic bag. If the apples were placed in the plastic bag and all the air did not escape then that would cause browning.
* Note: Some youth might combine the liquids. This is fine and you can explain the different roles of each component. This would be a good time to speak about the concept of synergy. A simple way to describe synergy is by relating it to the example below.
It is easier to score more goals during a soccer match when you have a team full of players versus the amount of goals one person could score on their own. This is synergy. Components by themselves do not produce nearly as great of an effect as they do when they are combined. When participants combine the water and lemon juice, the interaction between the two may or may not produce apple slices that are less brown than the apple slices with just lemon juice or just water.
Ending Questions:
- Why do we care about enzymatic browning?
- Do you think it’s important in the food processing industry? Why?
Enzymatic Browning is responsible for fifty percent of all losses during fruit and vegetable production.
Methods of Prevention used in the food industry:
- Inactivate the enzyme: this can be done through heat, acid (enzyme activity is pH dependent)
- Remove the essential compound, oxygen, from the product
- Can you think of any scenarios where browning is desirable in the food industry?
Answer: It is desirable in some products such as raisins, prunes, coffee, tea, and cocoa. The browning of these products contributes to their flavor and color. Note that most of the browning in cocoa and coffee comes from the roasting process.
If you had to design your experiment over again, would you change anything?
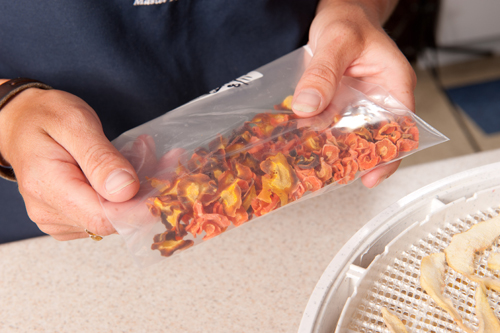
Activity 6: DIY Trail Mix
Objectives:
Explore a healthy alternative to store bought mixes. DIY trail mix can be healthier, and provide the opportunity for participants to include ingredients they like to create a personalized, healthy snack.
Time to complete activity: 2-3 hours (or more)
Materials:
 dehydrator
- fresh fruit slices such as apples, bananas, mangoes, blueberries
- rice crackers
- granola
- mini-pretzels
- raisins
- cereal squares
- nuts
- cheese crackers
- cereal
- sunflower seeds
Methods
- Making trail mix is easy and fun and you get to choose what goes in it!
- Different ingredients create different tastes.
- Possible fruits you can use: apples, bananas, papaya, pineapple or other fruits you like to eat.
- Using a dehydrator: follow the manufacturer’s directions included with the dehydrator
Many factors affect drying, including:
- The type of food you are drying
- How thick or thin you slice your fruit
- How well air circulates in and out of the dehydrator
- The temperature and humidity where you live
* It might take some practice to figure out how to best operate your dehydrator. Different machines will operate in different ways. To check your fruit, remove one slice and let it cool.
- Mix ¼ cup of your dried fruits in a bowl with ¼ cup of any of the following:
- rice crackers
- cereal squares
- granola
- nuts
- mini-pretzels
- cheese crackers
- sunflower seeds
- cereal
- raisins
- other foods?
- Store ½ cup servings of your trail mix in zippered plastic bags.
- Write down your own special mixture recipes.
- Trade trail mixes with friends.
Lesson adapted with permission from WSU Extension, M. L. Wallace. “Getting Started in Food Preservation, Leaders Manual & Member Kit,” WSU Extension Publication, 2005.
Activity 7: Can Dried Fruit Be Brought Back to Life?
Objectives:
Participants will learn a food preservation technique, and model the process of how to revitalize fruit that has been dehydrated.
Time to complete activity: 30 minutes
Background:
 Dried fruit can be reconstituted. Reconstituting fruit is the practice of adding water back into the dehydrated fruit that was previously lost.
One cup of dried fruit reconstitutes to about two cups. Add water to just cover the fruit; more can be added later if needed. It takes one to eight hours to reconstitute most fruits. The time varies with the kind of fruit, size of pieces, and temperature of the water. Using hot water takes less time. Over-soaking will produce a loss of flavor.
Use pictures of reconstituted fruit located in the kit to show how the fruit changes over time.
Materials:
- dried fruit
- a pot and a stove
- 1 tablespoon of sugar
- 1/8 teaspoon salt
- A tablespoon or two of fresh orange or lemon juice
- low-fat yogurt or low-fat frozen yogurt
Methods
- Put dried fruit into a pot and cover it with water.
- Cover with a lid and simmer.
- Add sugar near the end of the process so it will not interfere with the fruit’s absorption of water.
- Add less than 1/8 teaspoon of salt to help bring out the fruit’s natural sweetness.
- Add a tablespoon or two of fresh orange or lemon juice to give it a fresh bright flavor.
- Serve to the youth plain or over something to test it out such as yogurt or frozen yogurt.
Have participants write down observations they noticed during the experiment. In what ways does the dried fruit change by being heated and restored with water?
Activity 8: Fruit Battery!
Objectives:
Build a simple battery using an unexpected energy source — fruit! Participants will learn to identify the basic parts of a battery and explain how a battery works.
Time to complete activity: 1 hour, plus additional time if extended
Materials:
- fruit/vegetables (recommended are apples, lemons, potatoes, onions, etc.) NOTE: Do NOT eat the foods after using them for this activity!
- volt meter
- steel nail
- zinc-plated nail
- two electrical wires
- sand paper (optional)
- sharp knife or wire strippers
Methods
- Use a sharp knife or cable shears/wire strippers to strip the insulation from the ends of the wires. Any type of electrical cable with copper wiring inside will do fine.
- Use a small piece of sandpaper to buff the ends of the wires and the nails. You only have to rub them gently for a moment.
- Wrap one end of one of the wires around the steel or zinc nail. It does not matter which one. Wrap the other end of the wire around the remaining nail. These will be the terminals.
- Pierce the fruit with the nails. Keep the nails as close as possible to each other without touching. If the nails touch, they will cause a short circuit and the project will not work.
- Turn on your voltmeter and choose a “DC” setting. You can test your voltmeter on a battery to make certain it is functioning.
- Touch the zinc nail with the voltmeter.
Extensions:
- Try various fruits, vegetables, and other foods.
- Try some liquids.
- Try the same type of food multiple times.
- Try the same piece of fruit over and over again multiple times.
- One youth reports that it works with a tortilla!
Data collection ideas:
Make a data table. Record the types of food you tried and the output from the voltmeter. Do some foods give higher voltages than other?
Show your results!
Graph the voltages for the various foods to enable better comparison. A simple bar graph, with the food on the x-axis (across the bottom) and the voltage on the y-axis (up and down) will give a great visual. This can be done using graph paper or using a computer program such as Excel.
More to try!
Did you generate enough voltage to power something with this food? Try lighting LEDs, powering buzzers, etc.
Questions to discuss
- What is in the food that makes it conduct electricity?
- What are the differences in voltages?
- What do you think makes the voltages different in the different scenarios (different foods, different tries for the same food type, different tries for the same piece of food over and over again)?
Explanation/What we expect to happen:
Let’s use an apple as an example. You may be thinking to yourself, “I’ve bought batteries at the store and I’ve bought apples at the store and they are not the same thing.” We showed that an apple can act as a battery, but how does this work?
First, if you have two electrodes made of different metals connected by a wire, electrons will flow from the metal with the lower electric potential to the one with the higher electric potential. Electrons are the negatively charged outer part of an atom. This is like a ball rolling down a hill due to gravity. However, electricity can’t flow if there is not a closed circuit. It stands to reason that if another wire were connected to the electrodes that the electrons would flow in the same direction in this wire as the other wire. This is not a circuit. In a circuit, the electrons must flow into an electrode through one wire and out into the other wire. A circuit can be thought of as a one-way street.
This is where the apple comes into play, acting as a battery. We all know from biting into an apple that it has juice in it. This juice contains electrolytes. Electrolytes are salts that are dissolved in the juice and have charges. These dissolved salts with charges are ions. Some of the ions are positive and some of the ions are negative.
Now when the electrodes are inserted into the apple, chemical reactions occur at each electrode. At the electrode with the lower potential, an oxidation reaction takes place. Oxidation means that the metal electrode loses electrons and metal ions from that electrode go into the apple juice. The electrode where oxidation occurs is called the anode. The electrons then flow through the wire to the other electrode. A reduction reaction takes place at this electrode. Reduction means that the metal electrode gains electrons (from the wire) and positive ions from the apple juice. The reduction electrode is called the cathode. To recap, electrons are oxidized from the anode and flow through the wire to the cathode. Meanwhile, in the apple positive ions are driven off the anode into the apple and positive ions from the apple are deposited on the cathode. If the positive ions are flowing in this direction, then the negative ions are flowing in the opposite direction, completing the circuit.