Activity 2: Capture the Sun
Learning Targets:
- Learn about renewable resources versus nonrenewable resources, and how conservation and new technologies are needed to prevent the complete elimination of nonrenewable resources.
- Construct a circuit using the solar panel as the power generator.
- Compare panel power output under different conditions.
- Understand how to use solar panels in the best way to capture solar energy.
Length: 40 – 50 minutes
Essential Questions:
- What are the best conditions for the panel to produce maximum power?
- What are the benefits of solar power?
- What are the limitations of solar power?
Enduring Understandings:
- Electricity can be produced from solar energy using a solar panel.
- Solar power can be used as a renewable resource; but has limitations.
NGSS Standards:
- 4-PS3-2, 4-PS3-4
- 5-ESS3-1
- MS-PS3-3
Background for Facilitator:
It takes millions of years for the radiant energy in the sun’s core to make its way to the solar surface, and then just a little over eight minutes to travel the 93 million miles to earth. The radiant energy travels to the earth at a speed of 186,000 miles per second, the speed of light. Only a small portion of the energy radiated by the sun into space strikes the earth, one part in two billion. For example, energy from the sun travels through space, through the earth’s atmosphere and weather forces before reaching the earth’s surface. Yet this amount of energy is enormous. Every day enough energy from the sun strikes the United States to supply the nation’s energy needs for one and a half years. About 15 percent of the radiant energy that reaches the earth is reflected back into space. Another 30 percent is used to evaporate water, which is lifted into the atmosphere and produces rainfall. Plants, the land, and the oceans also absorb radiant energy. Capturing sunlight and putting it to work is difficult because the solar energy that reaches the earth is spread out over a large area. The amount of solar energy an area receives depends on the time of day, the season of the year, the cloudiness of the sky, and how close you are to the earth’s equator. More information that may be useful is available in the Exploring Solar Energy Student Guide (Seven Activities) (PDF), U.S. Department of Energy/Energy Efficiency & Renewable Energy website.
If you are doing this curriculum as a series, youth in Activity 1 learned what a circuit is. It is not necessary to have done Activity 1 in order to do this activity. Either way, be sure to let youth know it is ok if they were not successful in lighting the light bulb or have never had experience with solar energy. This will hopefully be a new approach for them. Building a circuit with these materials, while seemingly simple, requires everyone to be open to a new challenge and discovery. It may also require some grit to keep trying if the fan does not spin easily.
Standard electrical circuits use red wires as positive and black wires as negative. These are used to indicate electrical polarity or the flow of energy in a circuit. Electricity flows from the positive pole to the negative pole. It will be important to explain the colors of the wires (black and red) to youth, so they match them correctly when building circuits.
This activity wraps up with a discussion around the pros and cons of solar energy, as well as how it might be utilized in real-world applications. This is not a complete list but provided as a reference for facilitators in case it is useful when engaging with young people in this discussion.
Table 1: Example Benefits and Challenges of Solar Energy
| Benefits of Solar Energy | Challenges of Solar Energy |
|---|---|
|
|
Facilitators and youth may also watch the video Maine 4-H Solar Energy Project with RLC Engineering 5422 (YouTube).
Limitations of solar energy are highlighted at minute marker 10:31-12:49 and benefits of solar energy are highlighted from marker 12:49-13:48.
Solar panels are absorbing energy from the sun. Solar panels do not radiate light from them or generate energy on their own, as they require an input of visible light.
Potential uses of solar energy include powering cars, boats, homes, and businesses. Solar energy can also be utilized to power smaller items, such as lights, heat, and the things created in this kit.
Safety tip: Youth should be told not to look directly at the sun or any area where the rays are concentrated.
Vocabulary List:
- Non-renewable resource: A resource that is not able to be replenished in a human lifetime
- Renewable resource: A resource that is able to be replenished in a human lifetime
- Solar energy: Energy that comes directly from the sun
- Photovoltaic cell: A small part of a solar panel that converts energy from sunlight; many photovoltaic cells make up a solar panel.
Materials:
- Solar panels
- Wires with alligator clips
- Motor with fan
- Multi-meter
- Capture the Sun Solar Panels Data Sheet (PDF) (to download and print)
Capture the Sun Solar Panels Data Sheet
| Variables | Voltage | # of Times Fan Revolves/Speed |
|---|---|---|
| No Light | ||
| Indoor Light | ||
| Flashlight | ||
| Direct Sunlight | ||
| Shadowed Sunlight | ||
| Angled Sunlight |
- Pencils
- Flashlight
- Protractor
- Graph paper
- One small bag of “resources” per group (this includes a Ziploc bag containing 45 red kidney beans and five white lima beans for a total of 50 beans per bag.)
- One large bag of “resources” per group (this includes a Ziploc bag containing 90 red kidney beans and ten white lima beans for a total of 100 beans)
- One copy of the worksheets for each group member:
- Large paper or plastic cup for holding “used resources”
Goal: To practice producing electricity from a solar panel.
Methods:
Engage:
The electricity that we use every day comes from two different kinds of resources, renewable resources, and nonrenewable resources. Renewable resources are resources that can be used again, that regenerate, or that are available in an almost never-ending supply. Nonrenewable resources, on the other hand, are resources that can be used only once and are then used up completely.
Take a moment to brainstorm some examples of renewable and nonrenewable energy resources. How many can the youth come up with?
The point of this part of the activity is to demonstrate the consequences of relying too heavily on nonrenewable energy resources. The red beans represent the nonrenewable resources and the white represents the renewable resources.
- Have one person in the group pick 5 beans out of the bag without looking.
- Count how many red beans and how many white beans were removed from the bag and record the information on the datasheet.
- Once the beans have been counted and the number of each color removed has been recorded, place the red beans in the cup and put any white beans back in the bag. Since the red beans represent nonrenewable resources, after they have been removed from the bag they are considered “used up” and are no longer viable. Since the white beans are renewable, they can go back into the bag to be used again.
- Continue this pattern until you have drawn from the bag 20 times or until you are left with only white beans in the bag.
Once all the youth have finished the activity, have them put the beans back in the bags and regroup. The previous activity was great to demonstrate the differences between renewable and nonrenewable energy resources at a constant rate, but as we know, the consumption of electricity is ever on the rise. Therefore, this model the youth just worked with is not applicable to the real-life model.
Next, each group of youth will need the next size up, the bags with 100 beans in them.
- Same as before, have one group member remove five beans from the bag without looking.
- Record how many of each color of bean was removed from the bag.
- Once the numbers of each bean have been recorded on the data sheet, put the red kidney beans in the cup and any white beans that were removed back in the bag.
- Here is where it’s different from before: since electrical demand is always on the rise, we will increase the amount of “energy resources” used by two each subsequent turn. For example, instead of picking out five beans on the second turn, the youth will now pick out seven.
- Repeat steps two-three.
- Youth will then remove nine beans from the bag
- Repeat this pattern until either all of the nonrenewable resources have been used up or until the group has removed beans from the bags 30 times.
Questions to Discuss
- How many turns did it take for your group to deplete the nonrenewable resources when consumption remained constant?
- Did you notice a pattern as you took more turns? Around what turn did you start to see an increase in the number of white beans you removed from the bag each turn? Did the same thing happen when you increased the number of beans you drew each turn? Around what turn did you see the increase in part two?
- What does this activity show about our consumption of nonrenewable energy resources?
Can we continue to consume high levels of nonrenewable energy resources like we have been for many years to come?
— Courtesy U.S. Department of Energy’s Office of Energy Efficiency and Renewable Energy.
Explore:
Be sure to be in the sunlight (or a high-power spotlight) when testing.
Today youth are going to explore ways to harness the energy of the sun. Divide youth into cooperative learning groups.
- Provide groups with a solar panel, a set of alligator clips, motor, and a plastic fan. If you have other materials, such as LED lights or buzzers, consider offering those as well. Introduce all the materials to youth so they know what they are called.
- Tell groups their challenge is to make the fan spin (or light up or make sound). Allow youth time to explore different ways to assemble the materials to complete the task.
- Once they are successful, encourage youth to explore the following conditions: darkness, indoor light, direct sunlight, shadowed light, and angled light.
- What happens to the direction of the fan’s rotation when they reverse the connections of the wires to the panel?
- What predictions do youth have about if they were to connect the fan to a battery? What do they think would happen?

Explain
Ask each group to share what they observed. Here are some questions that could be used as discussion prompts:
- What designs did they discover that worked?
- What designs did not work?
- What evidence supports designs that worked or did not work?
- Were there other factors that influenced whether the fan moved?
- Facilitators may want to have each group introduce their design.
- What patterns emerge?
- Did everyone use a common design to make their fan spin or are there different methods that worked?
- Are there places that consistently capture more energy than others? For example, did the fan spin faster in the darkness or outside? Why do they think that happened?
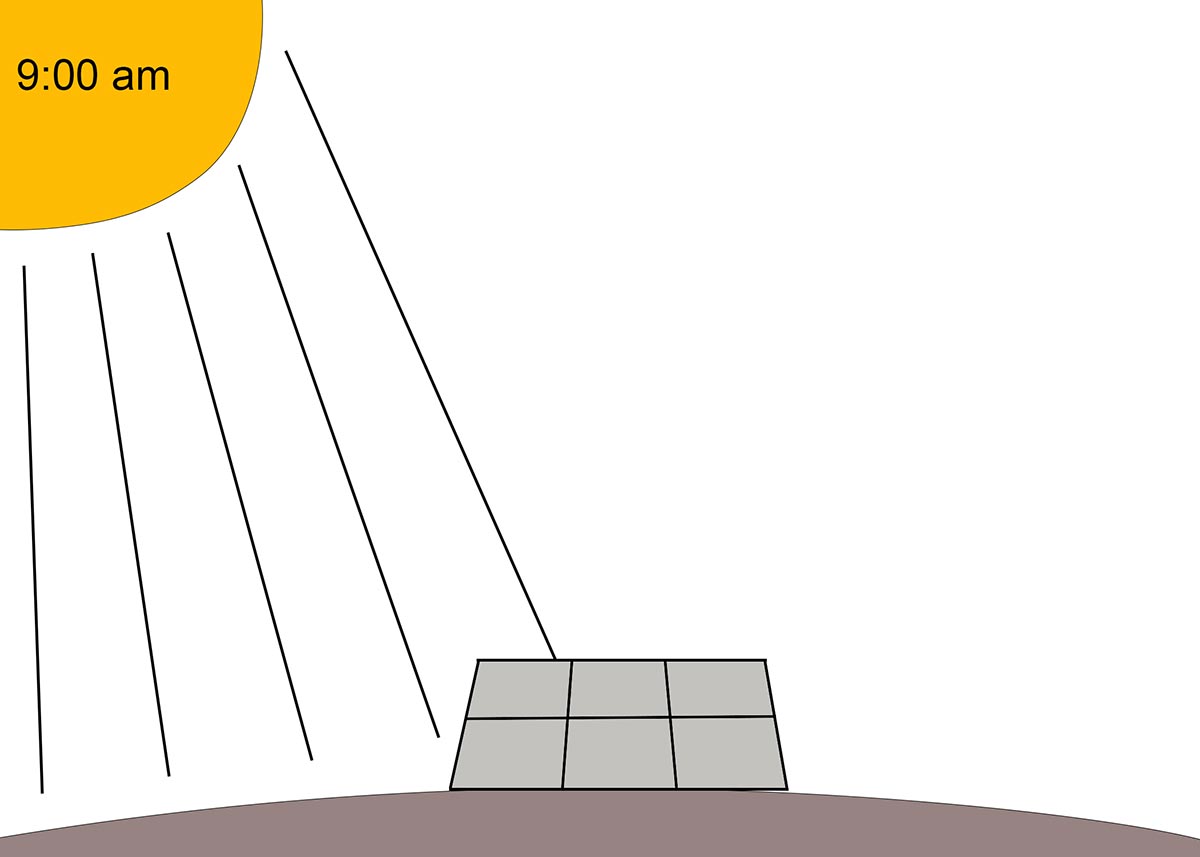
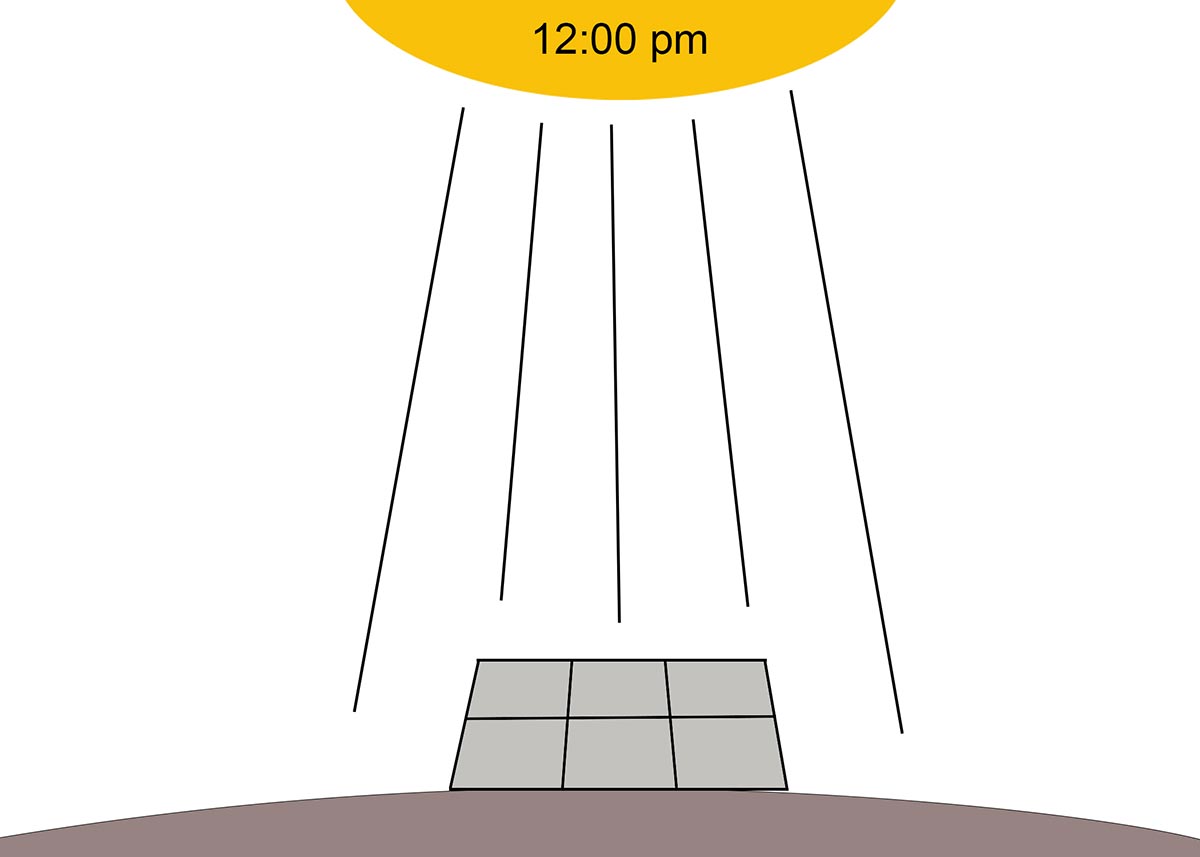
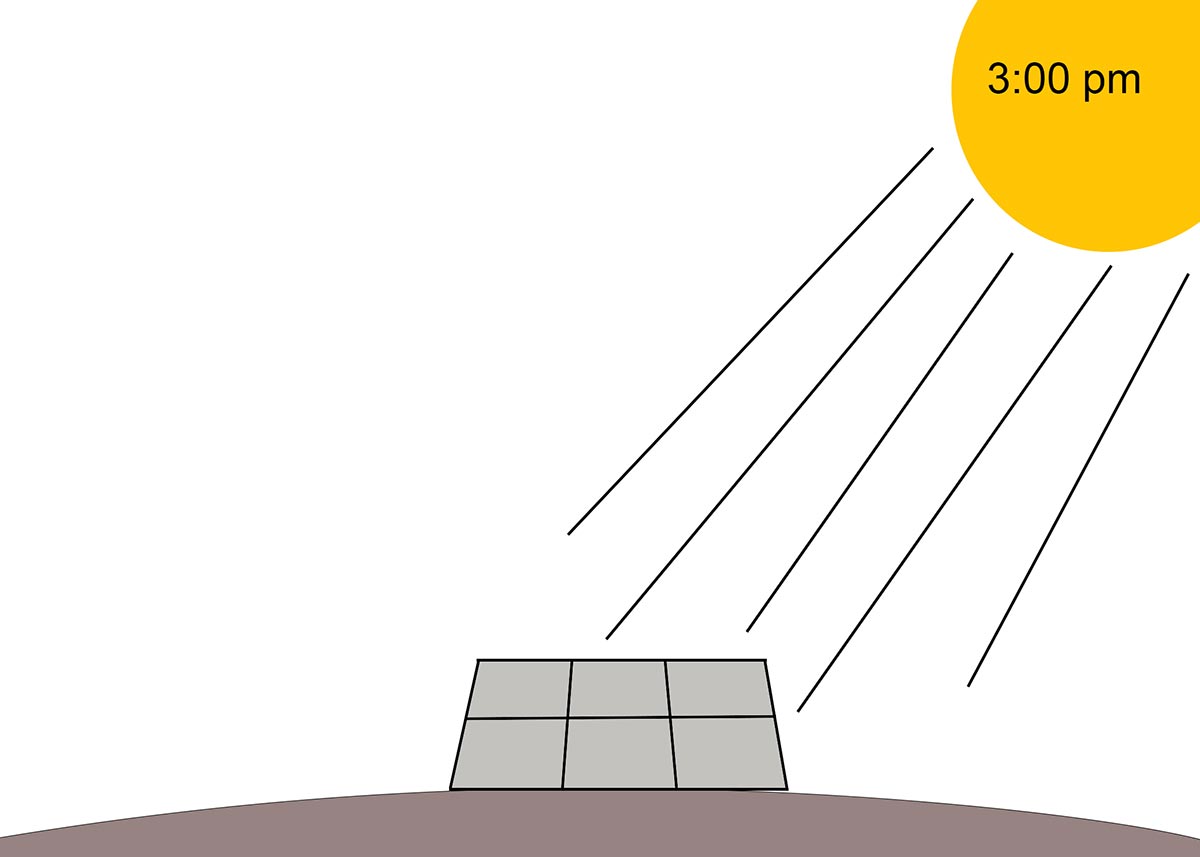
The more direct the sunlight is to the panel the more energy is produced. Solar panels work best if they can track the movement of the sunlight throughout the day. This is correlated between the solar radiance (energy per square foot) and the angle of the sun relative to the angle of the solar cell. Demonstrate this using a flashlight, graph paper, and a protractor. The paper represents the earth’s surface, the edge of the paper represents the horizon and the flashlight represents the sun. Mimic the sun rising and setting and see how many squares are covered in light at different points during the day.
-

- Figure 2.2: The sun at 9:00 a.m. (UMaine Extension 4-H Graphic, Jessy Brainerd)
-

- Figure 2.3: Sun at 12:00 p.m. (UMaine Extension 4-H Graphic, Jessy Brainerd)
-

- Figure 2.4: Sun at 3:00 p.m. (UMaine Extension 4-H Graphic, Jessy Brainerd)
Elaborate
As a group, discuss how you might be able to know what design or factors work best (generate the most energy). Explain that next you are going to use a scientific tool, a multi-meter, to measure the energy generated in voltage.
- Provide groups with a multimeter, solar panel and a set of alligator clips. Groups will need to follow directions carefully to get started, but will have time to explore after the first few steps.
- Turn the dial of the multi-meter until it points to 20V.
- Touch the red probe to the positive (+) end of the battery and the black probe to the negative (-) end of the battery. Record the voltage reading (see image below).
- Repeat with the black probe on the positive and the red on the negative. Record the voltage reading.
- Connect the solar panel to the multimeter using the alligator clips (see image below).
- Measure the solar panel’s voltage under the following conditions: darkness, indoor light, direct sunlight, shadowed light, and angled light.
- Shut off the multimeter when finished.

Evaluate
As a group, take time to reflect on the experience you just had. Here are some questions to get you started.
- How did you feel when you were testing the solar panels?
- What did you think was going to happen when the solar panel was in direct sunlight? Indoor light? Darkness? What did you think was going to happen
- When you attached the motor/fan to the solar panel?
- What did you observe happening when you attached the motor/fan?
- What challenges did you run into?
- How did you troubleshoot problems when your design did not work like you thought?
- How could you take what you discovered today and apply it to using larger solar panels?
- What are some of the benefits of solar energy?
- What are some of the concerns with solar energy?
- What are the potential uses for solar energy?
Extension Ideas:
- Try a bigger motor and see what happens.
- Try moving the solar panel higher and lower in the sky.
- Try different angles of the solar panel, different times of day, or different compass bearings.
Additional information: You could do this experiment without the motor and examine bulb brightness by using LED lights or 1.5V bulbs in holders.
Additional Resources:
- Exploring Solar Energy Student Guide (Seven Activities) (PDF), U.S. Department of Energy/Energy Efficiency & Renewable Energy website
- Renewable Solar: Solar Basics, Energy from the sun, Energy KIDS|U.S. Energy Information Administration