Maine Home Garden News — May 2011
- May is the month to . . .
- Early Start for Your Garden
- Healthy Gardeners = Healthy Gardens
- Spring Ephemerals Bring Early Beauty to the Maine Landscape
By Amy Witt, Horticulturist, University of Maine Cooperative Extension, Cumberland County, amy.witt@maine.edu
 Start a new landscaping project. Be sure to plan it on paper first! It is important to know the mature size of each plant and allow for growth. You want to make sure you have enough space and you do not want to over plant. Bulletin #2701, Designing Your Landscape for Maine, offers great tips for getting started.
- Select and plant perennials, trees, and shrubs. When selecting new plant material, make sure it is hardy to your area, you don’t want to be disappointed if the “perfect” plant you have chosen dies or doesn’t bloom after one season. Refer to Bulletin #2242, Plant Hardiness Zone Map of Maine, to find your proper planting zone.
 For maximum landscape interest in a small, vertical space, try annual vines. They can disguise ugly walls and fences. When trellised, they can create shade and privacy while hiding undesirable views. Morning glory, nasturtium, sweet peas, and scarlet runner beans are just some of the many flowering vines that will brighten up any vertical space.
- Before rototilling or spading your garden, check the soil for moisture. If it is too wet, working it will harm the soil structure. Test the moisture content by squeezing a handful of soil. If it sticks together in a ball, it’s too wet to work. Crumbly soil is ready to be tilled and planted.
- “Harden off” your houseplants and any seedlings you have started indoors. Hardening off your plants helps them develop the stronger stems that they will need to stay upright during outdoor windy conditions. It also allows your plants to slowly acclimate to the strong outdoor sun. To harden off plants, expose them to the outdoors for short periods of time (1-2 hours to start) and then bring them inside again. Start by putting them in the shade and each day increase the amount of light and time that they are outside. Within a week, you should be able to leave them outside full-time.
- Start planting your vegetables. In early May you can plant lettuce, spinach, peas, beans, hardy herbs, root crops (carrots, turnips, onions, beets), and cole crops (broccoli, Brussels sprouts, cabbage). Tomatoes, peppers, eggplants, sweet corn, and cucurbits (squash family) should not be planted until Memorial Day or later unless you plan to be diligent about using frost protection. See Bulletin #2190, Vegetable Varieties for Maine, for a list of vegetable varieties that are well-suited to Maine’s climate. Remember to rotate vegetable crops to help control pests and diseases, and to keep the soil in good condition.
- Protect newly transplanted vegetable plants from cutworms. Cutworms are fatal to newly planted seedlings. Any easy way to protect your plants from this nasty pest is to cut strips of cardboard two inches wide by eight inches long, staple them into circles, and place them around the plants. Press the collar about one inch into the soil. These collars will fence out the cutworms and protect the stems of the vegetable plants.
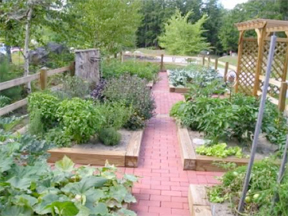 Start a vegetable garden. Having a vegetable garden gives you the pleasure of enjoying nutritious, delicious, and sun-warmed produce fresh from the garden. It allows you to grow and try new, unique, and heirloom varieties of vegetables that you can’t get in the grocery store (like: Sun Gold tomatoes, purple carrots, and golden beets). Growing vegetables is easier than you think. If you plan it right, you can enjoy a beautiful garden full of the fruits of your labor. To help you get started, refer to Smart Gardener: A Learning Guide for Home Vegetable Growers, Item #2282. This invaluable guide will teach you how to make the most of your home vegetable garden. Each of the 12 lessons focuses on a specific aspect of gardening know-how, such as soil, seeds, garden design, mulches, and weeds.
- For those of you in smaller spaces, why not try gardening in containers? Bulletin #2762, Growing Vegetables in Container Gardens, and Bulletin 2761, Gardening in Small Spaces, are both great resources.
- To better evaluate your gardening successes, keep a journal. Record the weather conditions (including temperature highs and lows, frost occurrences, precipitation), what you have planted, and how the plants and crops did throughout the season. Note if you had any disease or insect pests, the conditions in which they appeared, and what measures (if any) you took to control them. Include pictures of your garden taken throughout the season, seed packet covers, and identification cards of the plants and crops that were your favorites.
By Donna Coffin, Extension Professor, University of Maine Cooperative Extension, Piscataquis County, donna.coffin@maine.edu
Gardeners in Maine are anxious to get started planting their gardens. We have been waiting all winter to get out and till the soil, add our soil nutrients and amendments, and plant. But wait, planting some vegetables too early can lead to crop failures. We have warm season and cool season crops. Many of our “early season” crops can be planted in early May. Many of our “late season” crops need to wait until late May or June to be planted or transplanted into our gardens.
Where you live makes a difference in when your garden will be ready to plant. If you are on the coast of Maine, your growing season starts a lot earlier than a garden in central or northern Maine.
In central Maine (Dover-Foxcroft region), the average frost free date is the end of May. Average means you have a 50-50 chance that the last frost date could be after this. We usually suggest that folks add an additional two weeks to their average frost free date to reduce the chance of frost damaging your crop. That said, I do remember a year that the strawberries had to be protected (by irrigation) from spring frost on June 13th. And you never know when we will be setting a new record for the last frost free date. Keep an ear to the weather forecast and be prepared to cover any susceptible plants if frost threatens.
The type of soil you have can make a big difference in when your garden will be ready to plant. Heavy, wet clay soils are slow to dry out and will be later to till. Sandy, well drained soils dry out quickly and heat up quickly. They will be ready to till sooner and will be warmer sooner for our warm season crops. Heavy clay soils can be amended with organic matter such as compost, peat moss, etc. to improve soil drainage and help the soil warm up quicker in the spring. Another technique is to build either ridges or raised beds so the water will drain more quickly and warm the planting bed faster. How can you tell how warm your soil is? Use a thermometer with a long stem that you can place at least 3 inches down into the soil. If we have a cold rain, it will drop the soil temperature to the air temperature and your soil will have to warm up all over again. I can remember getting 4 inches of snow May 14th. Yes, it melted the next day, but it took the soil a few days to warm up again.
What you plan to plant makes a big difference on when you can plant the crop. Early crops that can tolerate cool soils can be planted as soon as you get your garden prepared in the spring time. Lettuce, onions, peas, radish, spinach, turnips, cabbage, carrots, celery, broccoli, cauliflower, and chard will germinate at cooler soil temperatures (40 degrees F), but it will take a lot longer and so you may want to consider using fungicide treated seed or wait until the soil warms up. For example, lettuce can take up to 15 days to germinate at 40 degrees F and only 4 days at 60 degrees F.
 Warm season crops like beans, cucumbers, eggplant, melons, peppers, pumpkins, squash, and tomatoes do best at soil temperatures of 60 degrees. Transplants such as tomatoes that get chilled (temperatures below 50 degrees) stop growing for a couple weeks, so you will want to consider providing some type of protection if you plan to transplant these plants early.
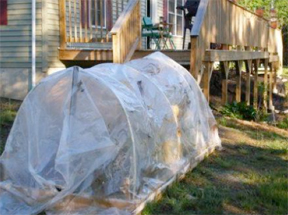
You can get an early start in your garden by using some garden season extension techniques presented in Bulletin #2752, Extending the Garden Season. This fact sheet is filled with ideas for using plastic mulches, row covers, cold frames, hoop houses, and hot caps, and includes videos on how to make a raised bed. Also, Bulletin #2763, Garden Equipment and Items to Make for the Garden, has more ideas for starting seeds, container gardens, and coverings for your raised bed gardens.
Healthy Gardeners = Healthy Gardens
By Corie Washow, AgrAbility Program Coordinator, University of Maine Cooperative Extension, Androscoggin/Sagadahoc Counties, corie.washow@maine.edu
 As gardeners, we put a lot of energy into supporting a plant’s natural systems and parts. We don’t just drop a tomato seed in the dirt at the edge of the sidewalk and expect to come back in a few months to harvest. If despite all our attention to growing medium, nutrients, temperature, timing, staking, etc., our tomatoes don’t grow well, we look at every part of the system and figure out what is within our control to change. Can we increase soil health, provide more/less water, create warmer conditions, manage pests better, or take measures to avoid disease? We respect the complicated system of the tomato plant, and know that to get the best results, we have to pay attention, proactively and reactively, to every step of the process.
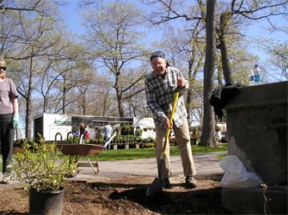
Considering all the effort we put in to obtaining a juicy tomato or vibrant rose, it is surprising how little effort we put in to making sure that we, the gardeners, are similarly cared for. Until they are screaming at us, we don’t think much about the bones, muscles, tendons, ligaments, nerves, and other body parts that interact in amazingly complicated ways to allow us to lift, carry, bend, push, and pull to accomplish our goal of healthy, productive gardens.
Just as we can change conditions to improve a tomato’s health, there are changes we can make in how we garden that improve the health and functionality of our system. For example, we all know the pain that comes from too many hours battling lamb’s quarters or hairy galinsoga. How many of the variables that contribute to the pain of weeding can we adjust? Here’s a partial list:
- Minimize the weed problem with appropriate growing techniques and cultural controls.
- Develop loose soil and avoid weeding during very dry conditions so pulling is easier.
- Use specialized cultivating tools with long or telescoping handles and ergonomically friendly designs.
- Garden in raised beds and containers to minimize bending.
- Use garden stools and kneelers to decrease the strain on your back and knees.
- Be thoughtful about what other tasks you need to do on a heavy weeding day — don’t weed and rearrange your living room furniture on the same day!
- Stretch for a few minutes before getting started, and take stretching breaks while you are working.
Some of these solutions may be outside of your control. I recently heard some great advice from an occupational therapist. She said that, of course, we can’t control everything. But we always have some control over how we are using our bodies. Even shifting one action in 10 can be a 10% improvement. Maybe that translates into having the stamina to do a 10% larger garden, or garden for 10% longer a time, or simply have 10% more energy at the end of the gardening day to enjoy your friends and families. Ten percent is within everyone’s reach.
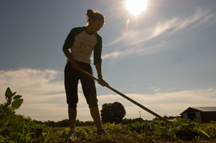
Tools are one area that can easily make a 10% difference. Start researching ergonomic tools and you will see all sorts of options that look a little strange, but may be a much better fit for your body. You can also adapt tools you already have with minimal cost, or build a tool that addresses your own particular challenge. There are several things you should look for when purchasing/adapting ergonomic garden tools:
- Find the right size grip. The handle should be the same size as the circle made by just touching your index finger to your thumb. Grip size can be easily adjusted with athletic or duct tape as needed.
- Choose a design that keeps your wrist and arms in a neutral alignment. Your wrist should be straight and the bulk of the work should be done by the tool and the larger muscles of your arm, not your wrist and fingers.
- Longer handles minimize bending and kneeling. Look for tools with telescoping handles.
- For tools that already have long handles, make them even more user friendly by attaching handles that allow you to work standing up straight, avoiding lower back strain.
- Tools with a non slip grip reduce the force and pressure you have to exert to use the tool. Look for tools with grips, create your own with athletic tape, or wear gardening gloves.
- Look for tools that do the work for you. For example, ratcheting tools are designed to maximize the work required by the tool and minimize the effort exerted by the user.
- Get as light weight a tool as you can to complete the job. Ounces have an impact!
- Make your own tools. For example, a piece of PVC pipe with a funnel (can use the top of a plastic soda bottle for a funnel) attached is a cheap and easy way to put seeds in the ground without bending.
- Add wheels! Get a garden scooter, so you can sit while working and then use your legs to push yourself to the next location. Haul heavy items in a wheelbarrow (the 2 wheeled version impacts your body less because you don’t have to work to balance it) rather than carry with your arms. Store tools in a wheeled garbage can and drag them along with you.
Ideally, you’ll want to try a tool before buying to make sure it works for your particular gardening needs and your body. Unfortunately, many local garden supply stores do not stock a wide range of ergonomic tools. Shop around, though, and if you can’t find anything locally, read reviews on the internet or talk to gardening friends who may have experience with particular tools. In southern Maine, visit the Coastal Maine Botanical Gardens to see their display of ergonomic tools and accessible gardening modifications.
Far too often, gardeners tolerate unnecessary pain, damage their bodies, or are forced to give up gardening entirely. Gardening, as we all know, is a labor of love. Don’t let that labor of love just become labor! Offer your body the same care and respect that you do your plants, and you will be able to continue producing healthy food and beautiful flowers for many years to come.
The following are useful websites for getting a sense of the different types of tools available:
- Gardening with Ease: Company that distributes multiple brands of ergonomic gardening tools.
- Great Farming and Gardening Tools for Women is an article specifically about the needs for tools designed for women! Very interesting ideas and tips here.
For more information on gardening with specific health conditions and disabilities, check out:
- Dave’s Garden has an extensive forum on accessible gardening, which is full of reader tips and suggestions on purchased and homemade tools.
- Carry On Gardening contains resources for gardeners with vision loss, strokes, heart disease, one arm, weak grip, wheelchairs, and bending challenges.
- Gardens for Every Body is from the University of Missouri Cooperative Extension and explains adaptive and assistive gardening, from hand tools to garden design.
Information in this article is provided purely for educational purposes. No responsibility is assumed for any problems associated with the use of products or services mentioned in this website. No endorsement of products or companies is intended, nor is criticism of unnamed products or companies implied.
Spring Ephemerals Bring Early Beauty to the Maine Landscape
By Kate Garland, Horticulturist, University of Maine Cooperative Extension, Penobscot County, katherine.garland@maine.edu
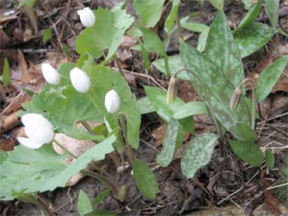
Spring ephemerals are herbaceous plants that emerge, flower, and develop seeds early in the season; going dormant during summer months. This clever group of plants takes advantage of early spring sunshine before the deciduous canopy above blocks out the light. While they have no aesthetic appeal during their dormant period (the foliage either turns yellow or dies completely back to the ground), they play a larger than normal role at a time when Maine gardeners crave the sight of greenery and flowers. Here are a few native spring ephemerals to add to your garden:
Anemonella thalictriodes – Rue Anemone (zone 4)
White to pink flowers appear in clusters over purplish-green leaves that resemble Columbine foliage. Rue Anemone grows approximately 8” tall, preferring part sun to full shade. Plants may not go completely dormant in summer months in sites where there is adequate moisture.
Dicentra eximia – Wild Bleeding Heart (zone 4)
Dicentra cucullaria – Dutchman’s Breeches (zone 3)
D. eximia has delicate pink, heart-shaped flowers, while D. cucullaria has white flowers that look like a tiny pair of upside-down pants. Both species have finely dissected leaves and grow well in shaded sites. D. eximia can tolerate full sun when sufficient moisture is available.
Dodecatheon meadia – Eastern Shooting Star (zone 4)
This plant has nodding medium-pink flowers similar to Cyclamen. Petals are bent backwards, giving the flower the appearance that it’s speeding through the air. Dodecatheon prefers light shade to full sun with moist soils.
Erythrionium americanum – Yellow Trout Lily (zone 3)
This plants mottled purple and gray-green basal leaves are just as appealing as its sweet flower. Yellow nodding flowers have petals that are curled back to reveal several dark orange stamen. Yellow Trout Lily will beautifully colonize a moist, deciduous understory site with very little care.
Mertensia virginica – Virginia Bluebells
Small trumpet-shaped flowers start out pink, eventually maturing to a pale blue. Plants are upright, growing from 1’ to 2’ tall. Virginia Bluebells grows best in part-sun gardens with moist, rich, well-drained soil.
Be sure to purchase nursery-grown native plants from a reputable nursery. Collection of native plants in the field is strongly discouraged. If you cannot find these plants at your favorite garden center, tell them that you would like to see more native plants offered at their business. Nurseries will generally bring in more native plants if their customers ask for them.
Resources:
- Native Plants: A Maine Source List, Bulletin #2502, by Lois Berg Stack, Extension Professor and Ornamental Horticulture Specialist
- Gardening to Conserve Maine’s Native Landscape: Plants to Use and Plants to Avoid, Bulletin #2500 by Lois Berg Stack, Extension Professor and Ornamental Horticulture Specialist
- The New England Wild Flower Society Guide to Growing and Propagating Wildflowers of the United States and Canada by William Cullina. 2000.
- Missouri Botanical Garden Kemper Center for Home Gardening PlantFinder
University of Maine Cooperative Extension’s Maine Home Garden News is designed to equip home gardeners with practical, timely information.
Let us know if you would like to be notified when new issues are posted. To receive e-mail notifications fill out our online form.
Visit our Archives to see past issues.
Maine Home Garden News was created in response to a continued increase in requests for information on gardening and includes timely and seasonal tips, as well as research-based articles on all aspects of gardening. Articles are written by UMaine Extension specialists, educators, and horticulture professionals, as well as Master Gardener Volunteers from around Maine, with Professor Richard Brzozowski serving as editor.
Information in this publication is provided purely for educational purposes. No responsibility is assumed for any problems associated with the use of products or services mentioned. No endorsement of products or companies is intended, nor is criticism of unnamed products or companies implied.
© 2011
Published and distributed in furtherance of Acts of Congress of May 8 and June 30, 1914, by the University of Maine Cooperative Extension, the Land Grant University of the state of Maine and the U.S. Department of Agriculture cooperating. Cooperative Extension and other agencies of the U.S.D.A. provide equal opportunities in programs and employment.
Call 800-287-0274 or TDD 800.287.8957 (in Maine), or 207.581.3188, for information on publications and program offerings from University of Maine Cooperative Extension, or visit extension.umaine.edu.