Maine Home Garden News – May 2024
In This Issue:
May is the month to . . .
How to Build a Zig Zag Garden (4-Post Trellised Garden)
Plant Identification Apps
Beet Growing 101
Backyard bird of the month: Red-Eyed Vireo
Mainely Dish: Rhubarb Muffins
Ask the Expert
Maine Weather and Climate Overview (May 2024)
May Is the Month to . . .
By Barbara Harrity, Penobscot County Master Gardener Volunteer
The sun is bright, – the air is clear,
The darting swallows soar and sing.
And from the stately elms I hear
The bluebird prophesying Spring.
—Henry Wadsworth Longfellow
Thank Maine’s Henry Wadsworth Longfellow for helping us appreciate this beautiful month: “For oh, it is not always May!” Nevertheless, it’s a busy month for gardeners, so here are some ideas for your to-do list.
In the vegetable garden:
Transplant seedlings. It’s time to transplant lettuce, spinach, parsley, onions, broccoli, kale, radish, and mustard greens seedlings into your garden.
Direct seed in the garden. Sow seeds of cool-season vegetables such as beets, carrots, peas, and Swiss chard directly into the garden.
Continue starting seeds indoors. Early May is the time to start seeds indoors of plants that don’t tolerate frost, such as tomatoes, peppers, basil, and cucumbers, and plan to transplant them after all danger of frost has passed (typically late May or early June in Maine). Late May is the time to start fall brassica seeds indoors for transplanting in late June.
Harden off seedlings before planting. Seedlings (both home raised and purchased) benefit from being gradually exposed to increased sun, wind, and cooler temper
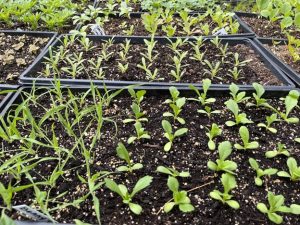
atures. Simply move plants into increasingly exposed sites over the course of a week or two while being prepared to bring them indoors when nighttime temperatures dip.
Apply nitrogen to emerging garlic plants. Sidedress rows with 1 tablespoon of bloodmeal (or an equivalent source nitrogen) for every six plants.
Sow an early-season cover crop to build soil organic matter. A mix of peas, oats, and vetch can be a winning combination to sow in early May, while late May can be a great time to sow buckwheat. Even if you don’t grow these crops to maturity (early August), they will improve the soil ecosystem and help suppress weeds.
In the flower garden:
Mulch perennial beds. Use dark bark mulch on your perennial beds to conserve moisture and prevent weeds. Avoid covering the crowns of herbaceous plants and the trunks of woody plants.
Stake peonies and other plants needing support. It’s easier to stake them now before the plants get unmanageable. The Maine Home Garden News from June 2021 has an informative article about extending the peony season. Definitely worth a read!
Learn how to attract butterflies and other pollinators to your yard. For more information, see Bulletin #7151, Landscaping for Butterflies in Maine, and Bulletin #7153, Understanding Native Bees, the Great Pollinators: Enhancing Their Habitat in Maine. Or consider taking part in Extension’s Pollinator-Friendly Garden Certification.
In the fruit garden:
Fertilize raspberries and blueberries. Apply about 2 lbs. actual nitrogen (N); phosphate (P2O5); and potash (K2O) per 1000 square feet (or 500 feet of row), i.e., 20 lbs. of 10-10-10. For organic substitutes use compost or rock powders. For more information, check out Bulletin #2066, Growing Raspberries and Blackberries or Bulletin #2253, Growing Highbush Blueberries.
Around and about:
Recordkeeping—keep it up! Okay, you created your garden plan, noted which seeds you started when, and now comes the hard part: continuing to write down your observations of plant growth and yield, and insect and disease problems. A good recordkeeping task for May is to assess your spring bulbs as they flower. Mark the bulbs that need to be divided this fall with a stake in the garden or a note on your garden map.
Forage for fiddleheads and dandelions. Depending on where in Maine you live, early May can be a good time to forage for fiddleheads and dandelions. Dandelions are ubiquitous, but be sure to harvest from areas where pesticides haven’t been applied. Ostrich Fern Fiddleheads, Bulletin #2540 will help you identify the tender, coiled shoots of the Matteucia struthiopteris fern and harvest them properly and sustainably. The Maine Department of Education has compiled a collection of recipes featuring dandelion greens, f
iddleheads, and sorrel, Wild Spring Greens: Wabanaki Foods in Maine Schools (pdf). Additionally, Facts on Fiddleheads, Bulletin #4198 offers tips on cooking, preserving, and using fiddleheads.
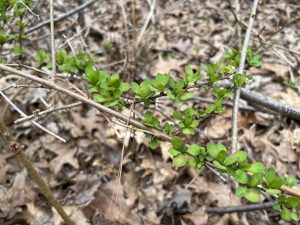
Notice invasive plants. Many invasive plant species produce leaves earlier than their native counterparts, making them easier to spot and mark for future removal.
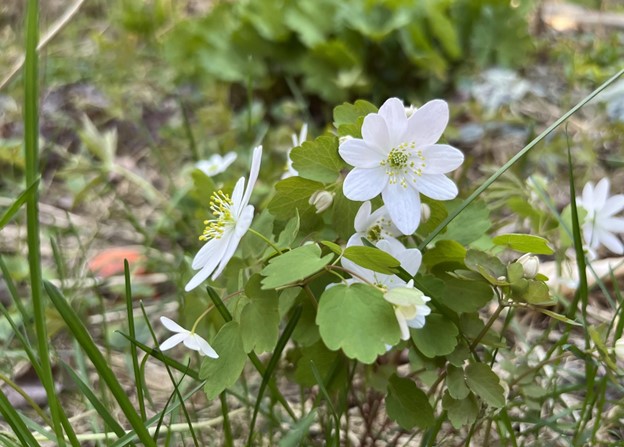
If you suspect you have uninvited plant guests, consider trying a plant ID app noted in the article below and then confirm the identification and develop a management plan using the fact sheets linked on the Maine Department of Agriculture, Conservation and Forestry’s invasive plant lists.
Enjoy an evening frog chorus. By early May, wood frogs and spring peepers will be singing from vernal pools and small ponds, creating a cacophony of high-pitched peeps (peepers) and low-pitched “wrunks” (wood frogs). According to Maine Amphibians and Reptiles (University of Maine Press, 1999), “In peak season, a chorus of peepers can be heard half a mile away.” The call of wood frogs does not carry very far, and their peak breeding season is a few weeks earlier than the peepers’.
How to Build a Zig Zag Garden (4-Post Trellised Garden)
By Richard Brzozowski, retired Extension Professor
A zig zag garden could be useful for people who have trouble kneeling or squatting. The zig zag garden is built for specific crops that climb: such as cucumber, indeterminate tomatoes, pole beans, sugar snap peas, butternut squash, climbing varieties of peppers, luffa gourds, as well as flowers such as sweet peas and morning glory. You will want to locate your zig zag garden in a sunny location that is well drained with soil deep enough to set the four posts at least 18” deep.
Materials needed for a 4-post zig zag garden:
- Four 8’ posts (4”x4”)
- Three 5/4”x10’ cedar decking (cedar is a natural self-preserving wood). 2”x10’ rough-sawn hemlock (pictured here) is a good substitute for cedar.
- One 16’ cattle panel (48” or 50” tall)
- Twenty-four fasteners (non-corrosive 3” to 3 ½” in length) – screws work better than nails for this type of construction. Large exterior screws (like GRK) or lag bolts with 3/8” diameter and 3” to 3 ½” in length will be strong and long lasting.
- Twelve eye screws (1” x 3 ½” should suffice)
- Zip ties (to fasten panel to the eye screws) 10” to 12”
Tools needed:

- Measuring tape
- Marker (pencil)
- Post hole digger (or spade)
- Saw (hand saw or portable circular saw)
- Carpenter’s square
- Drill (with bits for drilling holes and for screwing)
- Large screwdriver (to be used for setting the eye screws)
- Flat-sided file (to smooth any sharp edges of the cattle panel pieces)
- Level (2’ or 4’ in length) to plumb each garden panel when set into holes
- Hacksaw or bolt cutter (to cut the 16’ cattle panel into three equal pieces)
Steps to building a zig zag garden:
- Cut the three 10’ boards into six 5’ lengths.
- Lay out two 4×4” posts on a flat surface (floor, driveway, or ground).
- Fasten one board squarely (use the carpenter’s square) to the side at the top of the posts using at least two fasteners on each post. It is suggested to first drill pilot holes in the boards to avoid cracking the wood with the fasteners.
- Measure and mark 5’ down on the posts and squarely fasten the next 5’ board onto the posts (this board will be closest to the ground when set in place).
- Repeat this construction with the remaining two posts.
- On the inside of each unit and the center of the post, drill 4 pilot holes for the eye screws. It is recommended that the screw eye holes be drilled about 10” and 54” from the top of each post (12 pilot holes total). A large screwdriver is useful in screwing in the eye screw by placing the screwdriver through the eye of each eye screw and turning the eye screw clockwise. The screwdriver provides leverage.
- With the bolt cutter or hacksaw, cut the 16’ cattle panel into three equal sections. These will be about 5” 4” in length. Make sure the piece left after cutting has no sharp edges. Use a file to smooth off any sharpness after cutting.
- Attach one cattle panel piece to the eye screw eye using the zip ties.
- With the post hole digger or spade, dig two holes 5 feet apart and from 18” to 24”deep.
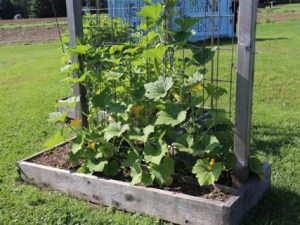
Photo by Art Shaw
- Lift the panel and set it into the two holes. Level and plumb the panel (all sides) using the level (horizontally and vertically).
- With a 5’ board, lay the board out to select the correct spot to dig the remaining two holes. This is an important step. Be accurate as possible as you want this layout to be square (90 degrees).
- With the post hole digger or spade, dig two holes 5 feet apart and from 18” to 24”deep. Once the two holes are dug at the same depth as the first two holes, place the second panel into the holes. At this point and using the exterior fasteners, connect the two panels with the two remaining boards – squarely and as close to plumb as possible.
- Check squareness, plumbness, and levelness of the zig zag garden panels. When level and plumb, fill in the remaining two holes and pack all holes to stabilize the unit. The two panels should be connected at 90 degrees (square).
Estimated cost of materials (March 2024):
- Four 4”x4”x8’ posts – $10 to $50 each. (cedar posts – $50 each): $40.00 to $200
- Three 5/4”x10’ long cedar boards – $14.00 each: $42.00
- One 16’x 50” cattle panel – $40.00: $40.00
- Twenty-four 5/16”or 3/8” 3 ½ long fasteners – $0.75 to1.50 each: $18.00 to $36.00
- Twelve 1” by 3” eye screws – $1.00 each: $12.00
- Zip Ties (one bag): $4.00
Total: $150.00 to $334.00
Plant Identification Apps
By Jonathan Foster, Horticulture Outreach Professional, UMaIne Cooperative Extension
Spotting a botanical oddity while walking in the woods, being blown away by some beauty in a blooming garden, or spotting a plant specimen miraculously thriving in the exact conditions of that eternal problem spot in your own yard where nothing grows – we’ve all been in this situation before. What is that plant?! Mobile apps have revolutionized horticultural recognition in the course of everyday life, and the good news is that the technology for plant identification mobile applications has come a long way in a relatively short period of time. Mostly gone are the 2018 days of checking an interesting little sundew at the Orono Bog Walk and being told it’s an endangered tropical epiphyte from the other side of the globe (ok, that’s extreme, but anyone who experimented with the early plant apps can feel my hyperbolic pain).
For a more objective treatment than my anecdotal experience (which I’ll provide below), I would like to point readers to a series of fantastic use surveys by Dr. Erin Hill, of the Michigan State University Cooperative Extension. Since 2018, she has asked university students to evaluate a total of 16 identification apps, with the best performers rolling over to the next year’s group. You can see a sample set of the pictures they used in the tests, as well as differential results from the various apps, in the link above. Their evaluation listed complete accuracy rates (first place 73%, last place just over 30%), partial accuracy rates, and incorrect rates, and the complete and partial accuracy scores were also combined into a subjective “helpfulness” score. For three consecutive years now, PictureThis has outperformed the competitors on overall accuracy, helpfulness, and accuracy in plant sub-groups. The runner-up for their most recent survey was PlantStory, followed by PlantNet, PlantIn, iNaturalist (of note because it uses a crowd-sourcing approach to identification), and Google Lens.
In my own anecdotal experience, I am a pretty big fan of PictureThis. I find it to be accurate far more often than not, and it’s easy and intuitive to use. My biggest criticisms are the frequent, somewhat intrusive attempts to upsell you to the full-featured version (which I hesitate to paint as too much of a negative, as I believe fully in the developers’ right to charge for their hard work and a good product) and its winner-takes-all approach to identification. You are presented with the software’s best match and if it doesn’t seem correct, there isn’t much else to it for the end user.
I have recently begun testing PlantNet, which is also intuitive and easy to use, and which instead presents a list of high scoring potential matches for the plant being identified. It also lets you choose to focus the identification process on different plant organs, which can help when you are searching out of season. The downside is a slight drop in accuracy, or a situation in which a slate of relatively equally scoring species are given and the user must decide which among them is accurate. Among other resources and training to bolster results, I use both of these apps in my professional life…and I certainly use them while strolling with the family for anything I’m unfamiliar with.
When you select your app, remember to think not only of accuracy (let’s be honest, the most important factor!), but also ease of use, how convenient/informative the user interface is, cost, and the extent to which you’re being upsold inside the free versions of software. As always, identifications are most accurate if cross-checked with definitive sources such as the UMaine Cooperative Extension plant identification services or a website like the USDA Plant Database or GoBotany.com.
Information in this publication is provided purely for educational purposes. No responsibility is assumed for any problems associated with the use of products or services mentioned. No endorsement of products or companies is intended, nor is criticism of unnamed products or companies implied.
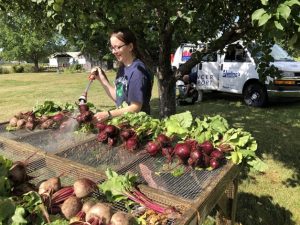
Beet Growing 101
By Tricia Griffith, Master Gardener Volunteer Intern
Beets! You love ‘em or you don’t love ‘em! Maybe you find yourself firmly in the “love ‘em” camp, but haven’t been sure about growing them. Let’s dig into some beet growing basics.
The beet (Beta vulgaris) is a member of the family Amaranthaceae (loosely pronounced am-a-ranth-a-see). This makes them cousins of plants like amaranth, spinach, chard, and quinoa. Native to Europe and the Mediterranean, beets are now grown almost everywhere and come in a wide variety of shapes and colors.
As always, a soil test will help you figure out what soil amendments you will need before you start seeding. Beets prefer a soil pH of 6.0 – 7.0, but will tolerate a slightly higher pH, and will not thrive at a pH lower than 6.0. Beets like loose, well-drained soil. If you have a lot of clay or your soil is prone to getting a crust on top, mix in plenty of organic matter before sowing your seeds (compost, shredded leaves, etc…).
Once your spring soil temperature has reached about 40°F (about 2-3 weeks before the last frost date), you can direct sow beet seeds into your garden as follows:
- Clear rocks from the area you want to seed.
- Create a furrow about ¼ to ½ inch deep – or make small holes 1” apart. ● Each row should be about 12-18” apart.
- If the soil is dry, trickle some water into the bottom of the furrows to give your beet seeds a good moist start (I know you love that word!).
- Once you have your moist (not soggy) furrows, sow your seeds 1” apart and lightly cover with soil.
- Water gently until the soil is saturated but not soggy.
Beet Growing Tip 1: If you’re having one of THOSE springs with torrential rains, prop up a board over the top of your row of seeds to prevent rain from washing them away. Remove the board as soon as they start to sprout.
A beet “seed” is actually a fruit with a cluster of seeds inside, so don’t be surprised when several sprouts pop up (in 7-14 days) where you put one seed. Once the seedlings are about 2” high, thin them so they are 3” apart. If you like, try planting each row about 2 weeks apart, so you have a succession of new beets throughout the summer.
Keep the plants evenly watered throughout the season; mulch alongside the rows to preserve moisture. Too much moisture fluctuation can cause the beet root to crack. Excess moisture may lead to root rot. This Utah State Extension article has a helpful list of beet growing problems and their causes/solutions.
Harvest beets 60-80 days after sowing. Most varieties of beets grow to about 1-½ inches wide. Some can get up to 3” with enough space and moisture, but if much bigger they’re going to be tough and woody. To harvest, use a garden fork to loosen up the soil, then pull the beet out by the leaves. Harvest the last of your beets before heavy frost or freezing.
Beet Growing Tip 2: Eat your greens! Similar to spinach or chard, beet greens are rich in vitamin K, copper, manganese, iron, and calcium. Save the beet greens you thin or trim and toss them in a salad or use them like you would spinach or chard.
To store your beets, cut off the greens and wash them. They will store at 32°F, 95% relative humidity for 2-4 months. Or prepare them your favorite way and freeze or can them.
Beet Growing Tip 3: Beets are a biennial plant. This means they will grow roots and leaves the first year, then flower (and produce seeds) the second year. If you want to try collecting and saving your own beet seeds, see if you can leave a few in the ground until the next season, depending on your winter climate. Seed Savers Exchange has a great detailed section on saving beet seeds.
So now, if you’re in the beet lover camp, you know it’s not super hard to grow some of your own! If you’re not sure about them, stop by your local farmer’s market this summer and grab a few and try roasting them. We think you’ll like them!
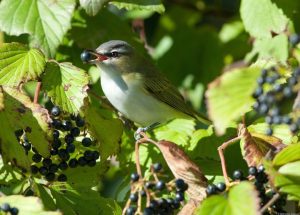
Backyard Bird of the Month: Red-Eyed Vireo
By Maine Audubon Field Naturalist Andy Kapinos
Here I am! Where are you? Way up here! In the tree! So goes the song of the Red-eyed Vireo, heard in nearly every forested area between Kittery and Fort Kent from May until early autumn. True neotropical migrants, Red-eyed Vireos spend the nonbreeding season in the Amazon Basin, especially in Colombia, Brazil, Venezuela, Ecuador, and Peru. Most depart South America during April, and over the course of a few weeks or a month, make their way up through Central America and the southeastern US, migrating on clear nights and refueling during the day by feasting on the abundance of newly-emerged insects. The first males can reach Maine by the first week of May, but the majority arrive in the second and third weeks, just in time for the emergence of leaves and insects in the canopy of our forests.
These canopy-dwellers are heard far more often than they are seen, and possess a huge vocal repertoire, combining various “syllables” into “phrases” that don’t repeat. In fact, there is often no similarity between the songs of males whose territories are right next to each other. While the males generally sing from treetops; Red-eyed Vireos forage and nest in the mid- and understory, and require forest habitat with layers of native shrubs and small trees. Their nests are usually built at these lower levels, with layers of foliage above to hide the nest from predators.
They raise their young on insects, especially caterpillars and other larvae, before eating increasing amounts of fruit later in the summer, which they subsist on throughout the nonbreeding season. The return of Red-eyed Vireos to their breeding territories in Maine is a yearly reminder that conserving healthy forest ecosystems is important not only here at home, but also in the neotropical forests where they spend the rest of their lives.
Mainely Dish: Rhubarb Muffins
By Alex Gayton, Assistant EFNEP Coordinator & Social Media Coordinator, Expanded Food Nutrition and Education Program (EFNEP), University of Maine Cooperative Extension
Visit EFNEP’s recipe website for the Rhubarb Muffins recipe and recipe video.
Growing up, my grandparents always had a rhubarb plant growing at their camp. I never really knew what it was. The one time I tried it, I remember not liking it because it was so tart. As an adult, I have learned that rhubarb is often paired with a sweeter ingredient, such as strawberries to help contrast the tartness. Where I live now, we have two large rhubarb plants that are growing in our yard that I haven’t ventured to use until this year because I didn’t know when to harvest or how to cook with rhubarb. I am excited to share this insightful information with you if you are new to using rhubarb like me.
Rhubarb is a cool-weather perennial that starts growing in early spring and will go dormant in the winter. Rhubarb can be commonly found in grocery stores or at farmers’ markets between April and June and can be harvested throughout the first half of summer. It is recommended to stop harvesting by August 31 to ensure that the plant has sufficient time to increase its nutrient storage to prepare for winter.
The rhubarb stalks can be harvested by pulling them with a twisting motion from the base or by cutting them right above the base. Be sure to remove the leaves and discard them since they are not safe to eat. Rhubarb contains vitamin A, vitamin C, thiamin, riboflavin, niacin, potassium, phosphorus, and fiber.
Before eating or cooking with rhubarb be sure to wash the stalks and cut the woody parts off the stalk. Our Rhubarb Muffin recipe calls for 2 cups of chopped rhubarb stalks, which is equivalent to about 2-4 stalks, depending on size. To help decrease tartness, this recipe calls for brown sugar. This recipe was a hit for my family, and another plus is that muffins are a great baked good to freeze. Make sure to use a freezer-grade container or zip-top plastic bag when freezing the muffins. Read our How to Freeze Rhubarb This Spring blog for more about food preservation of rhubarb.
Resources
- Bulletin #2514, Growing Rhubarb in Maine (UMaine Extension)
- Bulletin #4266, Vegetables and Fruits for Health: Rhubarb (UMaine Extension)
- How to Freeze Rhubarb This Spring (Spoonful Blog)
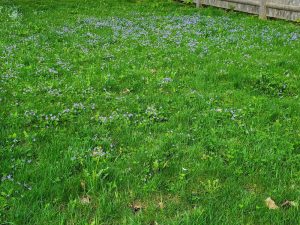
Ask the Experts Q&A: Low Mow or No Mow?
Response by Lynne M. Holland, Horticulture Professional
Q: I heard that no mow May is more harmful than reducing the amount of
mowing, or low mow May, which would increase the number of pollinator plants in the lawn… which is correct?
A: The answer to your questions of no-mow vs low-mow May is that “It depends”.
The purpose of both is to lessen the mowing in spring. By letting the grass grow a little before we are past the potential for frost we allow the pollinators who wintered in the “duff layer” of the lawn to get more time to begin their progression into the summer and give them protection should we have cold nights. In addition, many annual/perennial flowering weeds get a chance to bloom which provides food for the pollinators. In an especially dry spring in my yard, I don’t mow until about June 10th and I have forget-me-nots, bluets, dandelions, and clover blooming. There is even a patch of thyme that has flourished and when we mow, we mow around it.
The downside of waiting to mow is that in lawns that have been richly fertilized, there is the potential for such lush growth that when you mow you get thick clumps of grass that might then mold or have the potential for tick habitat.
If you have been regularly fertilizing your lawn, using a lawn service, or using a pre-emergent weed killer, then mow in May when the grass is 4″+ and mow higher (3″- 4″)/less often.
If you have a lawn that is “lean” (no lawn service/regular weed and feed applications) and don’t mind the look of a few “weeds” in the grass then go for No-Mow May and enjoy the rewards of pollinators and wildflowers. Then mow high and less often starting in June.
Alternatively, you might consider taking a more tidy approach in the more visible areas of your lawn while letting other areas get a little shaggy. Taking the “business in the front (yard), party in the back (yard)” approach can serve as a good compromise in more urban settings or where people in the same household have differing landscape management opinions. At our house, our side and front lawns are small but lush so we mow in May but the whole backyard is left to the pollinators.
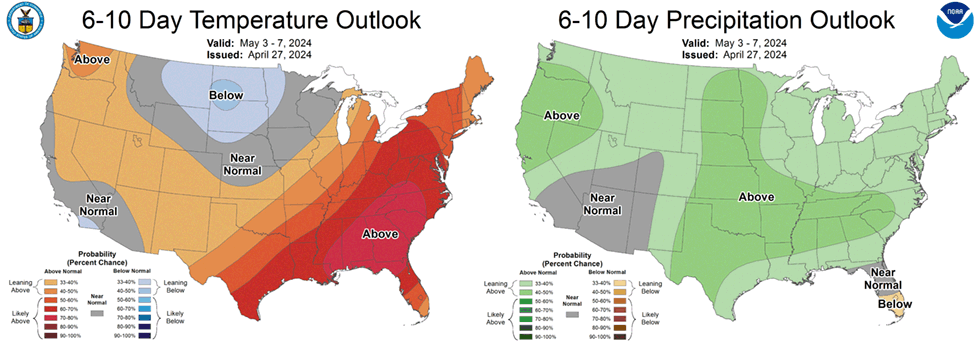
Maine Weather and Climate Overview (May 2024)
By Dr. Sean Birkel, Assistant Extension Professor, Maine State Climatologist, Climate Change Institute, Cooperative Extension University of Maine.
For a spring recap, March was warm and wet, ranking 9th warmest and 2nd wettest on average statewide for records beginning 1895. Prior to a snowstorm March 23–24 (with rain, sleet, and freezing rain along the coast), much of the state had an extended period of bare ground in March with the number of days without snow ranking in the top 10. Likewise, many lakes in the southern half of the state saw early ice-out, reminiscent of 2010 and 2012. The second half of March brought a cold wave and then near normal temperatures, which prolonged ice cover on lakes that had not already iced-out. April then brought generally seasonable temperatures and near normal precipitation for the first half of the month, followed by cooler temperatures and below normal precipitation. The current statewide hydrologic conditions are generally near normal, but with some indications of increasing dryness related to the early snowmelt and recent week of dry weather. Most groundwater measurements are in the normal range, but two sites, one in Kennebec and another in Aroostook, show below normal. Streamflows, which respond to recent conditions faster than groundwater, are measuring normal to much below normal for this time of year. The 6–10 day climate outlook covering the first week in May shows a lean toward above normal precipitation. The current 10-day weather forecast from weather.gov also shows potential for precipitation during that period.
| Product | Temperature | Precipitation |
|---|---|---|
| Days 6-10: May 3-7 (issued April 27) | leaning above normal | leaning above normal |
| Weeks 3-4: May 6-19 (issued April 26) | above normal | equal chance |
| Seasonal: May, June, July (issued April 18) | above normal | equal chance |
For questions about climate and weather, please contact the Maine Climate Office.
Do you appreciate the work we are doing?
Consider making a contribution to the Maine Master Gardener Development Fund. Your dollars will support and expand Master Gardener Volunteer community outreach across Maine.
Your feedback is important to us!
We appreciate your feedback and ideas for future Maine Home Garden News topics. We look forward to sharing new information and inspiration in future issues.
Subscribe to Maine Home Garden News
Let us know if you would like to be notified when new issues are posted. To receive e-mail notifications, click on the Subscribe button below.
University of Maine Cooperative Extension’s Maine Home Garden News is designed to equip home gardeners with practical, timely information.
For more information or questions, contact Kate Garland at katherine.garland@maine.edu or 1.800.287.1485 (in Maine).
Visit our Archives to see past issues.
Maine Home Garden News was created in response to a continued increase in requests for information on gardening and includes timely and seasonal tips, as well as research-based articles on all aspects of gardening. Articles are written by UMaine Extension specialists, educators, and horticulture professionals, as well as Master Gardener Volunteers from around Maine. The following staff and volunteer team take great care editing content, designing the web and email platforms, maintaining email lists, and getting hard copies mailed to those who don’t have access to the internet: Abby Zelz*, Annika Schmidt*, Barbara Harrity*, Kate Garland, Mary Michaud, Michelle Snowden, Naomi Jacobs*, Phoebe Call*, and Wendy Robertson.
*Master Gardener Volunteers
Information in this publication is provided purely for educational purposes. No responsibility is assumed for any problems associated with the use of products or services mentioned. No endorsement of products or companies is intended, nor is criticism of unnamed products or companies implied.
© 2023
Call 800.287.0274 (in Maine), or 207.581.3188, for information on publications and program offerings from University of Maine Cooperative Extension, or visit extension.umaine.edu.