Maine Home Garden News — May 2019
- May Is the Month to . . .
- The Economics of Starting Seeds Indoors
- May Is Lyme Disease Awareness Month
- 2019 Spring Plant Sale Fundraisers in Maine: Find One Near You!
- Cecropia and the Dangers of Introduced Species
- American Hazelnut: A Low Maintenance Shrub with Big Rewards
- Passport to Summer Fun Project
- Food & Nutrition: Food Safety and Infused Water
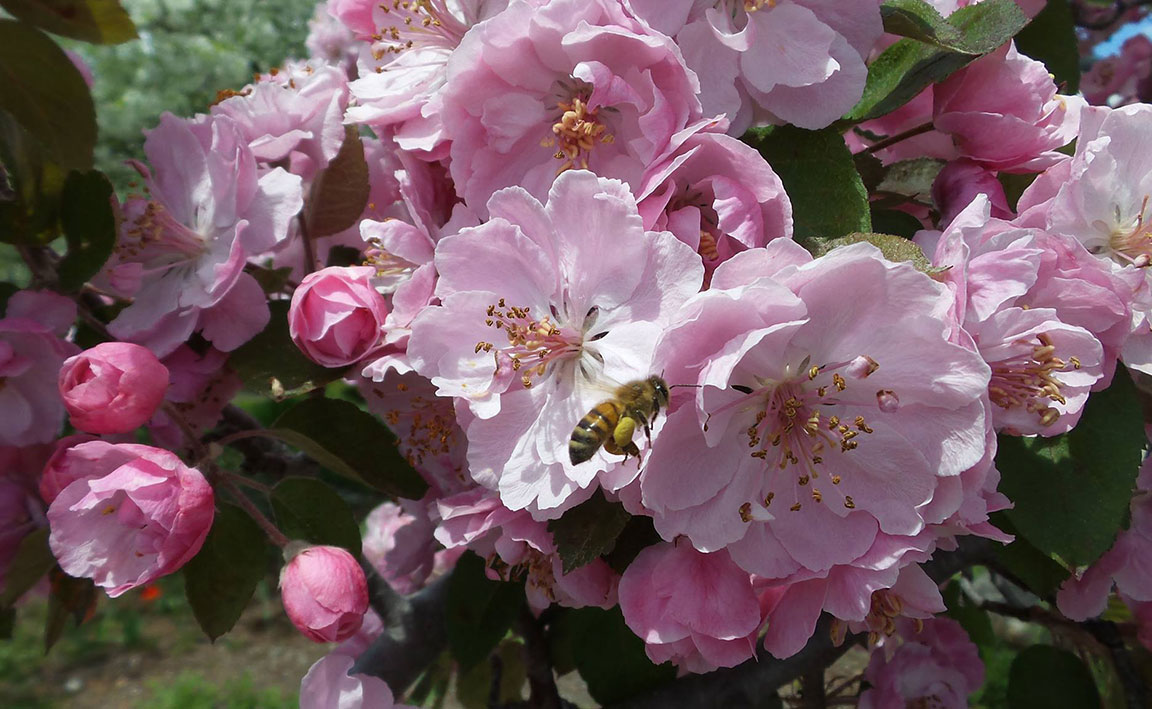
May Is the Month to . . .
By Tori Lee Jackson, Extension Educator, Agriculture & Natural Resources in Androscoggin and Sagadahoc Counties

- Get ready to transplant cool season crops (ex: brassicas, onions, leeks, spinach, etc.) into your garden by hardening them off and moving them outside once daytime temperatures are reliably above 45 degrees F.
- Start your warm season crops (tomatoes, peppers, and cucurbits) indoors for transplanting in mid-June, once the threat of frost has passed.
- Build raised beds to reduce the amount of bending you need to do to maintain your garden. Watch Extension Educator Frank Wertheim in these videos for instructions, and download a diagram and materials list to get started.
- Plan for a healthy gardening season by making sure your tools are clean, sharp, and designed for a full season of comfortable use. Consider a 3- or 4-wheeled wheelbarrow to make hauling materials easier on your back. Be sure you have well-fitting gloves, sunscreen, and insect repellant that hasn’t expired, and a sun hat that keeps your face and neck in the shade. For more healthy and accessible gardening tips, check out Maine AgrAbility.
- Finish up your spring pruning. For an overview of pruning woody plants, check out Bulletin #2169, Pruning Woody Landscape Plants, which includes diagrams, videos, and explanations of how, when, and why to prune. For some more specific options, you may also watch these videos:
- Consider a University of Maine Cooperative Extension workshop, class or event to keep up to date on new techniques.
- Identify any new plants in your landscape by submitting photos with our new Plant Identification Submission Form!
- Plan to combat food insecurity in your community with your excess garden vegetables by donating through Maine Harvest for Hunger.
- Keep a close eye out for ticks! If you find a tick on yourself or a pet, the University of Maine Cooperative Extension Tick Lab can identify the species (free) and test any suspicious ticks for diseases ($15) so you can quickly treat any tick-borne diseases.
- Be careful around any suspected Browntail Moth caterpillars or places where their shed skins and hairs may have accumulated. This year, 2019 is expected to be a particularly bad year for this pest.
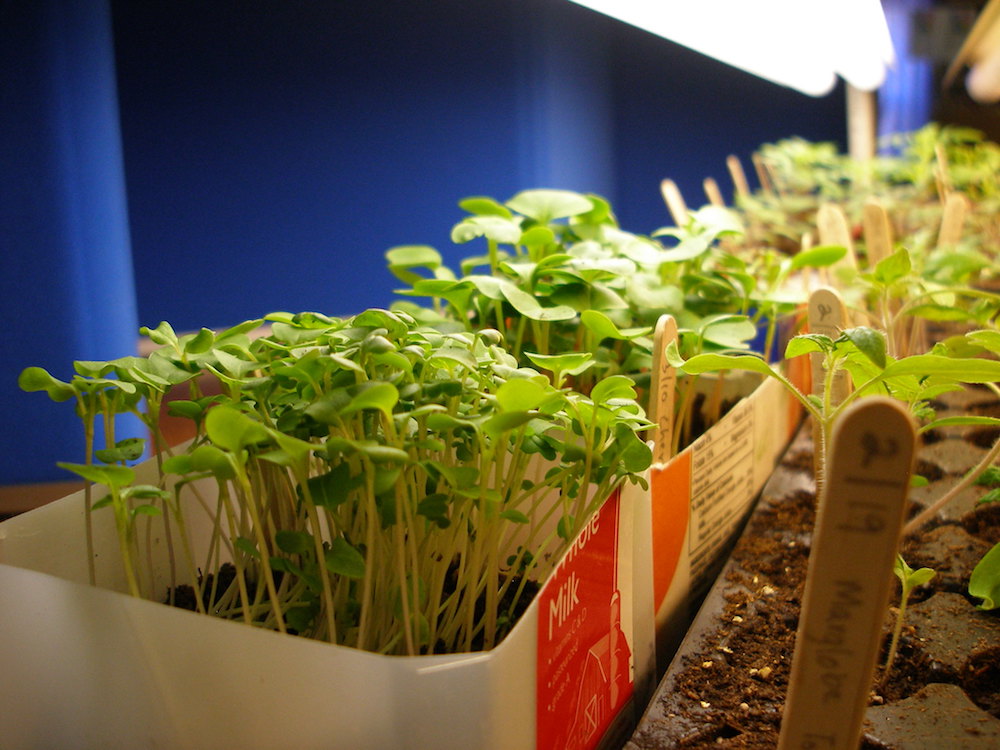
The Economics of Starting Seeds Indoors
By Bryan J. Peterson, Assistant Professor of Environmental Horticulture, UMaine School of Food and Agriculture
The winters of Maine sometimes seem to stretch impossibly long. Through the darkest months, the cold is punctuated by glimmers of warmth that melt snowbanks, which lend a premature hope that spring is finally on its way. I fall for it every time. But, it is not until April that the last of the snow is expected to land, and the last frost may not occur until the end of May in the warmest parts of the state, or as late as early July in the coolest parts of northern Maine.
Given our long winters, and too-short summers, when and how should you start growing your yearly garden? Three obvious choices are available:
1) Garden centers, greenhouses, and nurseries sell vegetable seedlings and annual bedding plants that you can purchase and transplant outdoors once the danger of frost has passed. Purchasing seedlings is a good choice for many crops, especially those for which you only want a few plants or for which you find seed starting difficult. However, it can be expensive for larger gardens, especially when canning large amounts of produce is your goal.
2) You might choose to buy seeds and sow them directly into the garden once the weather allows. This approach can be especially useful for cool-weather crops, like spinach and lettuce, which can tolerate some frost. For warm-weather crops, starting seeds outdoors after the danger of frost has passed may work for those with few days to maturity, but crops like tomatoes, peppers, and some melons are unlikely to yield before the fall cold arrives if directly sown outdoors so late.
3) This leaves the final option, which is to sow seeds indoors ahead of time, and transplant them to the garden once the danger of frost has passed. For people who grow large gardens, gain satisfaction from starting their own seedlings, or desire the diverse varieties that cannot be found in garden centers, starting seeds indoors might make the most sense. Maybe starting seeds indoors can even save some money vs. buying transplants! Let’s take a closer look at this last point from a financial perspective, by estimating expenses one at a time.
Seeds
You have a couple of choices when it comes to seeds. Open-pollinated seed cultivars, commonly sold as heirloom varieties, are a good choice for many gardeners due to their tried-and-true reputations and incredible flavor. At Johnny’s Seeds (no endorsement intended), an heirloom variety like Brandywine cost $4.55 for 40 seeds (11.3 cents per seed) or $6.40 for 250 seeds (2.6 cents per seed).
In contrast, you may choose to invest in hybrid seeds, which carry a premium price tag. Why? Because every hybrid seed for sale required someone to pollinate one specific variety with another—usually by hand—while excluding pollen from any other varieties. At Johnny’s, seeds of the hybrid tomato variety Defiant PhR cost $5.45 for 15 seeds (36.3 cents per seed) or $58.73 for 250 seeds (23.5 cents per seed). That may seem like a lot of money, but this particular hybrid may be well worth the price, if you are concerned about yield and resistance to late blight, fusarium, verticillium, or early blight.
You can theoretically save the seeds from your plants year after year. Implementing this successfully can be an incredible challenge, because only seeds of “open-pollinated” varieties (e.g., heirlooms) will come true-to-type year after year. For these, you still need to keep the flowers of the desired variety isolated from those of other cultivars. For example, if pollinators carry pollen from an Amish Paste tomato plant to a Brandywine tomato plant from which you plan to save seeds, you’ll end up saving seeds that produce unpredictable, and possibly undesirable, plants the following year. To save desirable seeds, your heirloom plant can only receive pollen from another plant of the same variety.
In the examples above, I gave prices for two sizes of seed packets, and you can see the cost per seed decreases when you buy in bulk. For many of us, it still pays to purchase small packets and resist the urge to sow dozens of seeds of every crop and variety when all we really need are a few! For those varieties you know you will continue to grow in coming years, you may wish to buy seeds in bulk (i.e., larger packets) and store extra seeds in the freezer—yes, the freezer! Seed packets of both hardy and tender species can be frozen without damage, and the cold keeps the seeds viable for a very long time. Another option to consider is coordinating seed purchases or seed swaps with gardening friends.
Containers
Seeds are typically started in plastic flats, grown for a couple weeks, and then transplanted to larger containers as they grow. Such containers may seem like a big expense. For example, a pack of five plastic 72-cell seedling flats from Johnny’s cost $16.95. Really, this translates into a per-flat cost of $3.39, or only 4.7 cents per individual seedling cell. Another option that’s easy to find at nearly any grocery or department store are aluminum lasagna pans. They’re inexpensive, easy to clean and re-use, easy to punch holes in for drainage, and often come with a lid to help maintain high humidity during early growth.
After a couple weeks, you can transplant the strongest seedlings into individual pots. For example, Johnny’s sells 18-count packs of 3.5” x 3.5” plastic pots for $15, or 84 cents per pot. You can also save money by repurposing small household containers like soda bottles, water bottles, or yogurt containers (be sure to drill holes in the bottom!), or by saving old pots for reuse.
Media
A good germination medium for most plants is a fine-textured mixture that includes an organic component (usually peat moss) and a mineral component (usually perlite or vermiculite). Johnny’s sells a germination mix for $16.33 for a 20-quart bag, which will fill about 3 standard seedling flats (about 10” x 20” x 1.5” each). If you are filling a 72-cell seedling flat, a conservative estimate comes out to a cost of $5.44 worth of medium per flat, or 7.5 cents of medium per seedling cell. When you transplant to larger pots, a 3.5” x 3.5” pot holds 40 cubic inches of medium, for a cost of 60 cents of medium per pot.
Light fixtures
If you are fortunate enough to have a large south-facing window in your home, or enough small windows to line up the flats you’ll need, you might not need additional lights. If sufficiently bright windows are hard to come by, and they usually are in Maine, you will probably need supplemental lighting. Keep in mind that what seems bright to us is not the same as bright to a plant—a plant needs to receive enough light for photosynthesis, the process that it needs to grow. Too little light leads to weak, spindly seedlings that stretch toward the window and are difficult to transplant.
If you visit a store, you are likely to find a bewildering array of lights and shelves to which they can be mounted. Some suppliers, like Johnny’s, offer light-and-shelving packages for seed starting, with prices ranging from $94.21 for a 4’ stand holding a single-bulb fluorescent light, which can accommodate two flats oriented lengthwise, to more than $1,000 for a four-shelf stand with four bulbs per shelf and a capacity of 16 flats. For this reason, the lighting cost per flat can vary considerably, depending on the cost of the fixture, bulb longevity, number of flats accommodated, and the lifespan of the fixture. As an example, let’s choose a mid-range setup from Johnny’s ($488) that accommodates six flats across three shelves containing two bulbs per shelf, and estimate the lifespan of the fixture to be 10 years. We arrive at a fixture cost of $8.13 per flat per year, or 11.3 cents per seedling in a 72-cell flat; this increases to 45.2 cents per final transplant if only six trays of 3.5” transplants (108 pots total) are retained to the final transplant date.
Electricity
A 120-watt fixture like that described above will use about 2 KwH of electricity per day, if it operates for 16 hours each day. This means that operating all the lights of the fixture described for about six weeks per season would use 84 KwH of electricity, or 14 KwH per flat. At average Maine electricity rates, that translates into about $1.50 per flat, or about 2 cents per cell of a 72-cell flat; this increases to around 8 cents per final transplant if they are repotted into 3.5” square pots along the way.
Water
Water is a negligible expense for seed starting, based on a rate of $3.52 per 100 cubic feet, or ½ cent per gallon. According to research by Dr. Stephanie Burnett, associate professor of Environmental Horticulture at the University of Maine, along with her colleagues from the University of Georgia, petunias grown in 4” pots required only half a gallon of water over 40 days in a greenhouse. If we assume a generous use of one gallon per final transplant, water will cost a mere ½ cent per transplant.
Fertilizer
Fertilizer is a minimal expense for most seed starting, if a good quality medium is selected. In general, high rates of fertilizer should not be applied to seedlings, because gardeners do not want to produce rapid shoot growth indoors. If fertility is too high, seedlings tend to produce soft, leggy growth and respond poorly to transplanting. Instead, the goal for seed starting is to produce robust seedlings with strong root systems, which does not require much fertilizer over the several weeks indoors. In fact, seeds started in a medium that contains sufficient nutrition (e.g., Johnny’s 512 Mix), may not need additional fertilizer until after they are planted out into the garden.
Label stakes
Wooden label stakes can be purchased for seedling transplants, with a price tag of about $4.00 for 20 stakes. If you want each transplant labeled with its own stake, this works out to an added cost of about 20 cents per transplant. You can write on these stakes with pencil, which will not run when wet or fade in the sun. Jotting down the variety name and seeding date on a piece of masking tape wrapped around a pot is a very inexpensive alternative to individual labels. However, this still leaves you needing labels for the garden or having to draw a map to note where each variety is planted.
Summary of the costs
Below are rough estimates for the cost-per-plant to produce 18 heirloom tomato transplants indoors, under grow lights. Calculations assume that the gardener wishes to plant out a single flat of tomatoes in 3.5″ pots, with other crops started in the remaining space of a six-flat shelving and light setup. Estimates further assume that half of a 72-cell flat is dedicated to germinating tomato seeds, but only the strongest 50% of seedlings are potted into 3.5” square pots, for a final count of 18 pots of tomato transplants in one standard plastic flat.
Seeds: 5.2 cents per final transplant, assuming 2.6 cents per seed and 50% loss between sowing and planting out
Containers: 93.4 cents per final transplant, assuming 50% loss between sowing and planting out
Growing media: 67.5 cents per final transplant, assuming 50% loss between sowing and planting out
Light fixture: 45.2 cents per final transplant, assuming 10-year fixture life
Electricity: 8 cents per final transplant, assuming 6 weeks of light and 50% loss between sowing and planting out
Water: 1 cent per final transplant, assuming 1 gallon each
Fertilizer: 4.7 cents per seedling, assuming one dose of fish emulsion
Label stakes: 20 cents per seedling, assuming one stake per final transplant
Grand total: $2.45 per 3.5” tomato transplant
Ideas to trim seed-starting expenses
Grow seedlings for a shorter period and don’t re-pot from flats into larger pots; sow seeds judiciously with only a modest over-sow to account for poor germination; put leftover seeds into the freezer to preserve them; use repurposed containers to grow seedlings; use tape to label pots; skip the lights (only practical if you have a sunny window), and only start seedlings indoors when necessary (limited to crops and varieties that don’t require long growing seasons).
Conclusions
Starting seeds indoors might save you money, or it might not. One thing’s for sure… seed starting is not an undertaking for the faint of heart! The time involved is considerable, and diligence is demanded if you want your transplants to survive, and thrive, to transplanting time. What you really get for the effort—the real reason you should consider starting your own seeds—is that you have the freedom to decide which varieties go in your garden, without being limited by the selection that happens to be available at the garden center. And, let’s face it, if you are the dedicated gardener who diligently starts your own seeds each year, it was probably never really about the money!
More Information
UMaine Extension Bulletin #2751, Starting Seeds at Home by Marjorie Peronto, Associate Extension Professor, and Theresa Guethler, Extension Master Gardener, provides more background on the supplies and steps needed to start seeds indoors.
Reference
van Iersel, M., S. Burnett, and J. Kim. March 2010. How much water do your plants really need? Greenhouse Management.
May Is Lyme Disease Awareness Month
By Maine Department of Health and Human Services, Maine Center for Disease Control and Prevention
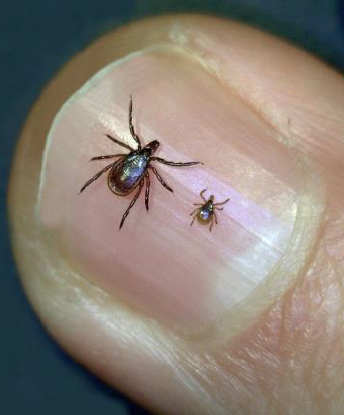
Warmer weather is on its way, which means that everyone needs to be doing their part to help prevent tickborne diseases. Providers reported over 1,400 cases of Lyme disease in 2018 (preliminary data as of 3/25/19). May is Lyme Disease Awareness Month each year in Maine—the perfect time to remind everyone to be “Tick Aware and Tick Alert” when spending time outdoors since ticks are most active in warmer weather.
Lyme disease is treatable and most individuals recover completely with proper treatment, however easiest way to avoid tickborne diseases is prevention. This May, please remember to be “Tick Aware and Tick Alert”:
- Use caution in areas where ticks may be found;
- Wear light-colored clothing that covers arms and legs;
- Use an EPA approved repellent such as DEET, picaridin, IR3535, and oil of lemon eucalyptus; and
- Perform tick checks daily and after any outdoor activity on yourself and pets. Taking a shower after exposure to a tick habitat is an effective way to wash off any unattached ticks and provides a good opportunity to do a tick check.
Lyme disease is caused by a bacterial infection that is passed through the bite of an infected deer tick. Adults over the age of 65 years and children between the ages of 5 and 15 years have the highest rates of the disease in Maine. Individuals that work and play outside are more likely to be exposed to ticks. Ticks must be attached for 24-48 hours before they can transmit the bacteria that can cause Lyme disease. Proper tick checks will allow you to find and remove ticks before getting Lyme disease.
If you are bitten by a tick or spend a lot of time outdoors, make sure to monitor for symptoms for up to 30 days after exposure. Also be sure to call your healthcare provider if symptoms develop. The most common symptom of Lyme disease is a skin lesion called erythema migrans (EM), better known as the “bull’s-eye” rash. This usually appears 3-30 days after the tick bite. Other symptoms include fever, headache, and joint or muscle pain.
Lyme disease is not the only disease that can be carried by deer ticks in Maine. Anaplasmosis, babesiosis, Borrelia miyamotoi, and Powassan are other tickborne infections found in Maine. The number of provider-reported human cases of anaplasmosis, babesiosis, and Powassan decreased in 2018 while reported cases of Borrelia miayamotoi increased slightly. All four remain a public health concern for the Maine Center for Disease Control and Prevention (Maine CDC).
While the deer tick is the only species of tick in Maine that can pass the bacteria that causes Lyme disease, there are a number of other species of ticks found across the state. Tick identification is important, especially when removing ticks. There are tick identification resources available to order at the Maine CDC website. The University of Maine Cooperative Extension Tick ID Lab also offers identification and testing services as well as educational references.
Resources:
- Maine CDC has Lyme disease information available on its website.
- Lyme disease data is available through the Maine Tracking Network (under EPI Information on the left hand side of the page).
- University of Maine Cooperative Extension Tick ID Lab submission instructions can be found at their website.
- For additional questions, please call Maine CDC at 1.800.821.5821 or email disease.reporting@maine.gov.
- Tickborne videos can be found on the Maine CDC website.
2019 Spring Plant Sale Fundraisers in Maine: Find One Near You!

Buy local plants; help a local cause!
Are you starting to get excited about gardening? Do you wish there was a place to find all of the plant sales happening around the state? Well, some of our fine Master Gardener Volunteers pulled together a fantastic list, which we used to create an interactive map showing the locations of more than 40 plant sales coming up in the next few weeks. View the map and mark your calendars!
If you don’t see your group listed, please email lynne.holland@maine.edu with the information for your sale so it can be added to the map.
Cecropia Moth and the Dangers of Introduces Species
By Leala Machesney, Environmental Horticulture Student at the University of Maine

The cecropia moth (Hyalophora cecropia) is one of the most impressive North American insects. A member of the silk moth family, Saturniidae, the cecropia moth has a wingspan of up to 6 inches, making it the largest moth in North America. Their native range in the United States extends from Maine down to Florida, and west to the Rocky Mountains. Insects can be easily identified by their soft, red, and white abdomens and large feathery, or plumose, antennae. Males tend to have larger antennae that aid them in detecting sex pheromones produced by female cecropia, while female moths have larger abdomens than their male counterparts.

Cecropia caterpillars have five instars: developmental stages when the caterpillar sheds its exoskeleton. Size and coloration of the cecropia caterpillars changes with every instar. The first larval instar is completely black, with small spine-like protrusions extending outward from its body. After approximately a week, the caterpillar molts into its second larval instar. This second instar is larger, and possesses either a bright yellow or dark yellow body. Molting continues until the the fifth instar, which is the final instar of the cecropia moth life cycle. At this point, the caterpillar has a blue-green body and can be up to 4.5 inches in length. Bulbous red, yellow, and blue protrusions decorate the larva. The caterpillar will form a cocoon in late summer on host plants that will serve as an overwintering structure. A wide variety of plants can serve as hosts for this species, including paper birch, red maple, oaks, and American hazelnut. Caterpillars will pupate in this cocoon and emerge the following spring as adult moths.
Cecropia caterpillars in the Northeastern United States have an unusual behavior—they’ll either spin a large fluffy, baggy cocoon or a tight, compact cocoon. This cocoon dimorphism is not exhibited outside of the Northeastern United States. In the Midwest, caterpillars will spin compact cocoons over 99% of the time. The offspring of two parent cecropia moths that had both spun baggy cocoons to pupate may or may not spin a baggy cocoon itself, leading researchers to conclude genetic factors do not determine the cocoon type a caterpillar will spin. Instead, it’s believed this is a type of bet-hedging behavior. Baggy cocoons retain more moisture than compact cocoons and act as heat sinks. Because of this, they are better suited to unusually dry or cold springs that may occur the following year. This strategy ensures that at least some offspring will survive unpredictable weather the following spring and reach adulthood.
If you believe cecropia moths aren’t as common as they once were, a parasitoid fly introduced to control invasive species may be to blame. Compsilura concinnata is a tachinid fly that deposits its young inside the larvae of other insects; particularly moths and butterflies. The larvae of C. concinnata live inside a host larva and will consume the insect, inevitably resulting in the death of the host. The majority of C. concinnata releases were aimed at controlling gypsy moth populations. These releases continued until 1986, despite strong evidence that C. concinnata was parasitizing a large number of native butterfly, moth, beetle, and bee larvae. While C. coninnata may be here to stay, its introduction should serve as a cautionary tale of the dangers of reckless introduction of non-native species.
References
Guerra, P. A., & Reppert, S. M. (2017). Dimorphic cocoons of the cecropia moth (hyalophora cecropia): Morphological, behavioral, and biophysical differences. PloS One, 12(3), e0174023.
Reddy, N., & Yang, Y. (2010). Structure and properties of cocoons and silk fibers produced by hyalophora cecropia. Journal of Materials Science, 45(16), 4414-4421.
Boettner, G. H., Elkinton, J. S., & Boettner, C. J. (2000). Effects of a biological control introduction on three nontarget native species of saturniid moths. Conservation Biology, 14(6), 1798-1806.
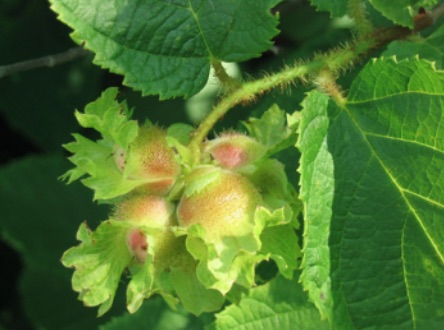
American Hazelnut: A Low Maintenance Shrub with Big Rewards
By Leala Machesney, Environmental Horticulture Student at the University of Maine
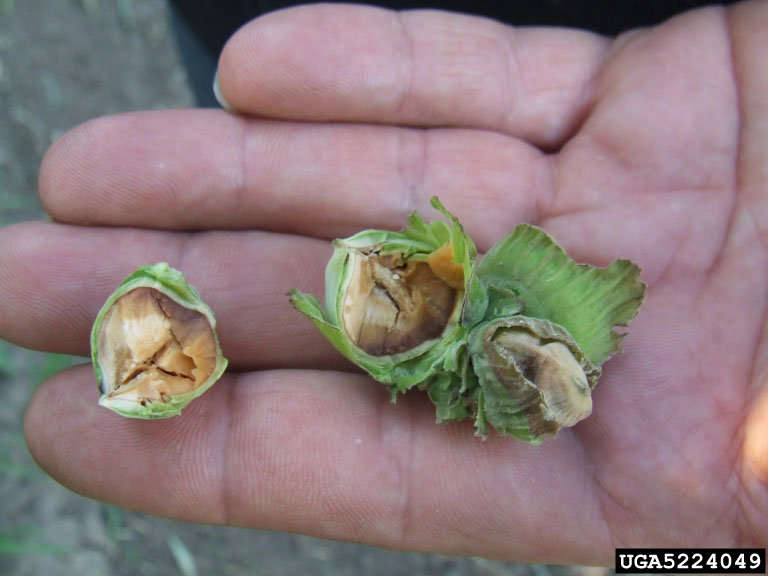
American hazelnut (Corylus americana) is a native shrub that is incredibly valuable to North American wildlife. Many moth and butterfly larvae feed on American hazelnut. Some, like the moth Bucculatrix fugitans, feed exclusively on American hazelnut foliage. Elongated male catkins form in early spring that release pollen and are a favorite food of ruffed grouse. American hazelnuts are monoecious—both male and female flowers are present on the same plant—but the female flowers are small and fail to attract the attention of many herbivores. While fruit will set with just one shrub, yield will be greatest with cross pollination between multiple shrubs placed in close proximity. The nuts mature in July or August and are protected by an attractive fringed bract called an involucre. Squirrels, deer, turkey, pheasants, and woodpeckers are as fond of the nuts as humans.
Shrubs will tolerate part shade. If fruit production is important, plants should be placed in full sun and well-draining soil. American hazelnut’s spreading habit may be undesirable in some landscapes, but it’s an easy task to remove root suckers if you’re trying to maintain a hedge. The fall foliage, although variable in color, can be remarkable hues of orange, red, or purple. Because American hazelnut is hardy from zones 4 to 9, winter cold is no obstacle to growth in most of Maine. These plants are highly resilient and require little management for pests and disease. Occasionally, a shrub may contract blight gall, crown gall, or leaf spots. Eastern Filbert Blight (EFB), a disease that has been devastating to common hazelnut growth in this country, is not a major disease of American hazelnut.
If you’ve ever eaten a hazelnut, chances are you’ve had the fruit of the common hazelnut (Corylus avellana). American hazelnuts and common hazelnuts taste very similar, but the common hazelnut is native to Western Asia and Europe and produces a larger nut more suited to commercial production. When common hazelnut was introduced to the eastern United States, plants were quickly colonized by the fungus Anisogramma anomala, the causal agent of EFB. American hazelnut was the initial host of A. anomala, and over centuries the shrub gained resistance to colonization. Plants infected with A. anomala generally survive with a small amount of stem cankering. However, the susceptible common hazelnut shrub will develop severe cankering and will eventually succumb to the fungus. Because of the presence of A. anomala and its host, American hazelnut, in eastern states, common hazelnut production was moved to Washington and Oregon. Production thrived there until the 1960’s, when EFB was confirmed on a plant in Washington and the disease quickly spread. Ever since, plant breeders have investigated hybridization between the two species to produce a hazelnut with the fruit quality of common hazelnut and the resistance to EFB American hazelnut boasts. By growing our own native shrub, Mainers can enjoy a harvest of hazelnuts while welcoming beautiful birds like ruffed grouse and pheasants to their properties without the fear of management for the devastating disease EFB.
References
Cullina, W., & New England Wildflower Society. (2002). Native trees, shrubs, and vines: A guide to using, growing, and propagating north american woody plants. Boston: Houghton Mifflin.
Molnar, T. J., Goffreda, J. C., & Funk, C. R. (2010). Survey of corylus resistance to anisogramma anomala from different geographic locations. Hortscience, 45(5), 832-836.
Eastern filbert blight — A threat to hazelnuts. (n.d.).
HOSTS — The Hostplants and Caterpillars Database at the Natural History Museum. (n.d.).
Corylus americana, Missouri Botanical Garden Plant Finder. (n.d.).
Passport to Summer Fun Project: A Ticket to Learning, Community Engagement, and Healthy Habits
By Trisha Smith, Community Education Assistant, Home Horticulture, University of Maine Cooperative Extension, Piscataquis County

The “Piscataquis Passport to Summer Fun” project began in 2017 to incentivize participation in the free summer meal program held at the SeDoMoCha school in Dover-Foxcroft. The collaborative effort led by Healthy Piscataquis (now Piscataquis Regional Food Center) and UMaine Cooperative Extension has since evolved into an even larger program focused on motivating kids and their families to engage with various community agencies, events, and learning opportunities that support positive youth development and aim to reduce potential food insecurity and summer learning loss.
How it works:
Youth ages 5-18 are enrolled in 4-H and issued a personalized, laminated “Passport to Summer Fun,” which they take with them on their explorations of the community, to be stamped or signed at selected events and locations. Younger siblings may participate, but won’t be considered 4-H’ers. Youth who sign up by June 3, 2019, will receive a passport that they can have stamped at the:
- SeDoMoCha school garden
- Thompson Free Library
- Dover Cove Farmers Market (DCFM)
- SeDoMoCha Middle School free summer meal site
- Mayo Regional Hospital free summer meal site.
This year we’ll also be collaborating with the Piscataquis Soil and Water Conservation District on an “Adventures in Nature Series” at the District’s Law Farm and there will be more events posted as we get closer to summer vacation.
One of the most popular features of the passport project is the Veggie Vouchers. Each time the participants have their passports stamped at DCFM, they’ll receive $5 in Veggie Vouchers (up to $30) to purchase fresh fruits and vegetables at DCFM. Veggie Vouchers are supported by the Piscataquis Regional Food Center, the Piscataquis Extension Association Executive Committee, and Farm in the Woods. Youth will also find a new series of enrichment activities at the market this year coordinated by a Master Gardener Volunteer.
In the past two years, 76 youth enrolled in the passport program and approximately $400 in veggie vouchers were redeemed at the market. The project is a collaboration between the University of Maine Cooperative Extension 4-H and Master Gardener Volunteers and a collection of community partners. Thanks to their efforts, we’re seeing more engaged kids at the market, out in nature, and in the garden!
The model is flexible and scalable for other locations to feature their own local and neighborhood resources. Contact Trisha Smith at trisha.smith1@maine.edu to learn how to get involved or to create a program like this in your community.
Food & Nutrition: Food Safety and Infused Water
By Kathy Savoie, MS, RD, Associate Extension Professor, UMaine Extension Cumberland County
 With no added sugar and virtually no calories, water flavored with fresh fruit, also known as infused water, has become a popular way to increase water intake. It is also a creative and healthy way to use leftover fruit. However, if the fresh produce is not properly prepared, it may increase the risk of someone catching a foodborne illness.
A recent study conducted by Callejon and colleagues has found that of all foodborne outbreaks that occurred in the U.S. between 2004 and 2012, incidences caused by fresh produce ranged from 23 to 60 per year. According to the US Department of Agriculture (USDA), fresh-cut fruit is considered potentially hazardous. When fruit and vegetables are fresh-squeezed or used raw, bacteria from the produce can get into your juice, including your infused water. With this in mind, it is important to handle fresh fruit safely when making infused water. Follow these tips for food safety.
How to prepare fresh fruit infused water safely:
- When buying fresh fruit, inspect produce thoroughly for intactness and choose fruit without any bruises or damage.
- When buying pre-cut fresh fruit, such as watermelon cubes, only choose refrigerated items or items surrounded by ice.
- Before preparing, wash hands thoroughly with soap under warm running water for 20 seconds.
- Ensure water is safe to drink or use bottled water purchased from a licensed and reputable source.
- Store infused water in a clean and sealed container.
- Date the infused water container and refrigerate it at a temperature of 40 degrees F or lower if you have any infused water leftover. Refrigerate leftover infused water within 2 hours.
- Fresh infused water should be stored in a tightly covered container in the refrigerator for about six days. Prior to drinking, be sure to inspect the water for any spoilage.
Keep cross-contamination in mind!
- In the market, be sure to bag fresh fruit separately from raw meat, poultry, and seafood to prevent cross-contamination.
- Store fresh fruit in a clean container on the shelf above raw meat, poultry, and seafood.
- If you handle raw meat, be sure to wash hands properly before preparing fresh fruit.
- Use separate cutting boards for fresh fruit and raw meat.
University of Maine Cooperative Extension’s Maine Home Garden News is designed to equip home gardeners with practical, timely information.
Let us know if you would like to be notified when new issues are posted. To receive e-mail notifications fill out our online form.
For more information or questions, contact Kate Garland at katherine.garland@maine.edu or 1.800.287.1485 (in Maine).
Visit our Archives to see past issues.
Maine Home Garden News was created in response to a continued increase in requests for information on gardening and includes timely and seasonal tips, as well as research-based articles on all aspects of gardening. Articles are written by UMaine Extension specialists, educators, and horticulture professionals, as well as Master Gardener Volunteers from around Maine, with Katherine Garland, UMaine Extension Horticulturalist in Penobscot County, serving as editor.
Information in this publication is provided purely for educational purposes. No responsibility is assumed for any problems associated with the use of products or services mentioned. No endorsement of products or companies is intended, nor is criticism of unnamed products or companies implied.
© 2019
Call 800.287.0274 (in Maine), or 207.581.3188, for information on publications and program offerings from University of Maine Cooperative Extension, or visit extension.umaine.edu.