Lesson 3. Fencing Systems — Appendix B
A Stronger Brace: It’s Less Expensive and Easier to Build, Too!
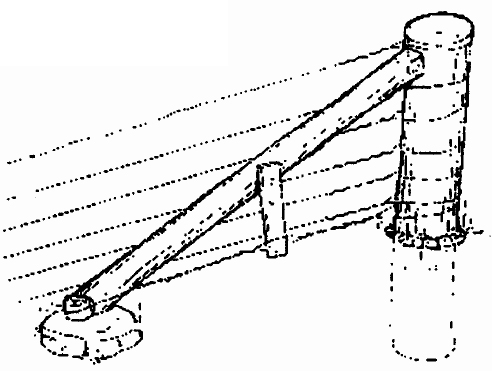
The following is a brace design that is less expensive and a bit easier to build. It’s called a Diagonal Strainer. This design has been tested and compared to a standard “H” brace on clay soils. The diagonal strainer was 8% stronger than the “H” brace. The brace failed at a load of 8400 pounds (that’s over 5 times the load you’d be likely to use on a 7 wire high tensile fence).
To build this brace you’ll need the following materials and tools:
Materials
- 2 — 8-foot-high quality pressure treated posts
- 1 — 4” x 3/8” brace pin
- 1 — twitch stick or (1) in-line strainer
- 20 feet of 12-1/2 gage high tensile steel fence wire
- 1 — rock (the rock should have a flat side at least 6” x 8”)
Tools
- Post hole digger & rammer
- 3/8” drill (or a chisel)
- Hammer
- Chain saw
Here’s How You Build It
- Dig a post hole 4 feet deep (for every 6 inches you set a post beyond 3 feet you double the strength of the post). Place the post against the side of the hole closest to the source of stress. Make sure that this side of the hole is straight so that the post fits flush against it. This will provide a solid surface to pull against and leaves only 3 sides of the hole to pack.
-
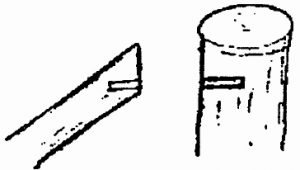
3/8-inch holes 2 inches deep in post and stay. Once the post is set, drill a 3/8” hole, 2 inches deep, 4 inches from the top of the post. The hole should face the direction of strain on the fence. If your post hole is less than 4 feet deep you’ll either need a longer stay-bar or have to drill the hole lower on the post. The stay-bar should be at least twice as long as the height of the hole drilled in the post.
- Saw the end of the stay-bar so that it fits flush against the post. Drill a 3/8” hole, 2” deep in the end of the stay-bar.
- Hammer the brace pin into the hole in the post. Slide the stay-bar on to the exposed pin. (As an alternative to brace pins, you can saw the stay-bar so that it fits into a 1/2” deep mortise chiseled into the post. This would replace steps 2-4.)
- Find a rock or other solid object with a flat surface and place it on the soil surface under the end of the stay-bar in the direction of strain. Do not bury it.
- Cut the bottom of the stay-bar so that it fits flush on the rock.
- Take a half-round wood scrap and place it at the end of the stay-bar on the rock.
- Loop the high tensile wire around the base of the post and around the end of the stay-bar on the rock. Fasten the wire to itself using a figure “8” knot or nicopress sleeves.
- Insert the twitch stick and make several wraps in the wire until the wire is tight. An in-line strainer can be used instead of a twitch stick.
The force on this post is transferred through the stay-bar to the ground. It looks weird but it makes a solid brace.