By Barbara Harrity, Penobscot County Master Gardner Volunteer
After the rush of the last few months, as you planned and planted, you may want to take a bit of a breather in July before the whirlwind of late summer harvesting, processing, and tidying starts. So I’ll start July’s to-do list with advice from 2011’s Maine Home Garden News:
Get a comfortable garden chair, put it in your garden, and sit in it often.
Much remains to be done, however, so after a refreshing pause, here are a few other things you might want to consider tackling:
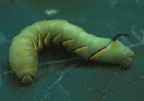
Hornworm; photo by J. Dill
Scout for and remove insect pests. Look for adult potato beetles, their bright orange egg masses, and their red, soft-bodied larvae. Watch for hornworms on your tomatoes or even peppers and eggplant.
Remove young weeds. Summer weeds can quickly overwhelm a vegetable garden, so learn to recognize them as very young plants, when you can control them easily. If left to mature, many weeds can produce hundreds of seeds per plant and become an even greater problem next year.
Plant crops for a fall harvest. Beans, beets, broccoli, cabbage, carrots, leafy greens, turnip, summer squash, cucumber, and peas are among the crops that can be planted in July. While you’re at it, plan ahead to use season extension strategies this fall. See Bulletin #2752, Extending the Gardening Season.
Sidedress vegetables, such as tomatoes and corn, as they begin to set their crops. Never add fertilizer to bone-dry soils. Either water it in or add it when the soil is already moist.
Harvest and enjoy garlic scapes. UMaine Extension research has shown that bulb size is reduced by up to 54% if scapes are not removed. Garlic scape pesto is a quick and delicious dinner on a warm summer evening.
Propagate softwood cuttings (PDF) of select woody plants. Serviceberry, forsythia, weigela, various dogwoods, viburnum, lilac, summersweet, Japanese maples, and flowering quince all root well from cuttings at this stage of growth.
Deadhead annual flowers to promote the production of new flowers. Deadheading is especially important for snapdragons, salvias, alyssum, dahlias, zinnias, and pansies, which tend to stop flowering if not deadheaded promptly.
Protect yourself from ticks and check yourself after being outside. The UMaine Tick Lab can identify ticks. If you remove one that’s embedded, they can test it for tick-borne diseases for a fee.
Visit your local farmers market or visit a nearby farm on Open Farm Day, Sunday, July 23. Watch farm activities and demonstrations from milking to felting; pet farm animals, pick berries, tour a barn or go on a hayride.
Prepare to preserve. Don’t find yourself short on supplies or food safety knowledge when the bounty arrives. Check out our series of food preservation videos, sign up for a workshop, and tap into a variety of publications available free online.
A Love Letter to Mulch
By Rebecca Long, Agriculture and Food System Professional, UMaine Extension Oxford County
Several years ago, before a new job and a move pulled me away, I tended a plot in a community garden. Weeds are often a challenge in community gardens, yet my plot remained mostly weed free. My secret? The bags of lawn clippings I pilfered from friends and dragged to the garden to mulch my plot. (As an apartment dweller, I had to get creative to source my lawn clippings).
Mulch, whether organic or inorganic, offers many benefits besides controlling weeds. It helps retain soil moisture, thus cutting down on the need for watering. It insulates the soil from extreme temperature swings and reduces soil crusting, erosion, and splashing, which in turn cuts down on the spread of disease. Organic mulches will also help to build your soil’s organic matter as they decompose over time. This is a great benefit and well worth the effort of replenishing the mulch every so often. A winter mulch can insulate the soil, protecting tender plants from early thaws and reducing frost heaving of woody ornamentals or food crops like garlic and strawberries. All these effects not only benefit your plants but also create a better habitat for the beneficial soil organisms we depend on.
Generally, 2 – 3 inches of mulch will be sufficient. Make sure not to mound the mulch against the stem of the plant itself, because this can encourage diseases and rodent damage. Avoid the dreaded mulch volcano around your trees and opt instead for a more suitable mulch donut.
Wait until the soil has warmed in the spring to apply summer mulch. My favorite free mulches for the vegetable garden are grass clippings from a chemical-free lawn and shredded leaves. I prefer to reserve bark mulch and wood chips for perennial plantings and permanent paths.
Winter mulch should be applied in late fall before the ground freezes. Straw, shredded leaves, and pine needles are all great options.
Inorganic mulches are also available. By warming the soil, black plastic mulch can encourage earlier harvests of heat-loving crops. Red plastic can improve the yield and taste of tomatoes, eggplants, basil, and strawberries, while green or blue plastic can benefit cantaloupes. These impermeable films are often paired with drip irrigation. For more information, review UMass Extension’s Mulch: Using Colored Plastic Mulches in the Vegetable Garden (PDF).
Unlike plastic film, landscape fabrics, and woven plastic mulches allow water to penetrate. However, I would avoid these products for long-term projects as they tend to shred, leaving tiny plastic pieces in your soil. Plus, they are very susceptible to becoming cemented to the ground by grass or tree roots (can you tell I’m not a fan?).
Rubber mulches made of shredded tires are also best avoided, especially on food crops, due to concerns that toxic chemicals may leach from these materials. Similarly, dyed wood mulches sometimes include shreds of pressure-treated lumber, introducing contaminants such as chromium, copper, and arsenic that are harmful to soil organisms as well as to plants. In some cases, the dye itself may contain harmful substances. Also, because dyed mulch is slower to break down, it can rob your plants of nitrogen as it decomposes.
Recycled materials like newspaper and uncoated cardboard make an excellent base layer under other organic mulches to suppress invasive weeds or to kill out grass when you want to establish a brand-new garden bed. Avoid old carpets and other synthetic materials, which may release unsuitable chemicals as they weather.
A final option to consider: living mulch! Low-growing perennials that tolerate foot traffic, like Dutch White clover, can make effective mulches for paths. Cover crops can also be intersown with your crops, but keep in mind that timing is crucial to avoid competition.
If you dedicate some energy early on to mulch, it will pay off dividends as the season progresses. You may even have a picture of your community garden plot featured in a newsletter!
How to Freeze Fruits and Vegetables
By Kate McCarty, Food Systems Professional, UMaine Extension Cumberland County
Posted in the University of Maine Cooperative Extension Spoonful Blog
Freezing is the unsung workhorse of summertime preserving. Freezing fruits and vegetables can take less time than canning and results in a product closer to fresh. Here are a few tips to ensure your frozen foods are still top-quality for use months later.
Tips for Freezing Vegetables
Many people enjoy freezing homegrown or locally-grown corn, green beans, tomatoes, and greens. Most vegetables need to be blanched before they are frozen. Blanching means “to dunk vegetables briefly in boiling water.” This process deactivates enzymes that negatively affect the color, flavor, and texture of your frozen vegetables over time. For best results, blanch in small batches and use 1 gallon of water for every 1 pound of vegetables. Blanching times vary by vegetable, so refer to Bulletin #4384 Freezing Vegetables Quick Guide for more specific instructions.
Tomatoes, peppers, and onions are the exception to the rule and do not need to be blanched.
Cooling Blanched Vegetables
Cooling your vegetables quickly after blanching is the key to preserving the texture. Using an ice bath stops the cooking and makes vegetables cold before they even go into the freezer, which means they’ll freeze faster. A quick freeze makes the ice form smaller crystals inside the vegetables, thus keeping the cell walls more intact. A long, slow freeze results in larger ice crystals, rupturing more cell walls and creating a flabby or mushy final product.
If you’re planning to blanch and freeze a large batch of vegetables, make sure you have a lot of ice on hand to keep that water nice and cold—even if that means buying a few 5-pound bags of ice from the store. And for best results, freeze no more than 1 pound of food per 2-3 cubic feet of available freezer space.
Tips for Freezing Fruit
Fruit does not need to be blanched before freezing. Prepare the fruit so it’s ready to eat, meaning peel, slice, and pit fruit as needed. For light-colored fruits like apples, pears, apricots, or peaches, an ascorbic acid dip is recommended to prevent oxidation or browning of the fruit’s flesh. Commercial ascorbic acid dips are available or you can use Vitamin C. Refer to Bulletin #4383 Freezing Quick-Guides: Freezing Fruits to learn how to make an ascorbic acid dip. Lemon juice also works, but is not as effective as ascorbic acid.
Fruit can be frozen dry, with sugar, or in syrup. Adding sugar or syrup helps to protect the color, texture, and flavor of fruit. Berries can be frozen on a baking sheet before being packaged in freezer-grade materials. This method keeps them from freezing together in a clump and makes them easier to use in smoothies and baked goods.
Proper Packaging
The right packaging will help you avoid freezer burn, which occurs when frozen foods are exposed to the dry freezer air. Such exposure causes dehydration and oxidation, which will affect color, texture, and flavor. The food is still safe to eat, but the quality is poor. Use moisture- and vapor-proof packaging materials meant for the freezer to avoid this unpleasant result.
Options for packaging include zip-top freezer-grade plastic bags, glass canning jars designed for freezing, and vacuum-sealed plastic bags.
Using Frozen Fruits and Vegetables
Now that you’ve got a freezer full of frozen fruits and vegetables, it’s important to find ways to incorporate them into your cooking and baking so they don’t go to waste. Frozen fruits should be used within 8 to 12 months; they are great in quick breads, desserts like cobblers and crisps, smoothies, and oatmeal. Vegetables should be used within 6 to 8 months for best quality. They can be used anywhere you would use store-bought frozen vegetables, as in stir-fries, soups, casseroles, and side dishes.
Spotlight on research: can hand-picking Japanese beetle really help??
By Dr. Rebecca Sideman, Sustainable Horticulture State Specialist Full Extension State Specialist/Professor
A pair of researchers from Eastern Illinois University conducted a study on how to manage Japanese beetle, a pest that can be problematic on several crops from grapes and raspberries to roses and zinnias. Here, we’ll review their paper published in the journal Horticultural Entomology in 2014. You can read on, or, if you’d rather listen to or watch this presentation – check out this eight-minute video clip: Spotlight on Research: If and when hand-removal of Japanese beetles makes sense from the University of New Hampshire Extension.
Before jumping into the study, let’s review a little information about Japanese beetle biology. Japanese beetles produce aggregation kairomones (chemicals like pheromones) that send a signal to other insects. This benefits the beetles that receive the signal because they then know where the food is, and they arrive and start to aggregate. In addition to being attracted by beetles, they are also attracted by volatiles produced by plants that are experiencing feeding damage. So this turns into a positive feedback loop, where beetles feeding on a plant beget more beetles feeding on the same plant.
The question addressed by this study is whether hand removal of beetles can reduce damage on plants in a meaningful way – and if so, whether the time of day they are removed makes a difference. Note that this is most suited to management on a small-scale: a small farm or garden, rather than a very large farm. This doesn’t need to mean hand-picking, however – it’s easy to build a homemade insect collector to make collection easy and fast. An example: take two empty gallon milk cartons and tape the tops together, and slice the bottom off of one of them. My former colleague Alan Eaton told me that it’s possible to collect up to 1200 beetles per hour using a collector like this. Another simple collector is a shallow bowl filled with soapy water that the beetles can be knocked into.
The experimental setup in this study was straightforward. The researchers took 70 distinct two-year old grapevines in large pots and spaced them out 12 feet apart in all directions. They then managed the plants differently. For some, beetles were removed once every day at 8:00 a.m., or at 2:00 p.m., or at 7:00 p.m. – for others, beetles were removed all three times every day, and for the rest, beetles were never removed. After eight days of doing this, the researchers counted the beetles and estimated leaf damage on the plants.
So, what did they find? Removal of the beetles, even once per day, kept beetle populations low. Also, removing the beetles resulted in less plant damage. Removing the beetles three times a day was the most effective, but it wasn’t significantly more effective than removing beetles once, in the evening. Further, when the researchers looked at how likely the plants were to be re-colonized by new beetles after removing beetles, the probability was WAY lower for the evening removal than for the morning or midday removal times – even though the duration of time that colonization could occur overnight was much longer.
So, why would this be the case? The authors hypothesized that this could be because beetle activity is greatest in midday. Anyone who has tried to collect Japanese beetles knows that they are super active and lively at midday – whereas they are much less active and more sluggish in the evening and early morning. Because beetles don’t move much in the evening, if beetles are removed prior to nightfall, no beetles are feeding on the plants at night – so all night long, the plants are not producing the volatiles that they would be if they were being actively fed upon. So this might cut down on even more of the signals that bring in new beetles.
An important piece of information you need if you want to use this practice: Japanese beetles have just one generation in NH [and Maine]. The adults emerge from the soil sometime in early-mid July most years, their numbers peak within a week or two, and then decline until mid-late August. While they are there, the adults are actively feeding and laying eggs, which hatch into grubs. Those grubs feed on the roots of many grasses, and are therefore an annoying lawn pest. The point here is that there is a limited time during which you’d have to concentrate your beetle harvesting activities, should you choose to take this approach. You’d want to be ready to start in early July.
Putting it all together: This is probably the most practical piece of research we’ve talked about yet – these results could be really useful for small-scale farmers or gardeners who want to take a no-spray approach. The take-home messages are simple: hand-picking Japanese beetles once a day can reduce feeding damage, and if you are going to do it once per day, consider doing it in the evening, both to reduce feeding injury and the chances of having the plants be re-colonized before night.
One final caution: Other studies have shown that hand-picking hasn’t worked particularly well. In particular, a recent study looking at roses, where Japanese beetles were collected three times per week, midday, showed that hand-picking was only marginally effective. From this study, we could guess that they might have had better luck in the evening, and by collecting more frequently – and it’s also possible rose flowers emit volatiles that are more (or differently) attractive to Japanese beetle than grape. Regardless, I think that hand-picking on a small scale is worth a try, and I have shifted my beetle collection activities to become an evening ritual.
Do you have questions about this topic, or suggestions for other topics to explore in Spotlight on Research? If so, please reach out and let me know. Thanks for reading, and stay tuned for the next edition.
Sources: Switzer and Cumming (2014) Effectiveness of hand removal for small-scale management of Japanese Beetles (Coleoptera: Scarabaeidae). Horticultural Entomology 107(1):293-298
Book Review: Native Plants for the Maine Garden
Maureen Heffernan, with photographs by William Cullina. Down East Books, 2010 and 2023. 128 pp.
Book review by Clara Ross, Penobscot County Master Gardener Volunteer
Written by Maureen Heffernan, former Executive Director of the Coastal Maine Botanical Gardens, this helpful volume offers an encyclopedia of native perennials, shrubs, and trees, along with advice on how to use them in the home landscape. The book is illustrated with beautiful photographs by William Cullina, who like Heffernan was instrumental in making the beloved gardens at Boothbay a success. They are both well-qualified for pulling together such a robust reference book.
In her discussion of best practices in the landscape, Heffernan explains the value of native plants, which are hardy, disease-resistant, non-invasive, and beneficial to wildlife. When settlers arrived in North America, they brought seeds and plants from their own countries, along with associated diseases and pests. These newcomers disrupted ecological checks-and-balances in ways that still affect native plants and wildlife today. Furthermore, many beneficial insects have evolved in such a way that they can only feed or breed with access to native plants. The best-known example is probably the Monarch butterfly, which needs milkweed plants in order to complete its life cycle.
What does this mean for gardeners who really love non-native plants such as peonies, Oriental lilies, or apple trees? There’s no direct harm in using non-natives as long as they aren’t invasive. However, Heffernan encourages us to add natives when expanding our plantings or filling the inevitable gaps that open up through attrition in our flower beds. Making these changes will encourage pollinators, provide food and shelter for birds, and fortify our landscapes to better handle certain troublesome insects.
In this 128-page book, Heffernan provides tips for landscape design using native plants, planting suggestions, maintenance, and much more. You will find specialized plant lists for placement considerations, as well as lists of non-native invasives and common non-natives (lupine, day lily, rosa rugosa). It is organized by groundcovers, perennials, vines, grasses, fern, shrubs and trees.
I found this book to be easy to read, except for the method of alphabetizing by botanical names, which not all readers will know. Yet, be comforted, each entry is labeled in big print with the common name, oh yay!
For those who’d like to buy the book, don’t be alarmed if your top-level online search results turn up the 2010 edition at jaw-dropping prices over $200. The April 2023 edition, with a different cover but apparently the same content, is what you want; it can be found for around $20.
P.S. Yes…dandelions are non-natives, perhaps brought by the Pilgrims.
Maine Weather and Climate Overview (July)
By Sean Birkel, Assistant Extension Professor, Maine State Climatologist, Climate Change Institute, Cooperative Extension University of Maine
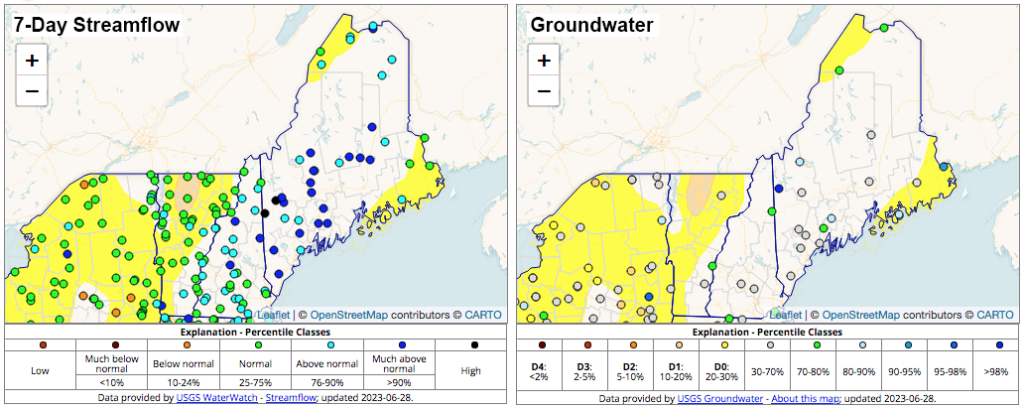
Both May and June of this year saw above-normal rainfall, and rank as the wettest since 2019 for most of the state. The overall damp, cool weather has been associated with anomalous ridging in the jet stream over western North America, and downstream troughs that have steered storm systems our way. As such, streamflow, groundwater, and soil moisture indicators are normal or above normal for this time of year. Several stream gauges currently register much above normal. The U.S. Drought Monitor shows some abnormal dryness down east and in northwest Aroostook due to 90-day precipitation deficits. The latest forecast from the National Weather Service indicates that the weather pattern could remain active and bring more rainfall over the next several days. Precipitation and drought information are available from the Northeast Drought Early Warning System Dashboard. As always, be sure to check weather.gov for the latest weather forecast for your area.
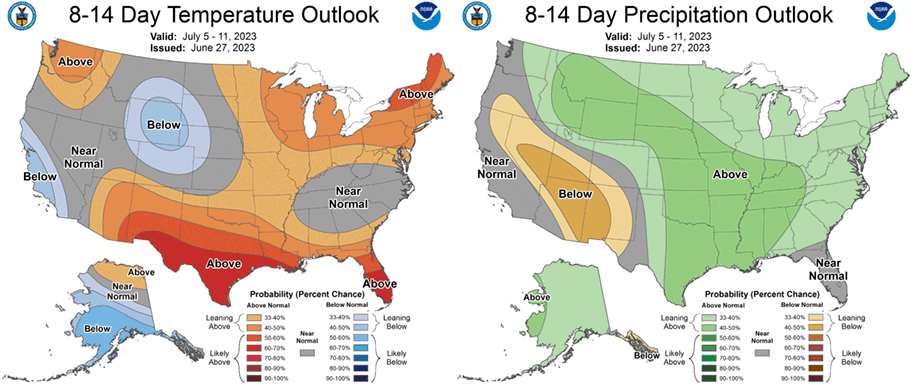
The NWS Climate Prediction Center 8–14 day outlook probability maps for June 5–11 show likely above normal temperature and a lean towards above normal precipitation. The 1-month outlook for July (issued June 15) shows above-normal temperature and an equal chance of above or below-normal precipitation. Looking further out, the three-month outlook for July–September (issued June 15) shows likely above-normal temperature and an equal chance of above or below-normal precipitation. These and other maps are available on the Maine Climate Office website.
For questions about climate and weather, please contact the Maine Climate Office.
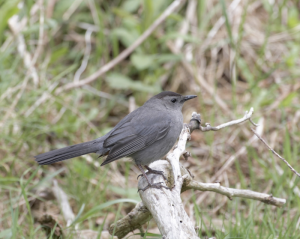
Backyard Bird of the Month: Gray Catbird
By Maine Audubon Outreach and Network Manager, Nick Lund
Photo credit: Pam Wells
Like Northern Mockingbirds, Brown Thrashers, and other members of the Mimidae family, Gray Catbirds are famous for their ability to mimic sounds around them. In the case of the catbird, though, it’s really known for mimicking one sound in particular: the meow of a cat. While similarities in the case of the catbird are believed to be coincidental rather than intentional, the loud “mew” call the Gray Catbird gives in spring and summer is a dead ringer for a pet tabby. The Gray Catbird makes other sounds in addition to its feline fuss, including a song of squeaks, whistles, and gurgles that can last up to ten minutes. Gray Catbirds are common and familiar backyard visitors, especially in areas with dense shrubs and thickets. Though sometimes overlooked in favor of more brightly-colored birds, the Gray Catbird sports a clean, stately look, with a slate gray body, black cap, and cheeky maroon patch on the underside of the tail. Look for these skulking birds plucking any number of native berries off backyard trees, or gleaning insects from inside thickets. In fall, Gray Catbirds leave Maine and head south to spend the winter fooling cat lovers in the southeastern U.S., eastern Mexico, Central America, and the Caribbean.
For more on the importance of planting Maine native plants to support birds like the Gray Catbird and other wildlife, visit Maine Audubon’s “Bringing Nature Home” webpage.
Ask the Expert!
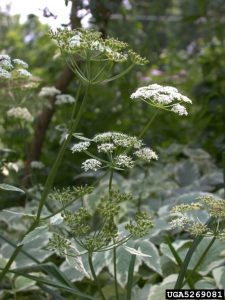
Q: Is there any recommended strategy for battling bishop’s weed? We have maybe 50 square meters. And I’ve been weeding by hand but it’s slow going.
Goutweed (Aegopodium podagraria); photo by Leslie J. Mehrhoff, University of Connecticut, Bugwood.org
A: I’m sorry to hear you’re dealing with bishop’s weed (also known as goutweed or Aegopodium podagraria).
Repeated pulling of bishop’s weed can be effective, but it can take a lot of time and persistence depending on the size patch you’re dealing with. It has a very persistent root system that will sprout new growth from very small segments. The key is to remain committed to pulling/cutting it very regularly (weekly) and not let it get a foothold at any point in the process of eradication. As soon as it’s allowed to photosynthesize for a period of time, then it will get reestablished. It’s a war, not a battle.
I would start with continuing your hand-pulling efforts for a few weeks, using a garden fork to loosen the area around the plants to get as much of the roots as possible without breakage. It’s especially helpful to do this when the soil is moist as the roots will more easily pull through the soil without breaking. If the area is mowable, mow the area for a few weeks after pulling at the lowest setting as your next step. After that, cover the area with a layer of cardboard covered with mulch to fully suppress the remaining growth. If you’re working around perennials, your best bet is to lift the desired plants and carefully remove any goutweed roots that are growing through the perennial root mass. Pot up the perennials or temporarily plant them in a holding bed until you fully eradicate the goutweed from the area (1 or 2 seasons). Keep an eye out for at least 2-3 years for stray goutweed plants. They can appear for many years in severely infested areas.
Be aware that bishop’s weed may cause skin irritation to some individuals. It’s best to wear gloves if you have sensitive skin.
It sounds like a lot of work, but it’s all very doable.
Do you appreciate the work we are doing?
Consider making a contribution to the Maine Master Gardener Development Fund. Your dollars will support and expand Master Gardener Volunteer community outreach across Maine.
We appreciate your feedback and ideas for future Maine Home Garden News topics. We look forward to sharing new information and inspiration in future issues.
Subscribe to Maine Home Garden News
Let us know if you would like to be notified when new issues are posted. To receive e-mail notifications, click on the Subscribe button below.
Maine Home Garden News was created in response to a continued increase in requests for information on gardening and includes timely and seasonal tips, as well as research-based articles on all aspects of gardening. Articles are written by UMaine Extension specialists, educators, and horticulture professionals, as well as Master Gardener Volunteers from around Maine. The following staff and volunteer team take great care editing content, designing the web and email platforms, maintaining email lists, and getting hard copies mailed to those who don’t have access to the internet: Abby Zelz*, Annika Schmidt*, Barbara Harrity*, Kate Garland, Mary Michaud, Michelle Snowden, Naomi Jacobs*, Phoebe Call*, and Wendy Roberston.
*Master Gardener Volunteers
Information in this publication is provided purely for educational purposes. No responsibility is assumed for any problems associated with the use of products or services mentioned. No endorsement of products or companies is intended, nor is criticism of unnamed products or companies implied.
Call 800.287.0274 (in Maine), or 207.581.3188, for information on publications and program offerings from University of Maine Cooperative Extension, or visit extension.umaine.edu.
In complying with the letter and spirit of applicable laws and pursuing its own goals of diversity, the University of Maine System does not discriminate on the grounds of race, color, religion, sex, sexual orientation, transgender status, gender, gender identity or expression, ethnicity, national origin, citizenship status, familial status, ancestry, age, disability physical or mental, genetic information, or veterans or military status in employment, education, and all other programs and activities. The University provides reasonable accommodations to qualified individuals with disabilities upon request. The following person has been designated to handle inquiries regarding non-discrimination policies: Director of Equal Opportunity, 101 Boudreau Hall, University of Maine, Orono, ME 04469-5754, 207.581.1226, TTY 711 (Maine Relay System).
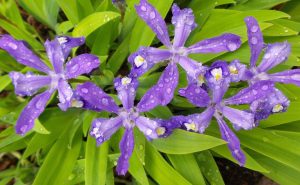 Divide and replant bearded irises and peonies, if needed. This guide from the University of Wisconsin-Madison leads you through the process.
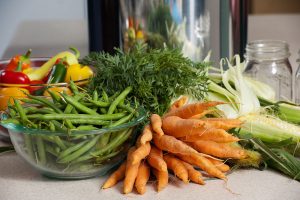 Many people enjoy freezing homegrown or locally-grown corn, green beans, tomatoes, and greens. Most vegetables need to be blanched before they are frozen. Blanching means “to dunk vegetables briefly in boiling water.” This process deactivates enzymes that negatively affect the color, flavor, and texture of your frozen vegetables over time. For best results, blanch in small batches and use 1 gallon of water for every 1 pound of vegetables. Blanching times vary by vegetable, so refer to Bulletin #4384 Freezing Vegetables Quick Guide for more specific instructions.
 Fruit does not need to be blanched before freezing. Prepare the fruit so it’s ready to eat, meaning peel, slice, and pit fruit as needed. For light-colored fruits like apples, pears, apricots, or peaches, an ascorbic acid dip is recommended to prevent oxidation or browning of the fruit’s flesh. Commercial ascorbic acid dips are available or you can use Vitamin C. Refer to Bulletin #4383 Freezing Quick-Guides: Freezing Fruits to learn how to make an ascorbic acid dip. Lemon juice also works, but is not as effective as ascorbic acid.